The section is used to maintain the student database. In it, Student cards are created, contact information is stored, and the main information about education is displayed.
Main blocks:
- Access to the section
- Tab «Students»
2.1 Search and filtering
2.2 Student table
2.3 Adding a new Student
3. Tab «Clients (Заказчики)»
3.1 Clients table
3.2 Adding a client
4. Tab «Contract templates (Шаблоны договоров)»
4.1 Templates table
4.2 Creating and editing a template
1. Access to the section
The section is located in the left side menu under «Students».
After navigating, a table with the list of all Students in the system will open. At the top of the page there are tabs:
- Students
- Clients (Заказчики)
- Contract templates (Шаблоны договоров)
Each tab contains a separate list and tools for working with the corresponding data.
2. Tab «Students»
The tab contains a list of the center's students. Each Student has its own card with contact details and information about education.
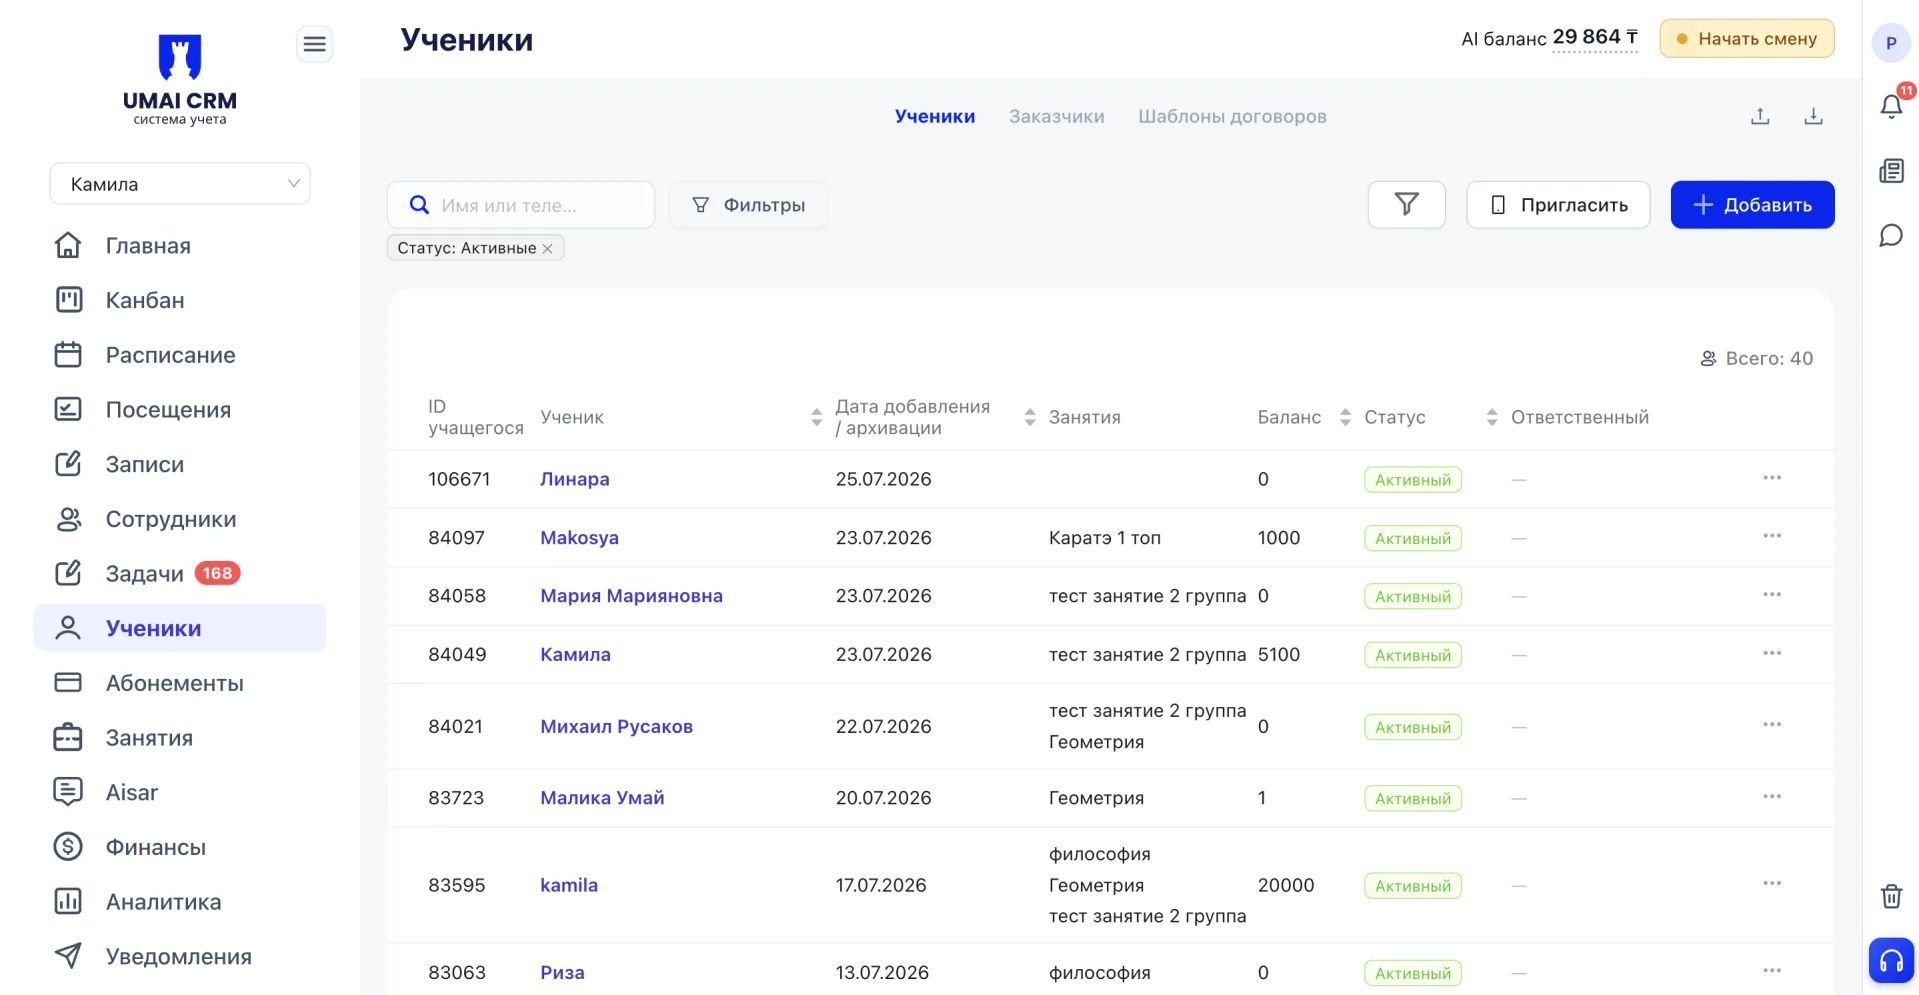
2.2 Search and filtering
When you click the «Filters» button, a panel opens that provides: search by name or phone, age (range «from — to»), gender, participant in government order — a filter for Students whose education is paid by a government order (subsidies), not entirely by parents, discount, mobile application — a filter for Students with a linked account in the Umai CRM mobile app, year of birth (range), Class, Student status, responsible staff, as well as Membership start period and Membership end period (both as date ranges). After selecting the required values, apply the filters with the «Apply» button. An applied filter is displayed as a tag under the search bar (for example, «Status: Active») and can be removed by clicking the cross next to the tag.
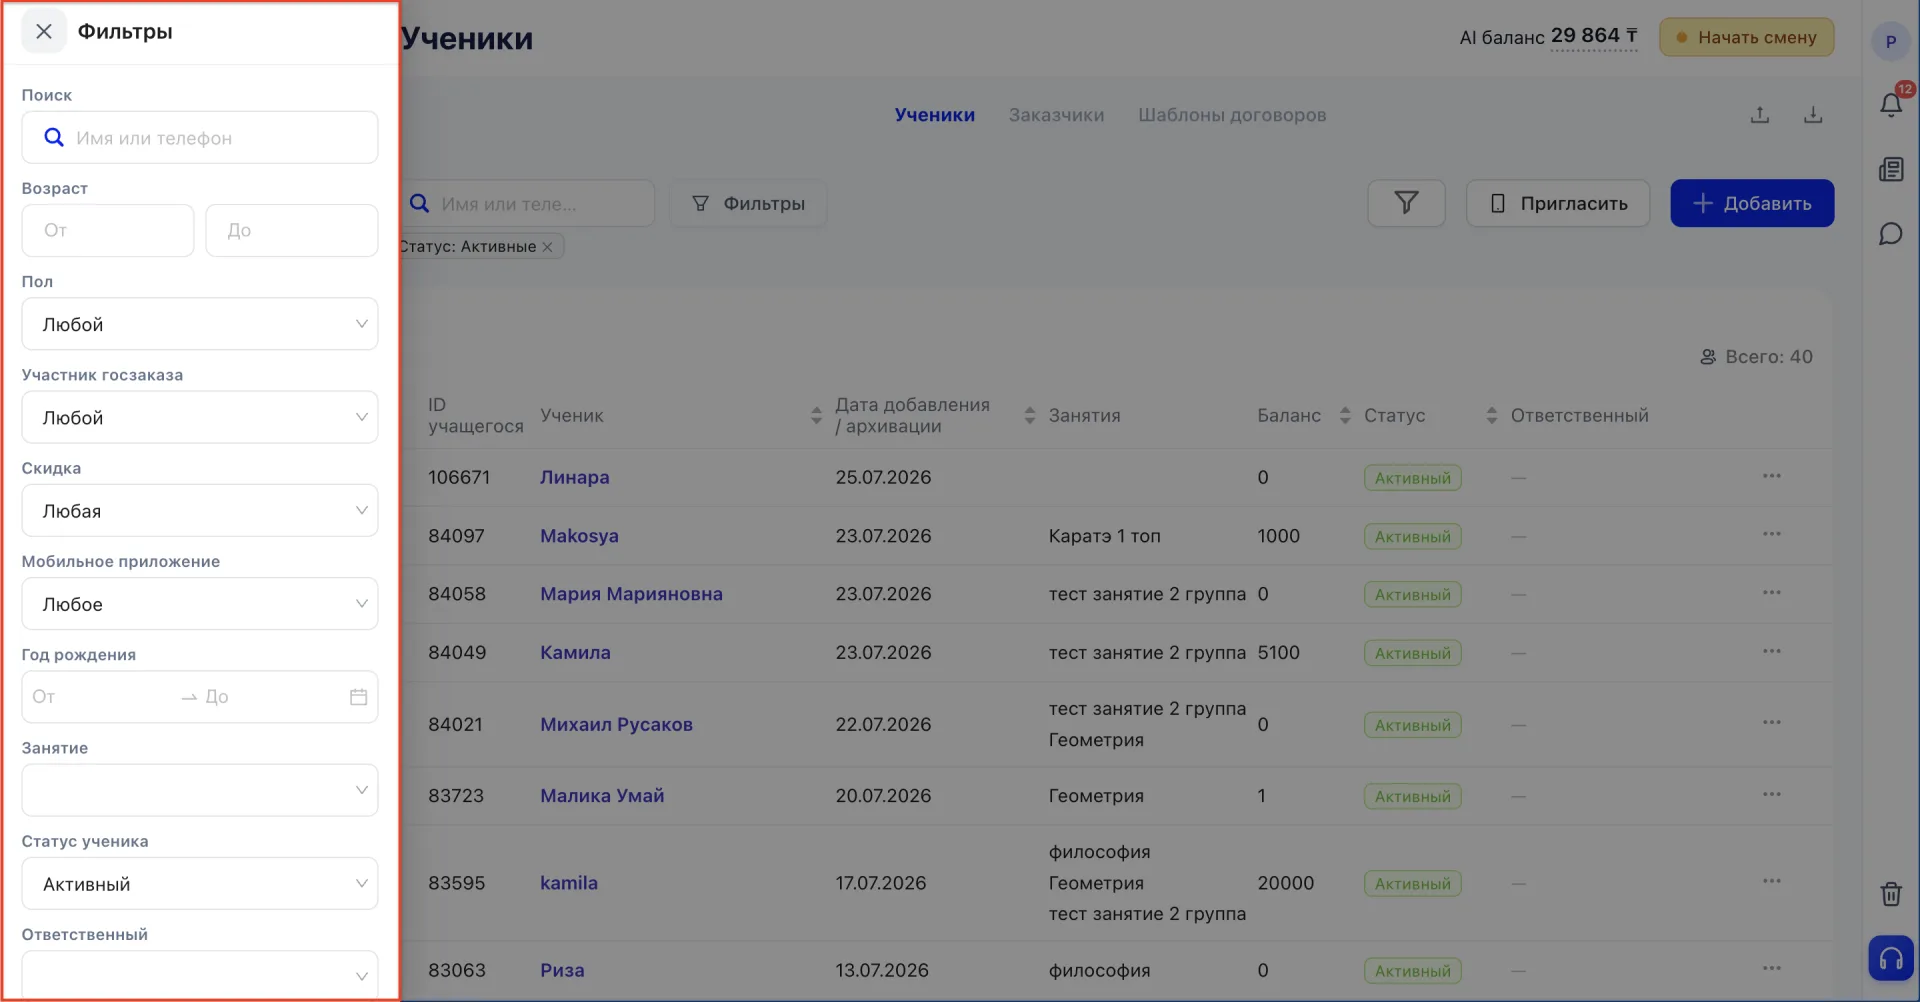
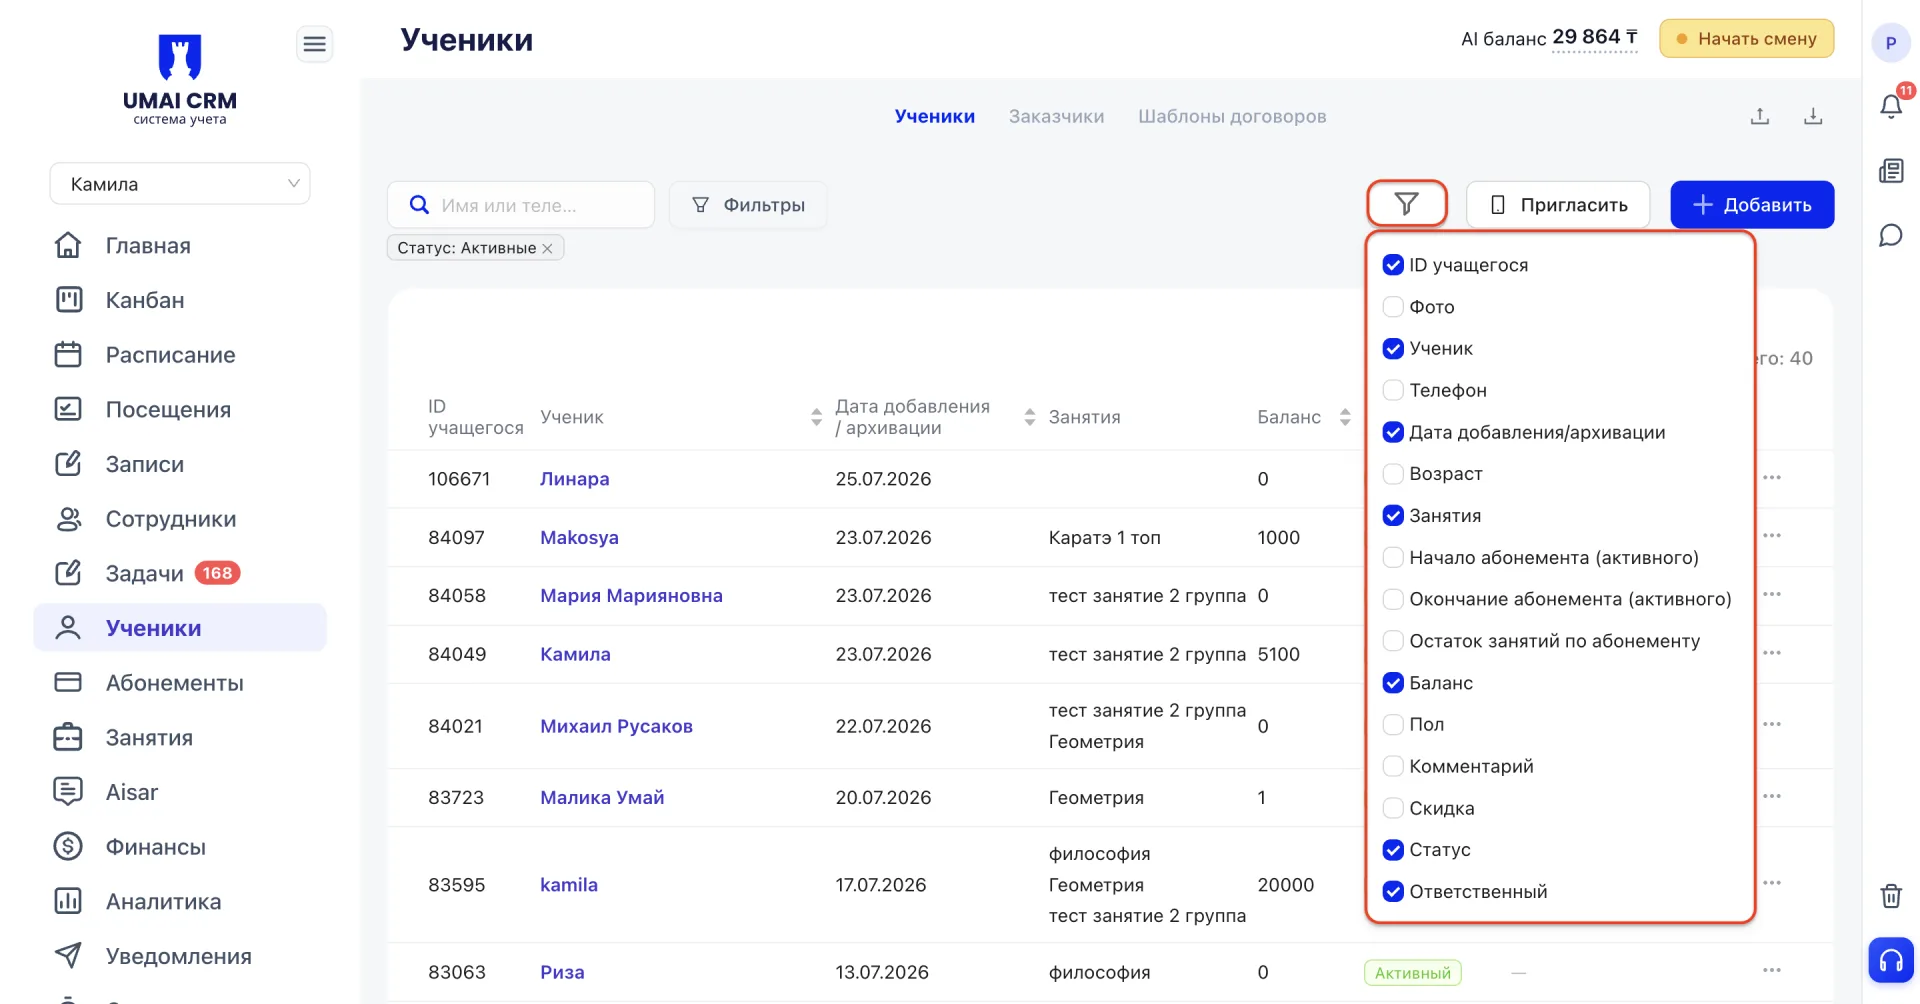
The set of displayed columns is configured separately via the «Customize table columns» button (funnel icon to the right of the «Invite» button). The opened list shows all table columns, which can be enabled and disabled using checkboxes. Each center independently determines which data it needs in its table.
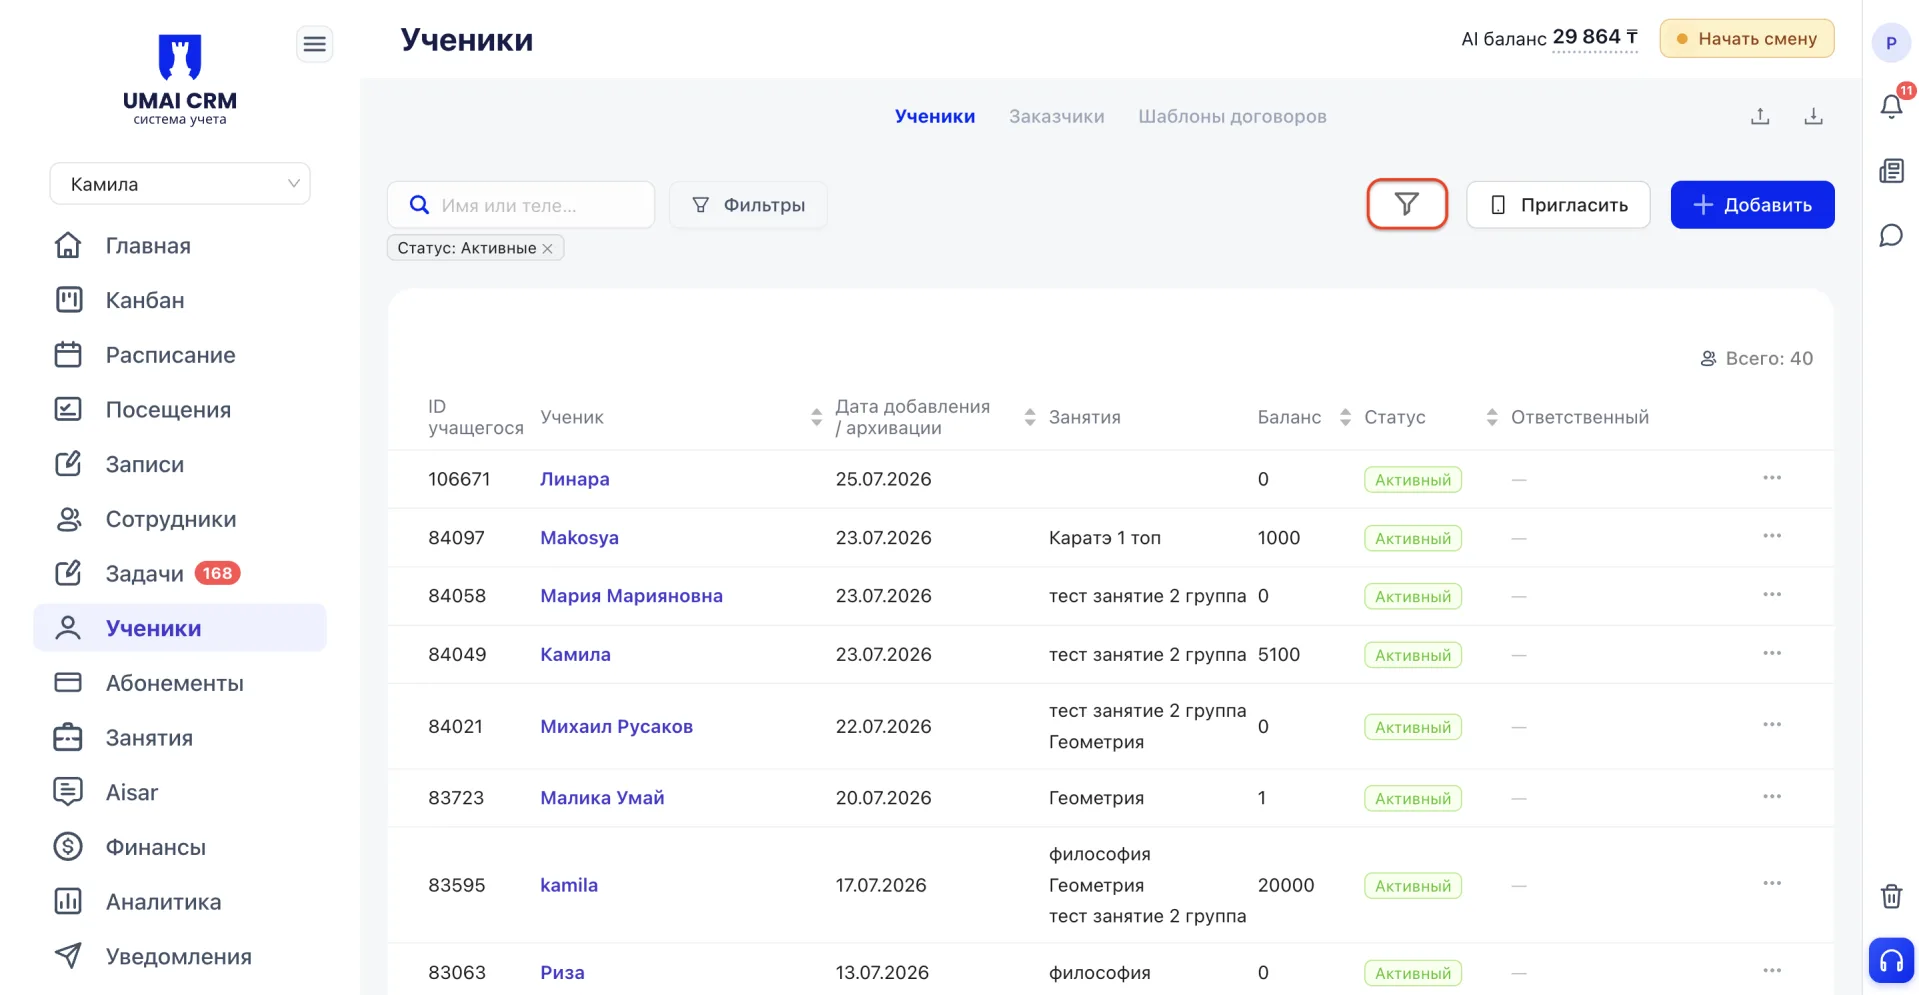
The following columns are available:
- Student ID — the unique number of the Student in the system, convenient for searching and identifying a record.
- Photo — the photo from the Student card, helps to quickly recognize the Student in the list.
- Student — full name provided when creating the card.
- Phone — the primary contact number of the Student or their parent.
- Date added/archived — the date when the card was created or moved to the archive.
- Age — calculated from the date of birth specified in the Student card.
- Classes — directions or courses the Student is enrolled in.
- Membership start (active) — the start date of the active Membership.
- Membership end (active) — the date until which the current Membership is valid.
- Remaining classes on Membership — the number of classes left for the Student under the active Membership.
- Balance — the Student's current balance in the system.
- Gender — specified in the Student card, displayed for easier filtering and accounting.
- Comment — additional information about the Student entered by managers or administrators when filling out the card.
- Discount — the percentage discount set for the Student on tuition or Membership.
- Status — the Student's state in the system, for example Active or Archived.
- Responsible — the manager assigned to the Student for further support.
«Invite» button
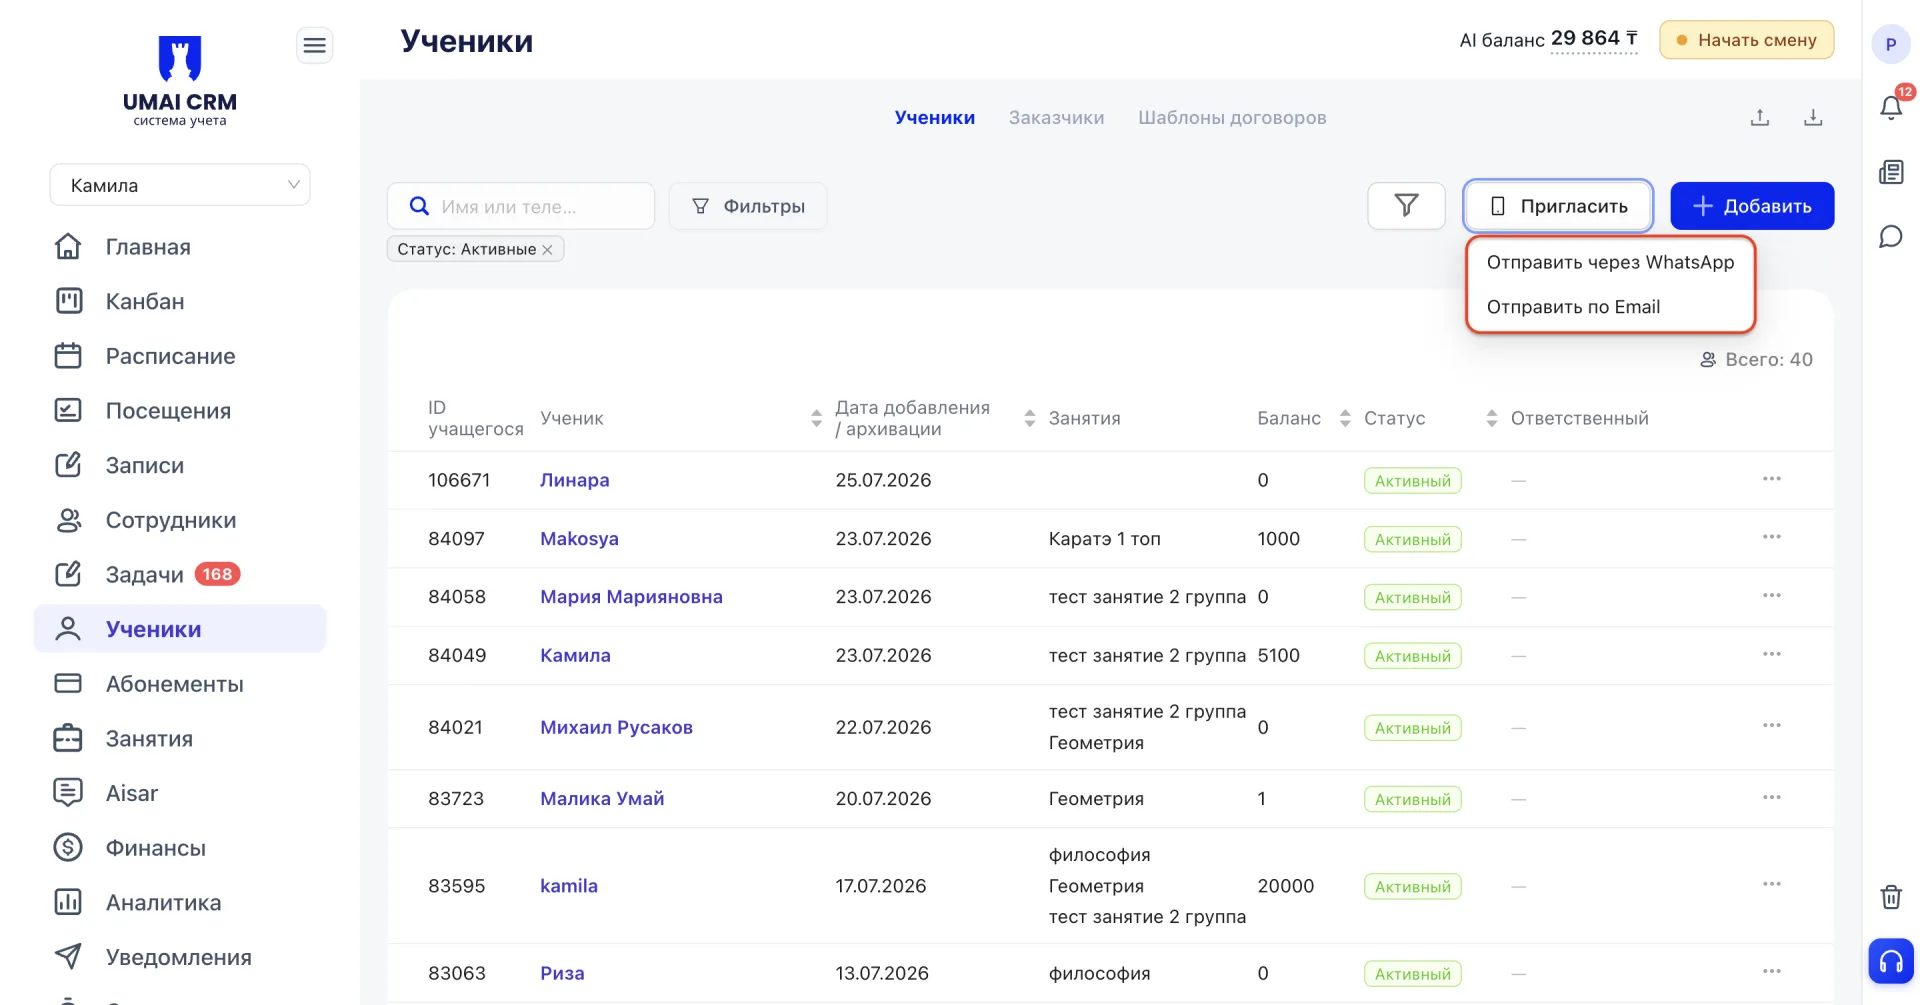
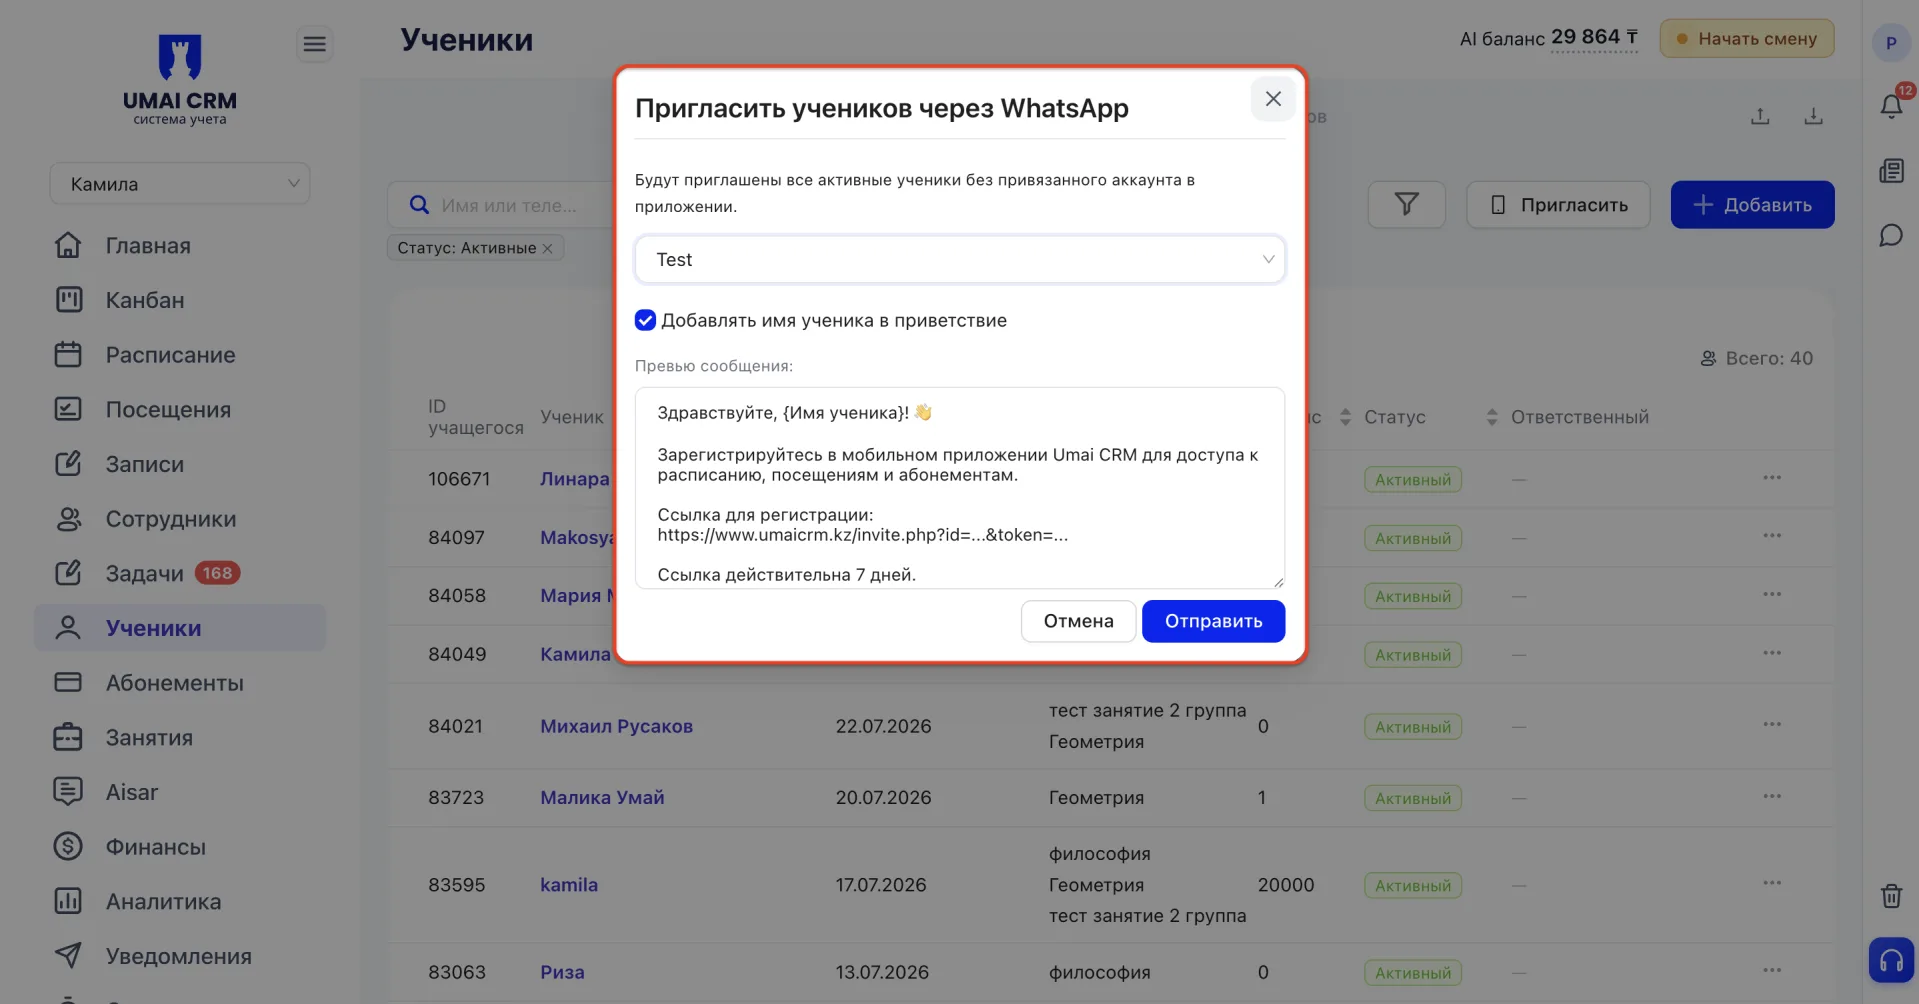
Send via WhatsApp.
If you choose this option, the «Invite Students via WhatsApp» window opens. The system indicates that all active Students without a linked app account will be invited. In the window you need to select a message template from the dropdown and enable or disable the option «Add Student name to greeting». Below a message preview is displayed: it contains a greeting with the Student's name, an invitation to register in the Umai CRM mobile app to access Schedule, Visits and Memberships, a registration link and its validity period (7 days). After checking the text, send the invitation with the «Send» button.
Send by Email.
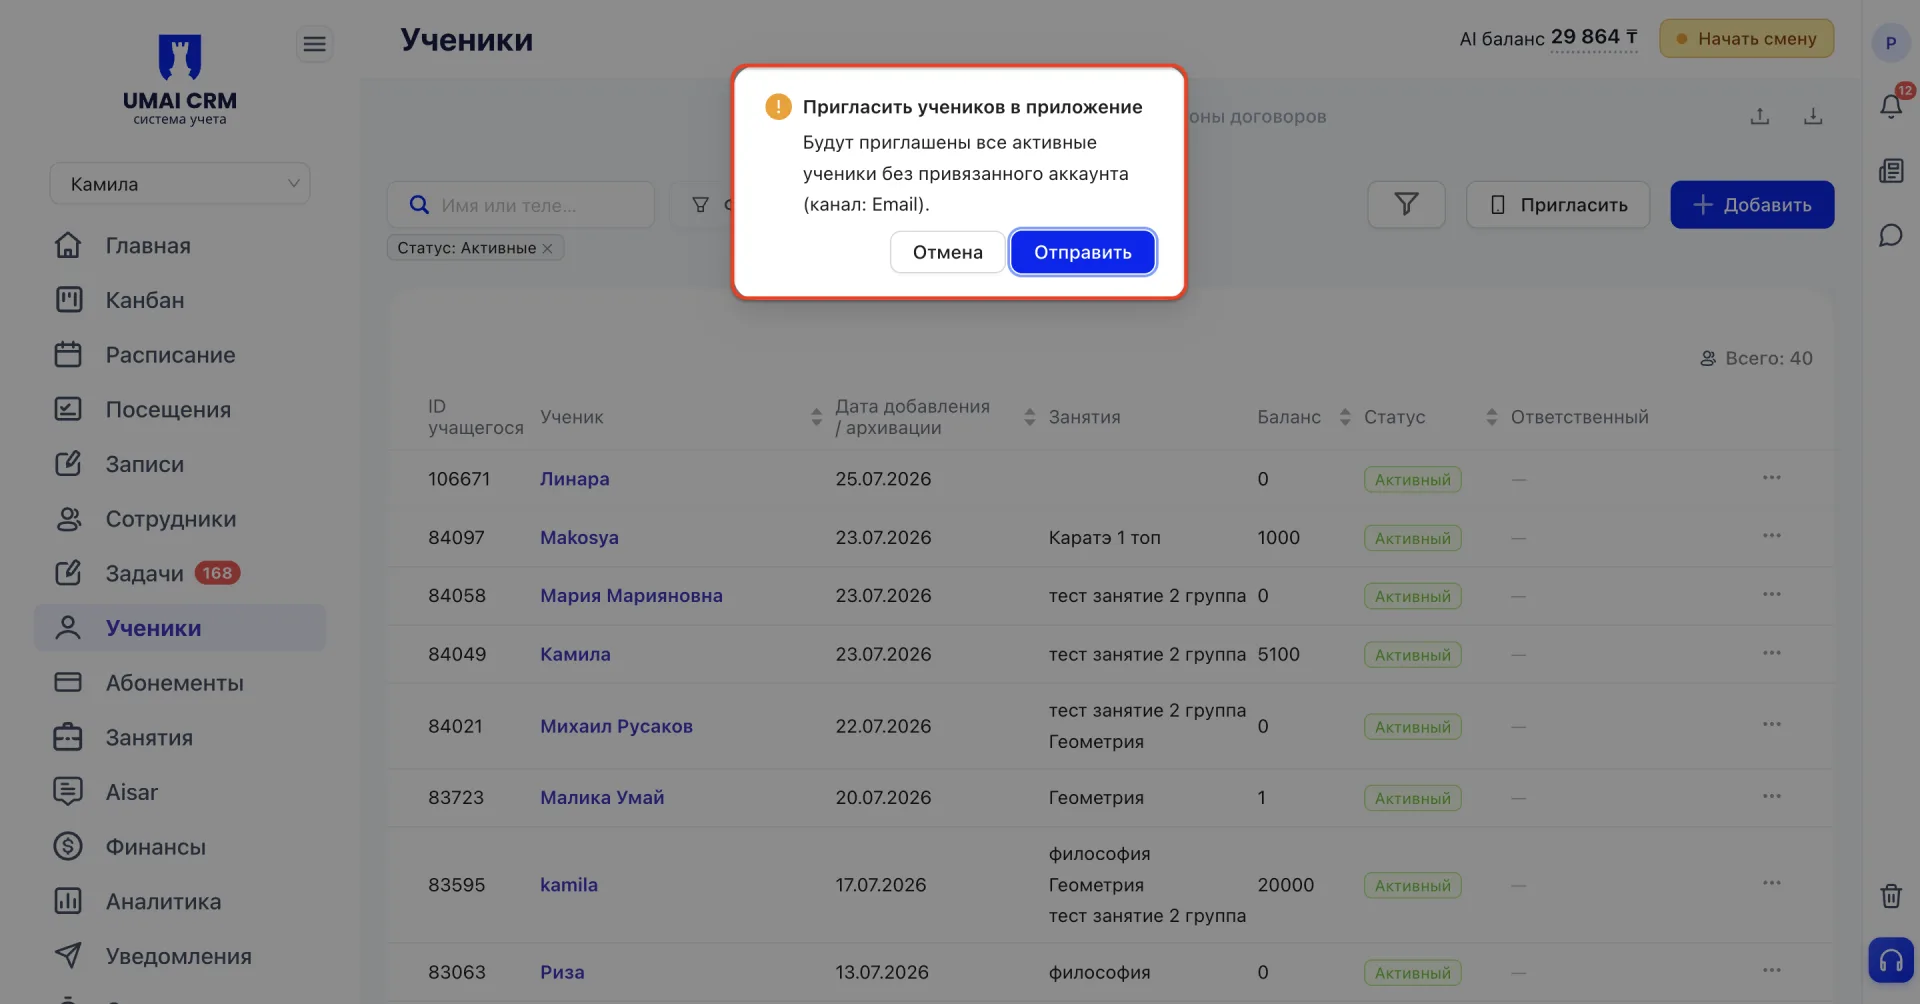
In both cases, the invitation is sent not to manually selected Students but automatically to all active Students without a linked app account — you cannot choose specific recipients in this window.
2.2 Student table
To the right of each table row there is a «⋮» button — the Student management menu. When clicked, a list of four actions opens:
- Details — opens a separate page with the full Student card. This page contains tabs: Education, Classes, Memberships, Payments, Visits, History, Comments, Calls, Documents. The full card is an independent section of the system, separate from the quick view, and contains the maximum information about the Student.
- Quick view — opens the main information about the Student in a side panel over the current page, without navigating to a separate card. The quick view displays: Student ID, date of birth, gender, client, responsible staff, status, phones, balance, address, preferred language, email, contract, discount, comment, as well as data about who created the card.
- Archive — moves the Student card to the archive. When selecting this action, the system opens the «Send Student to archive?» window, in which you must specify the reason for leaving — this field is marked with an asterisk and you cannot send a Student to the archive without selecting a reason. The list of reasons can be configured: next to the reason selection field there is a gear icon; clicking it opens the «Reasons for leaving» window. In this window you can add a new reason (field «Enter name» and «Add» button), as well as edit or delete any existing reason using the icons next to each list row.
- Delete — deletes the Student card from the system. Before deletion a warning appears that the action is irreversible. After deletion the Student is moved to the trash, and only a user with the director role can restore them.
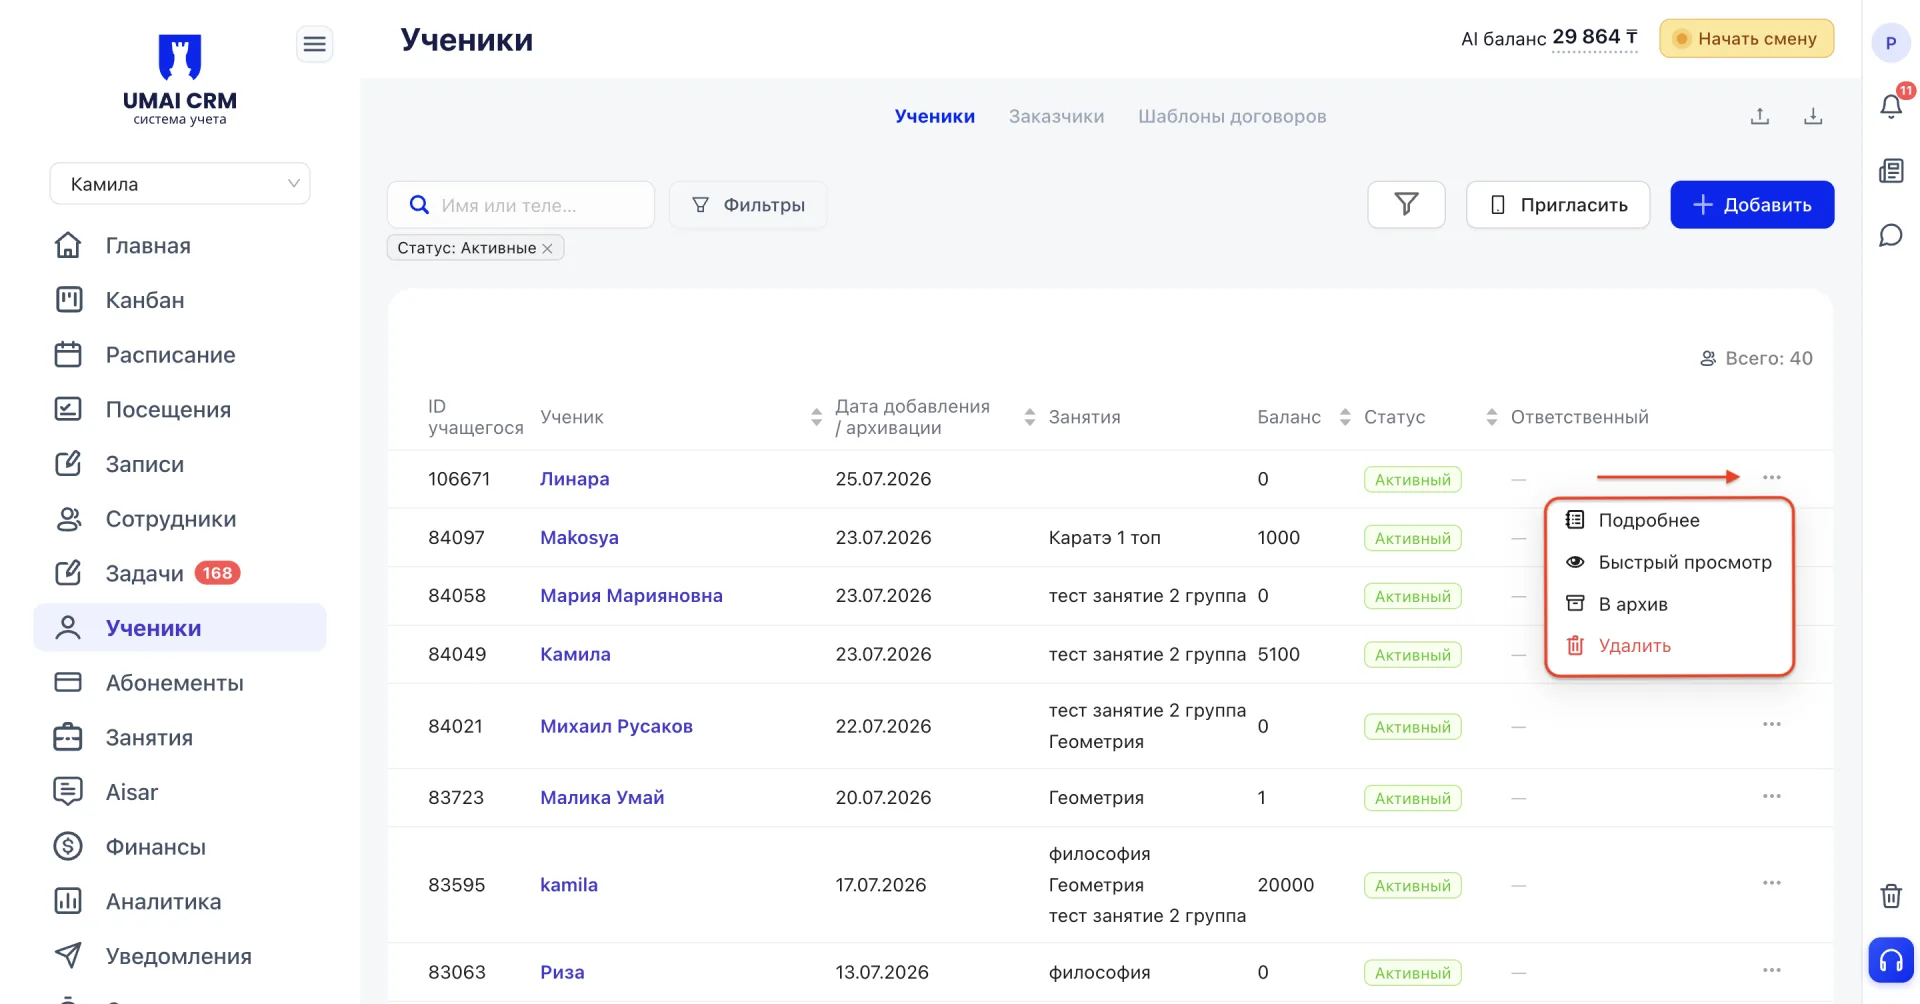
Each action is intended for its own purpose. «Details» is used for full work with the Student, «Quick view» allows quickly checking data, and «Archive» and «Delete» are applied when finishing work with the Student.
2.3 Adding a new Student
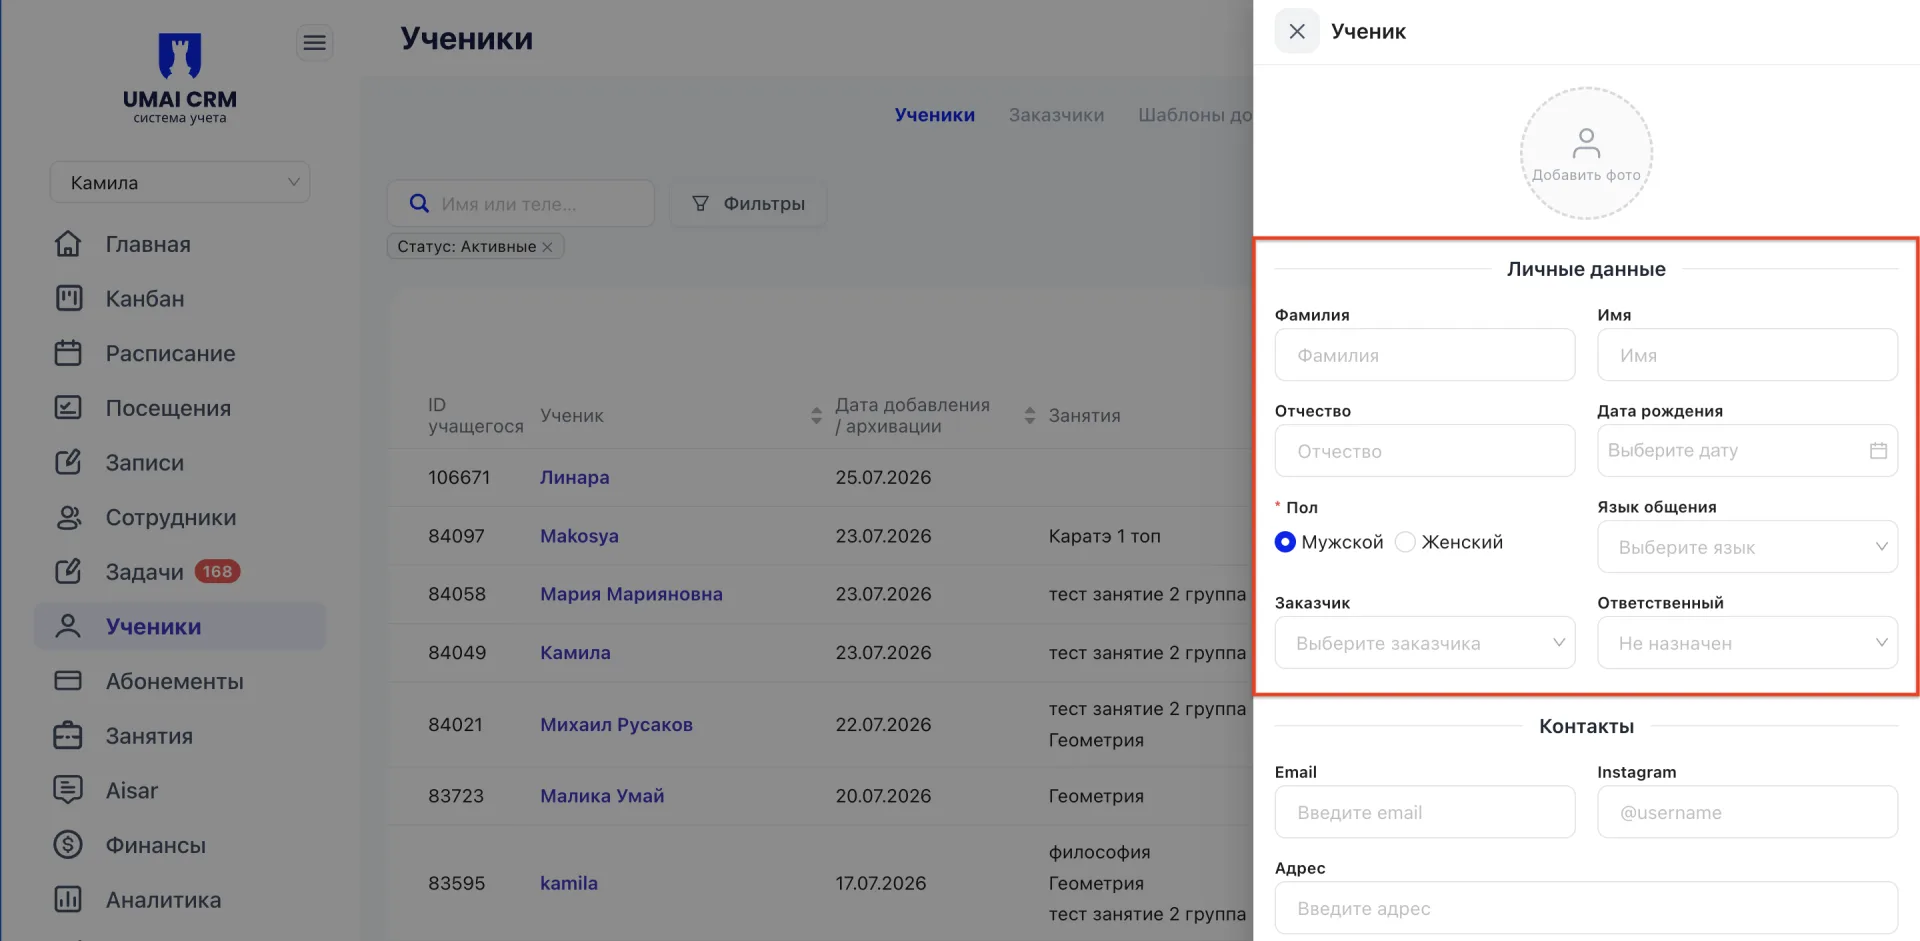
The add form opens with the «Add» button and is divided into several blocks.
Personal details
This block contains the main information about the Student: photo (optional), last name, first name, middle name, date of birth, gender (required field), preferred language, client and responsible staff.
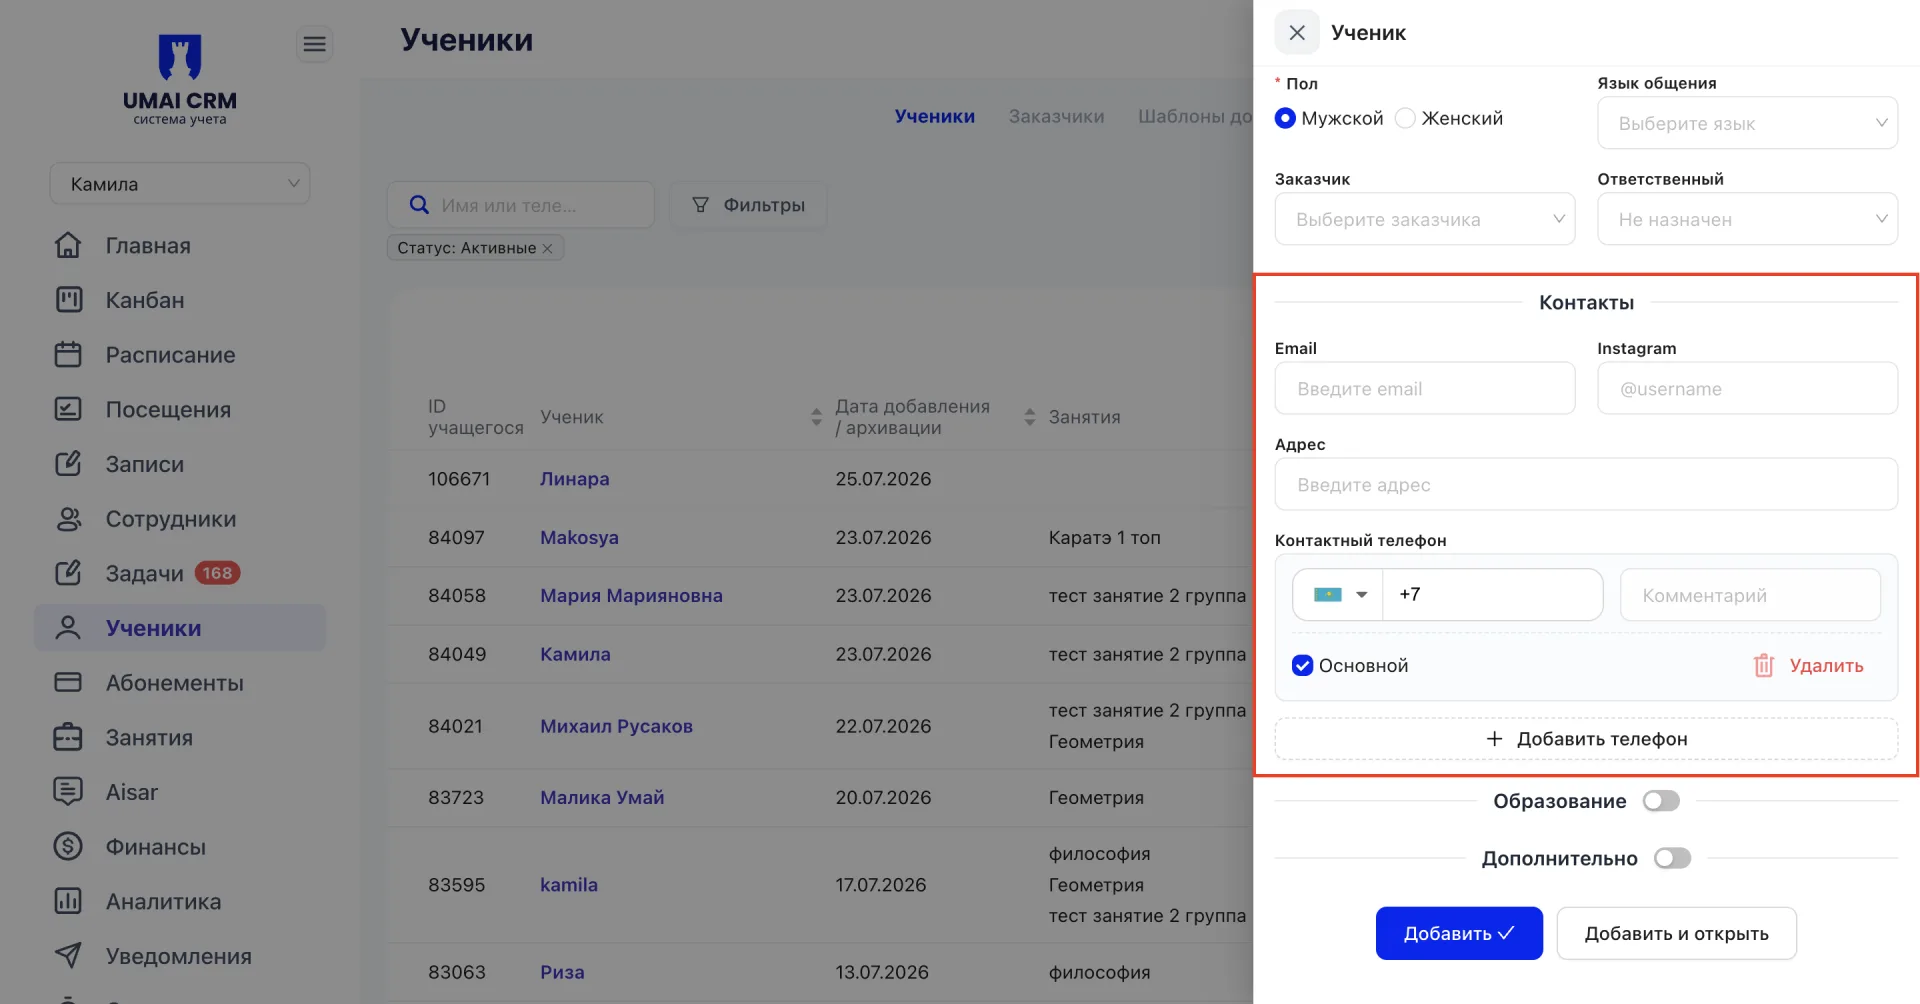
Contacts
Email, Instagram and the Student's address are specified.
A separate contact phone is filled in: choose the country code, enter the number and, if necessary, a comment for the number. One of the phones can be marked as primary using the «Primary» checkbox. Using the «Add phone» button you can specify several numbers; each extra number is removed with the «Delete» button.
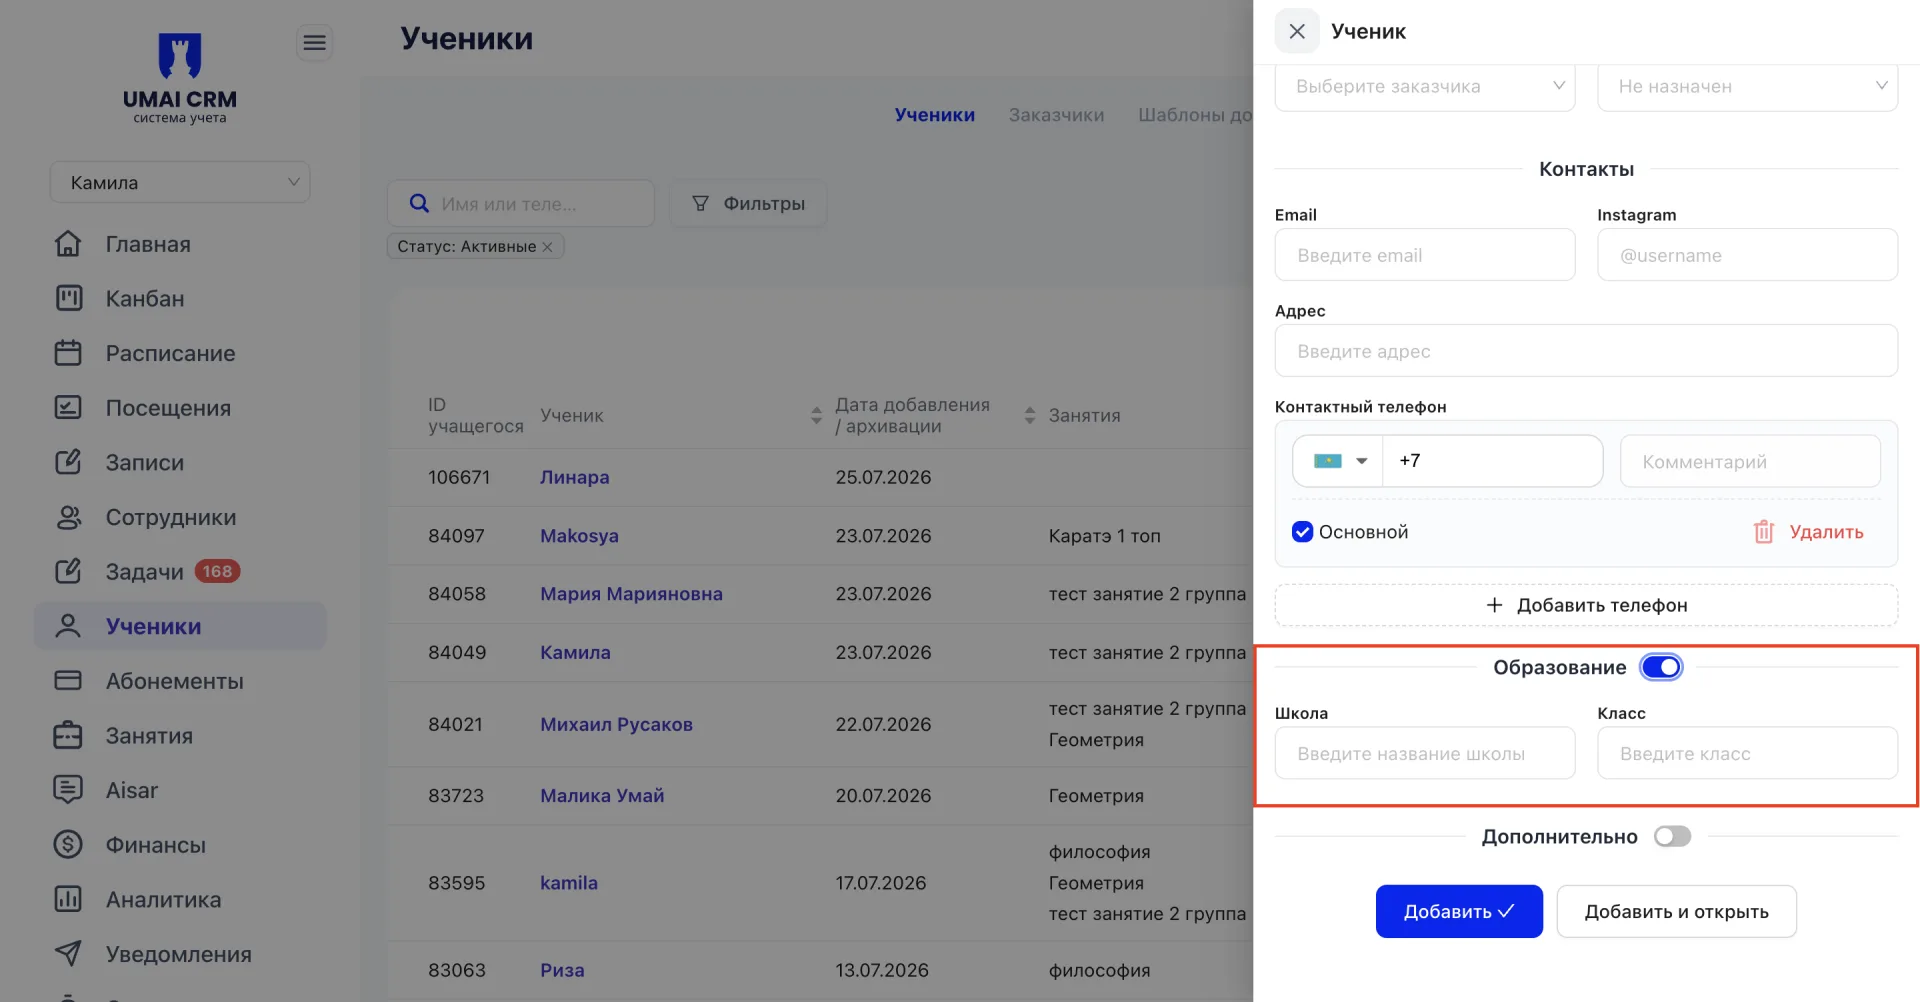
Education
The «Education» item is enabled with a toggle. If enabled, the Student's school and class are specified.
Additional
The «Additional» item is also enabled with a toggle. If enabled, the following fields are available: contract number, discount amount (%), participation in government order (specify the source, for example Qos) and loyalty (an assessment of the Student's attitude to the center with values «Negative», «Neutral» and «High loyalty»). Here you can also leave a comment about the Student.
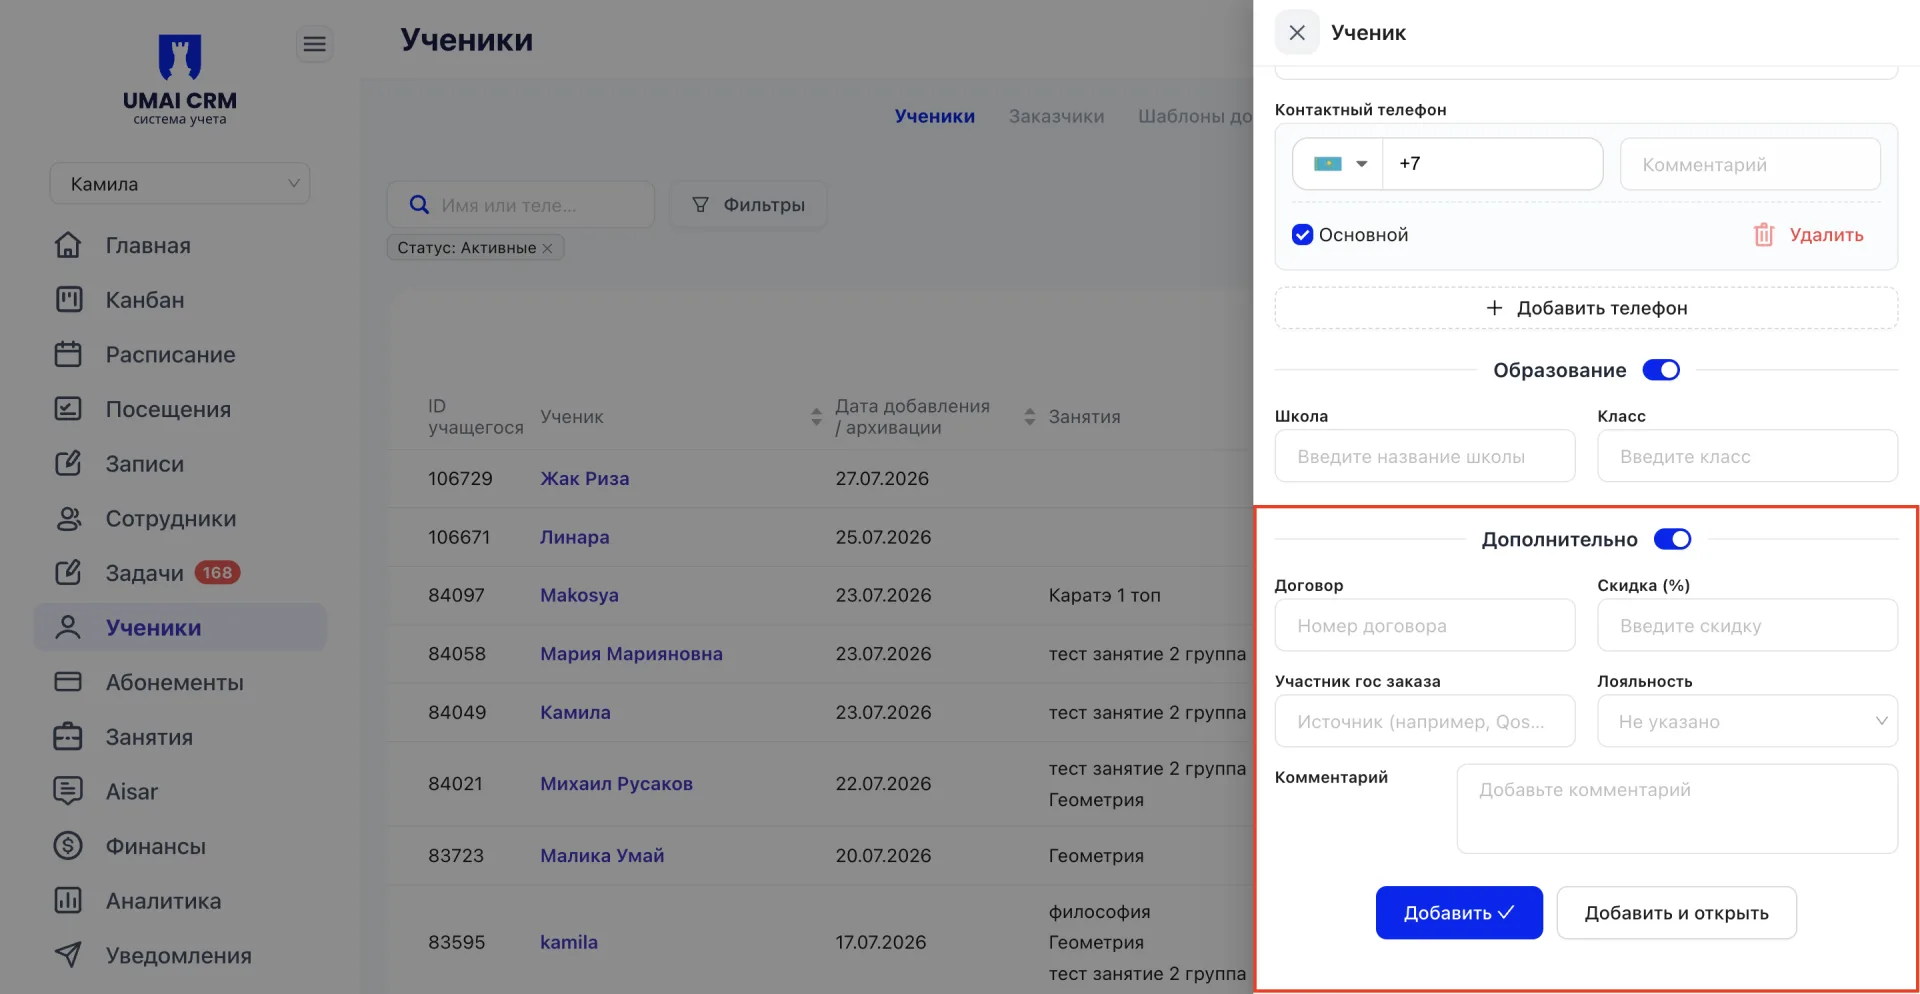
After filling in the data, the Student card is created with the «Add» button. The «Add and open» button creates the Student and immediately opens their card. The status field is absent upon creation: the system automatically assigns the new Student the status «Active». The status changes in the system with further actions, for example to «Archived» when sending the Student to the archive; when deleted the card does not receive a separate status but is moved to the trash.
3. Tab «Clients (Заказчики)»
The tab contains a list of parents or representatives of Students. One client can be associated with several Students.
3.1 Clients table
The page displays a table with a list of all clients.
Above the table there is a search field by name or phone and an «Active / Archive» toggle, which allows displaying either active clients or those sent to the archive. In the top right corner of the page there are export and import CSV buttons, as well as a «+ Add client» button.
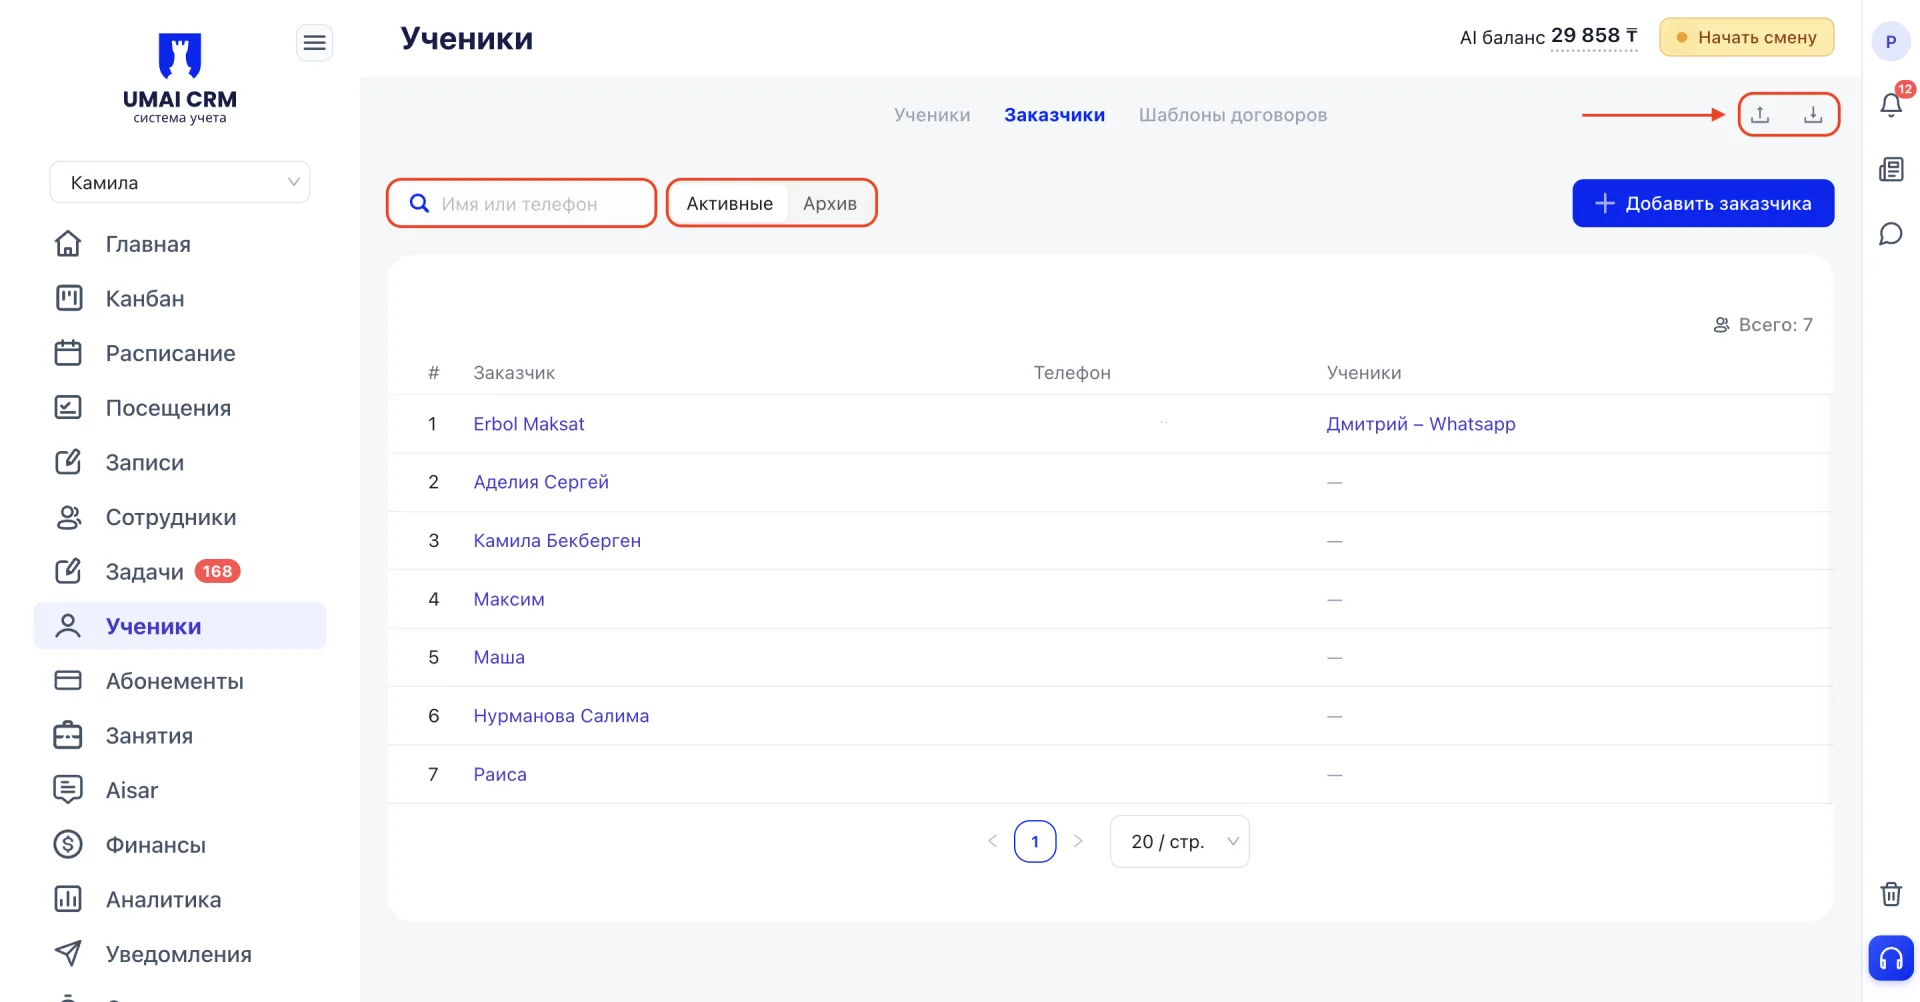
The table shows the main data:
- Client — client name or title.
- Phone — the client's contact number.
- Students — shows Students linked to this client; if there are no Students, a dash is displayed in the column.
On the right there is an «Actions» column with a «⋮» button — the client management menu. When clicked, a list of four actions opens:
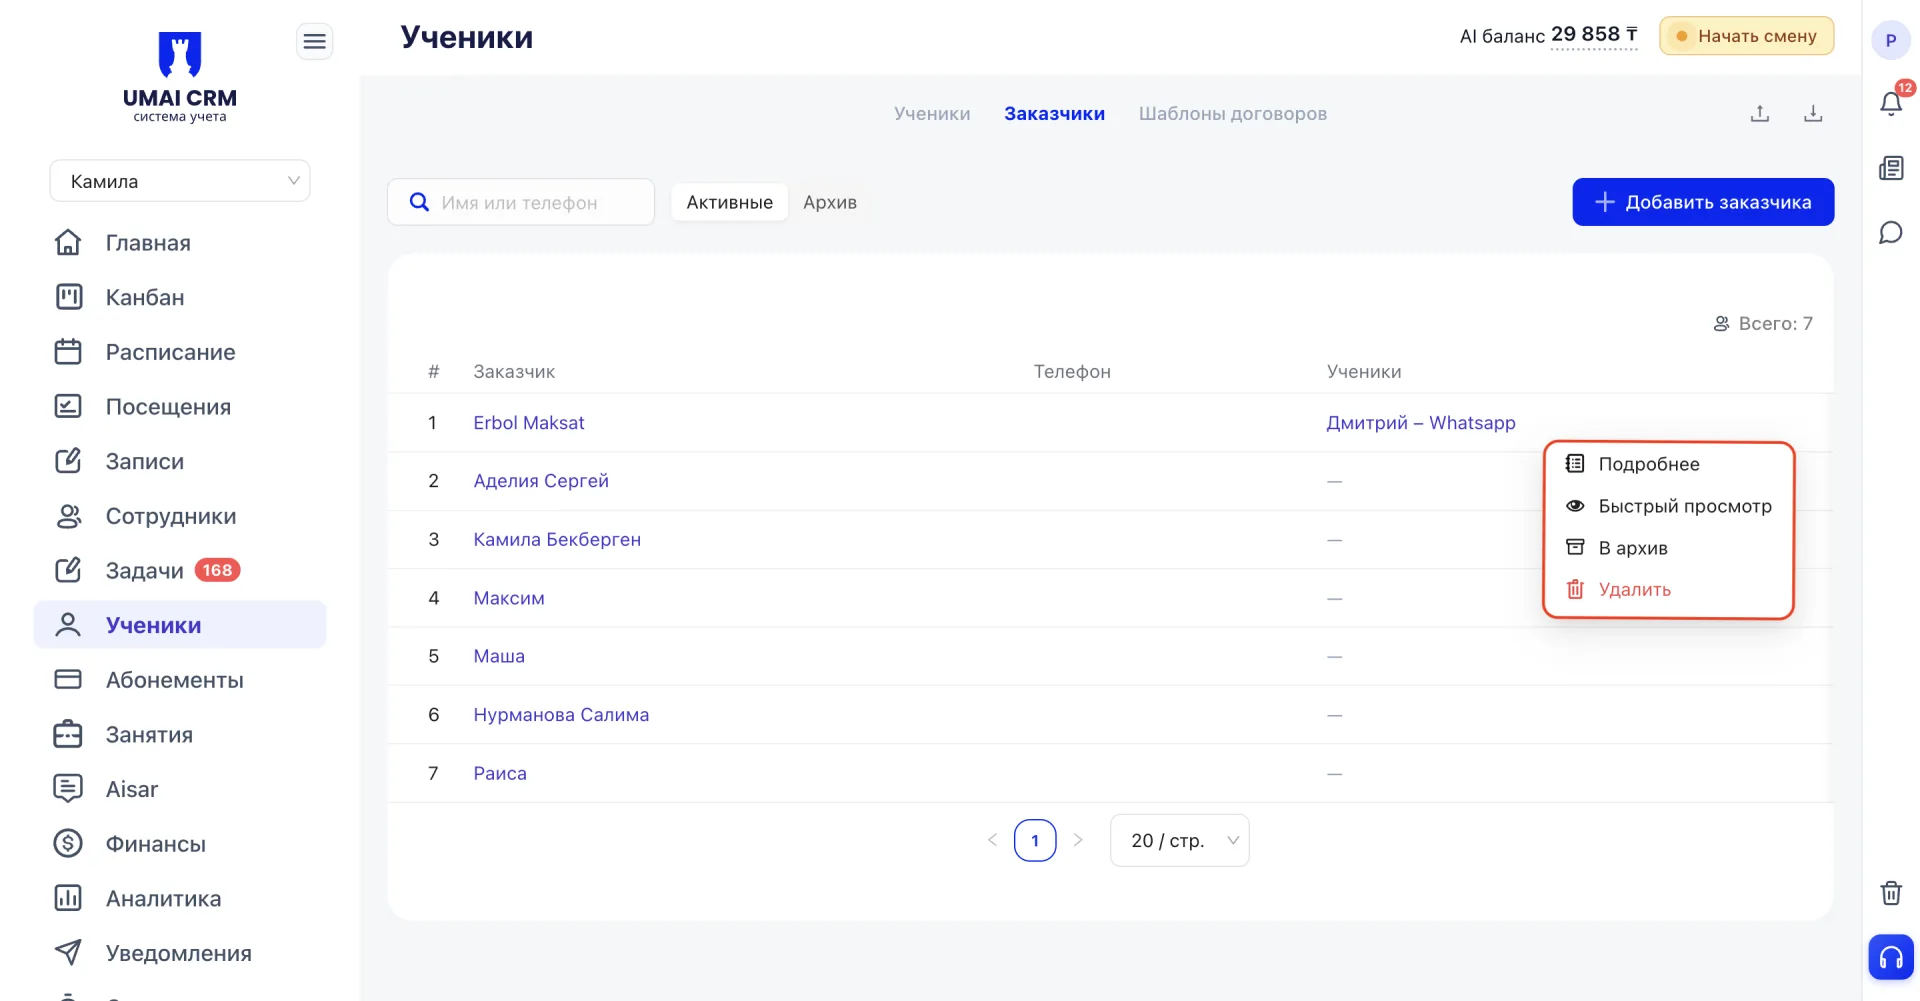
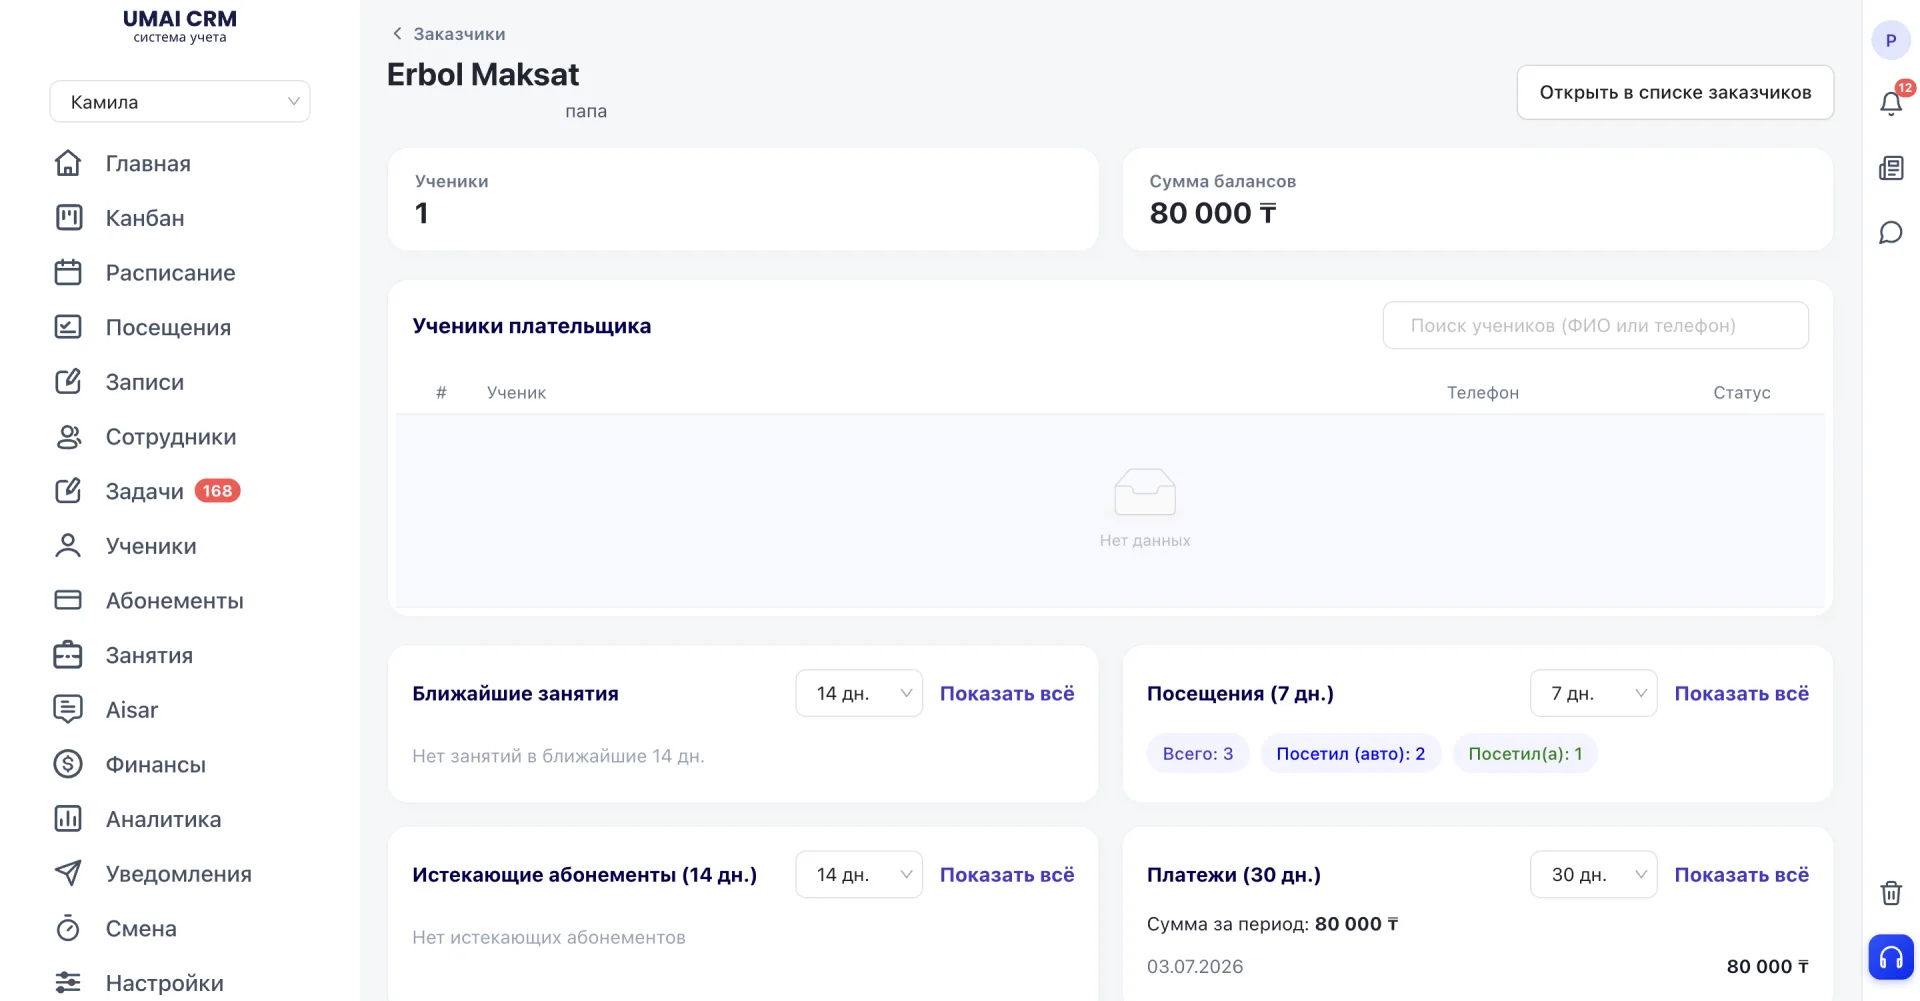
- Details — opens a separate page with full information about the client. The page displays contact details, the client's role (for example, «dad»), the number of linked Students, the total balance of all the client's Students, the payer's Student list with their statuses, upcoming Classes, Visits for the selected period, expiring Memberships and Payments for the selected period.
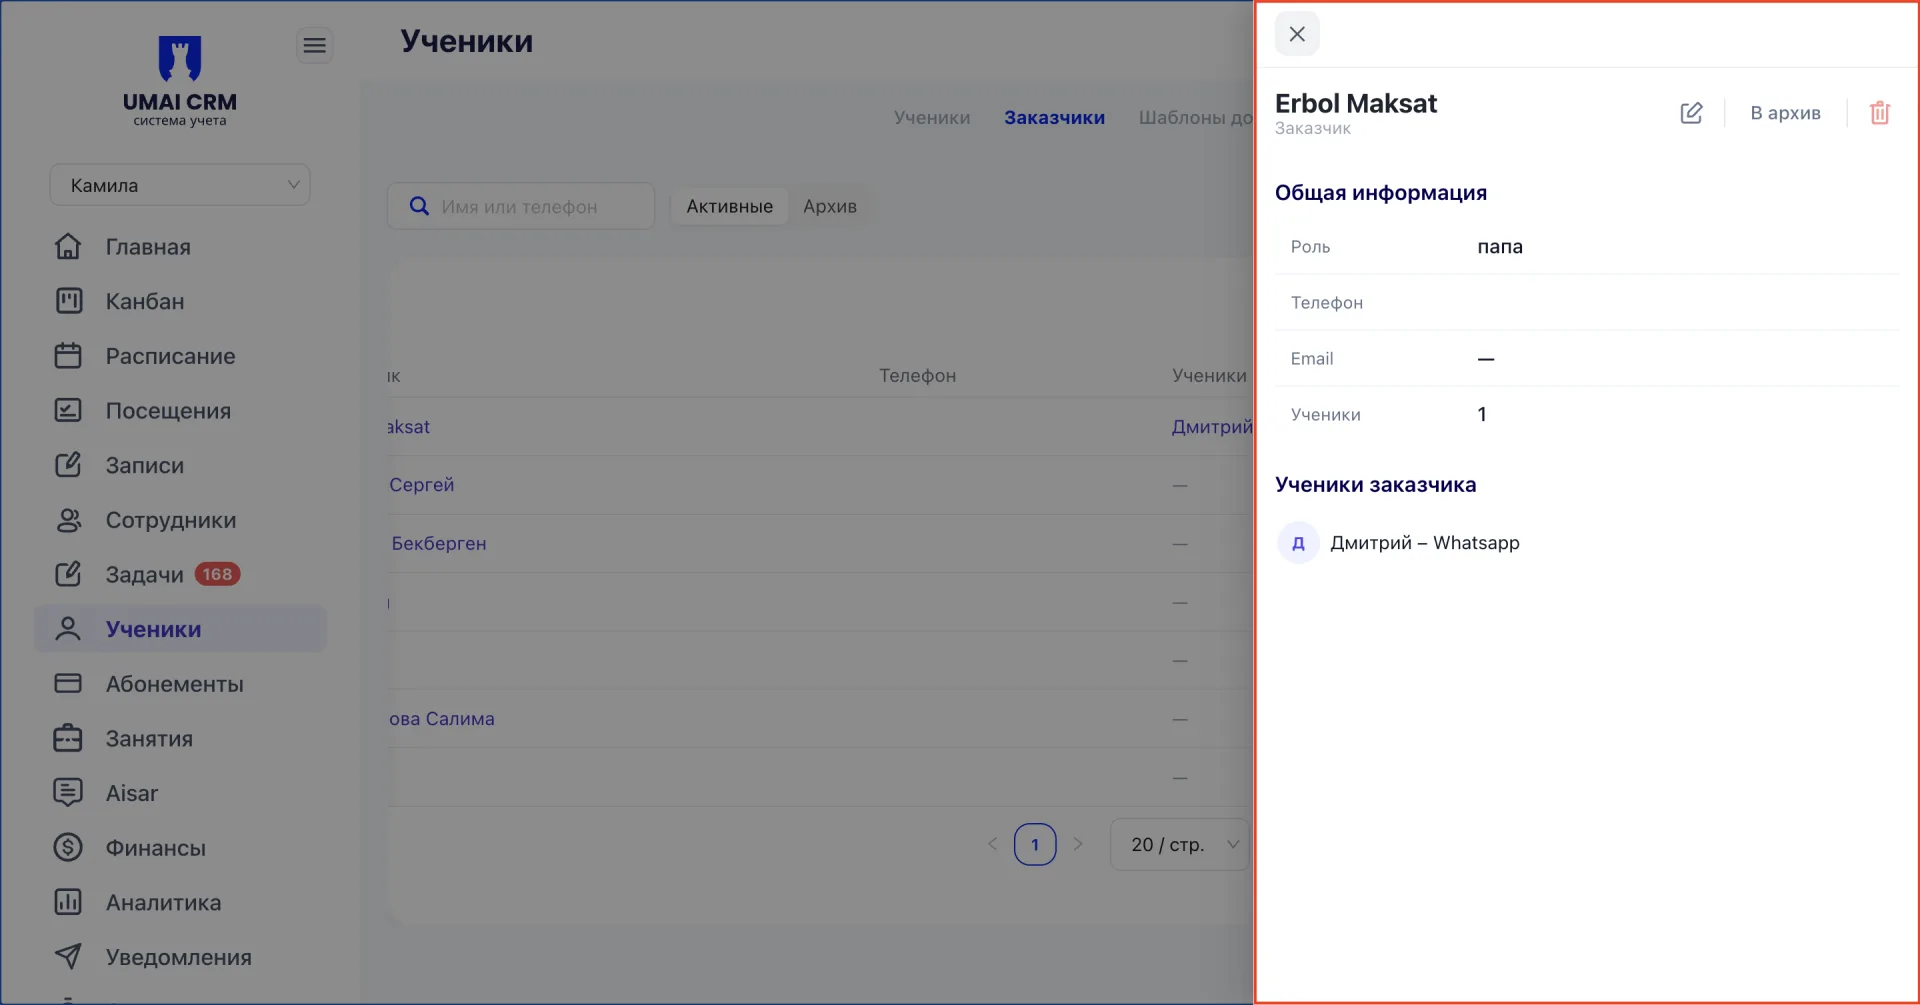
- Quick view — opens the main information about the client in a side panel over the current page, without navigating to a separate page. The quick view displays role, phone, email and the client's Student list. At the top of the panel there is an edit icon as well as «Archive» and delete buttons.
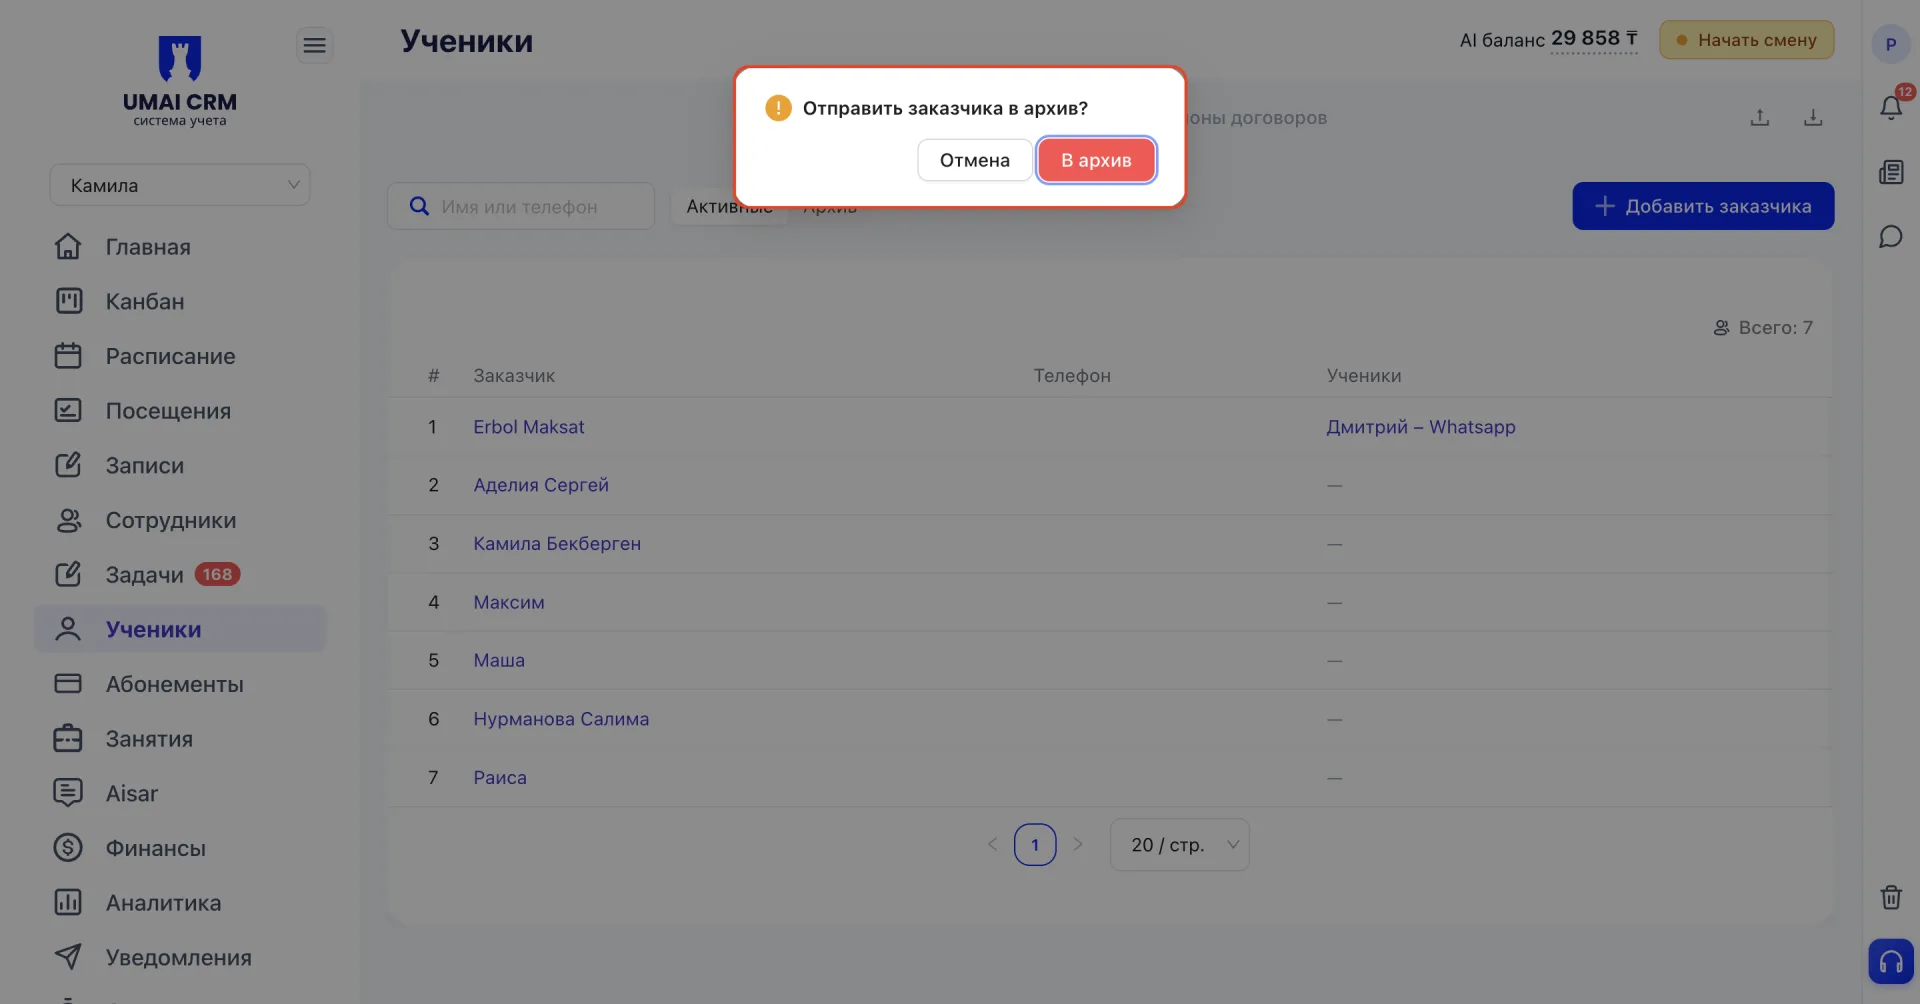
- Archive — moves the client to the archive. When selecting this action a confirmation window «Send client to archive?» appears with «Cancel» and «Archive» buttons. Unlike sending a Student to the archive, specifying a reason is not required.
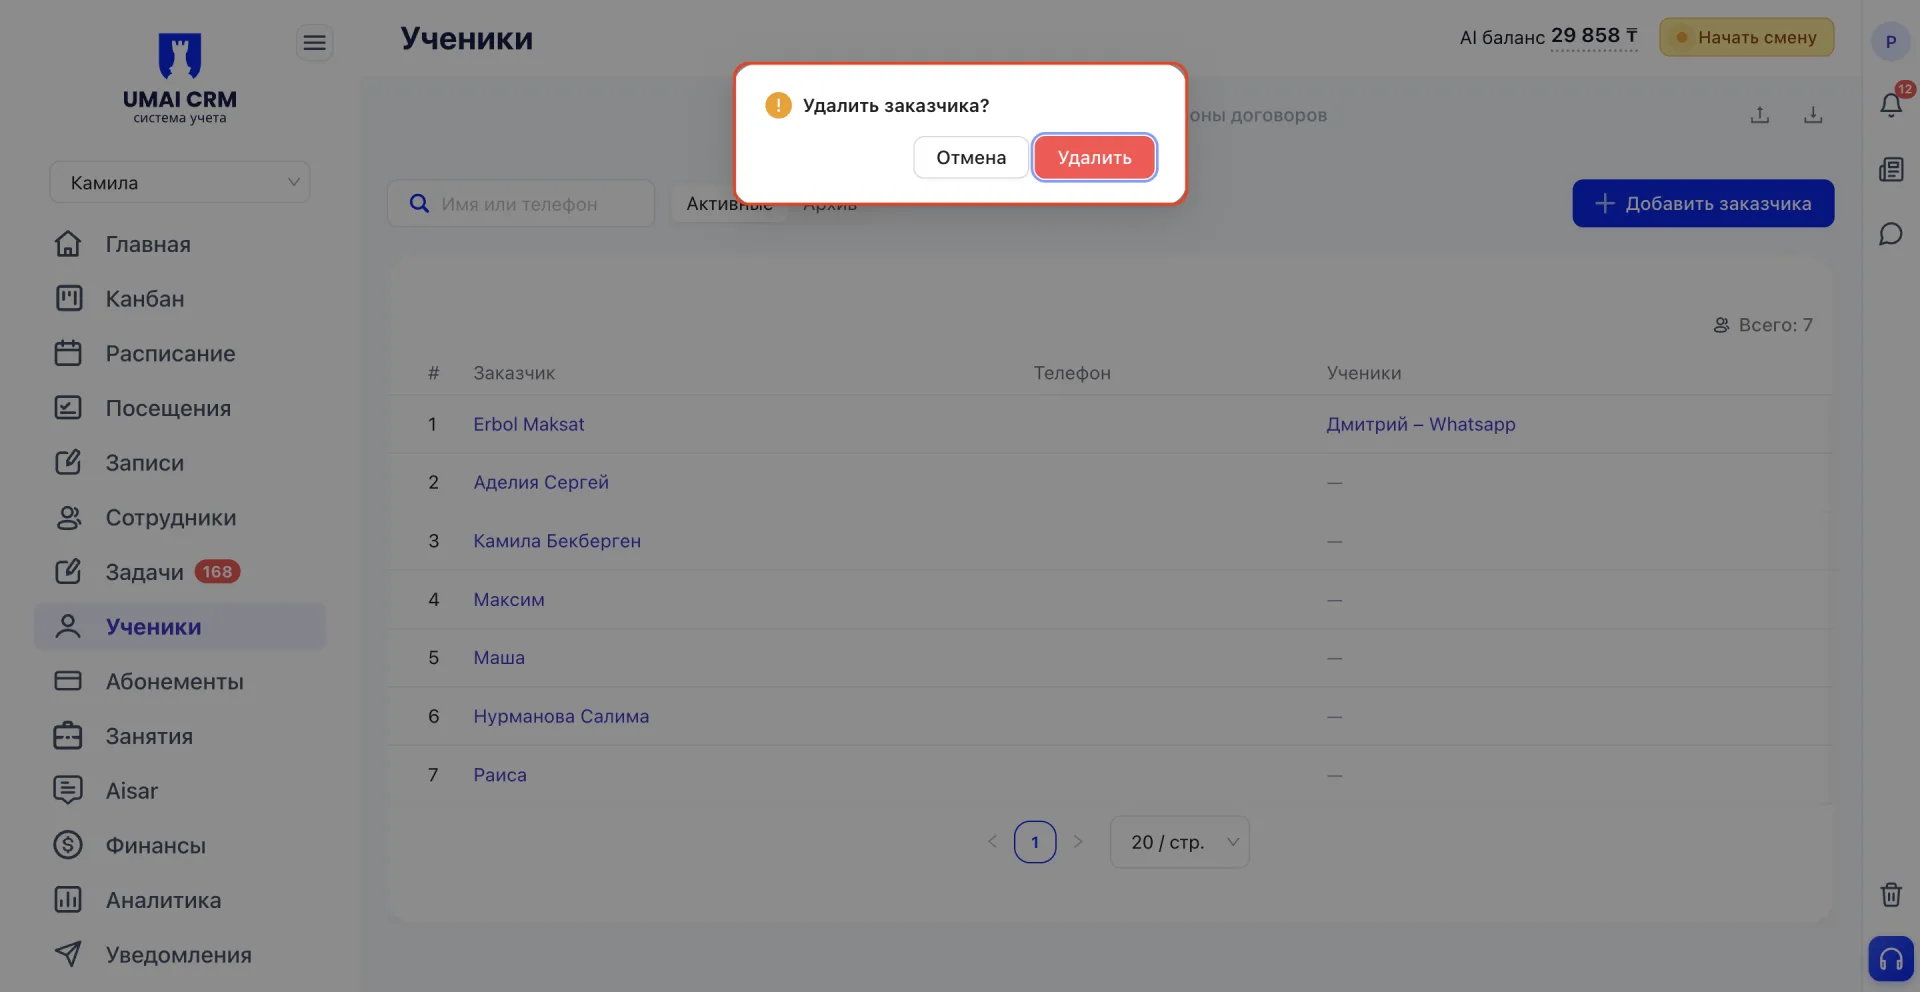
- Delete — deletes the client from the system without the possibility of recovery. When selecting this action a confirmation window «Delete client?» appears with «Cancel» and «Delete» buttons. Unlike deleting a Student, the client is not moved to the trash; deletion is immediate and final.
The choice of action depends on the task. If you need to view the full payment and visit history of the client's Students, open «Details». For a quick contact check, «Quick view» is enough. And «Archive» and «Delete» are used when work with the client is finished.
3.2 Adding a client
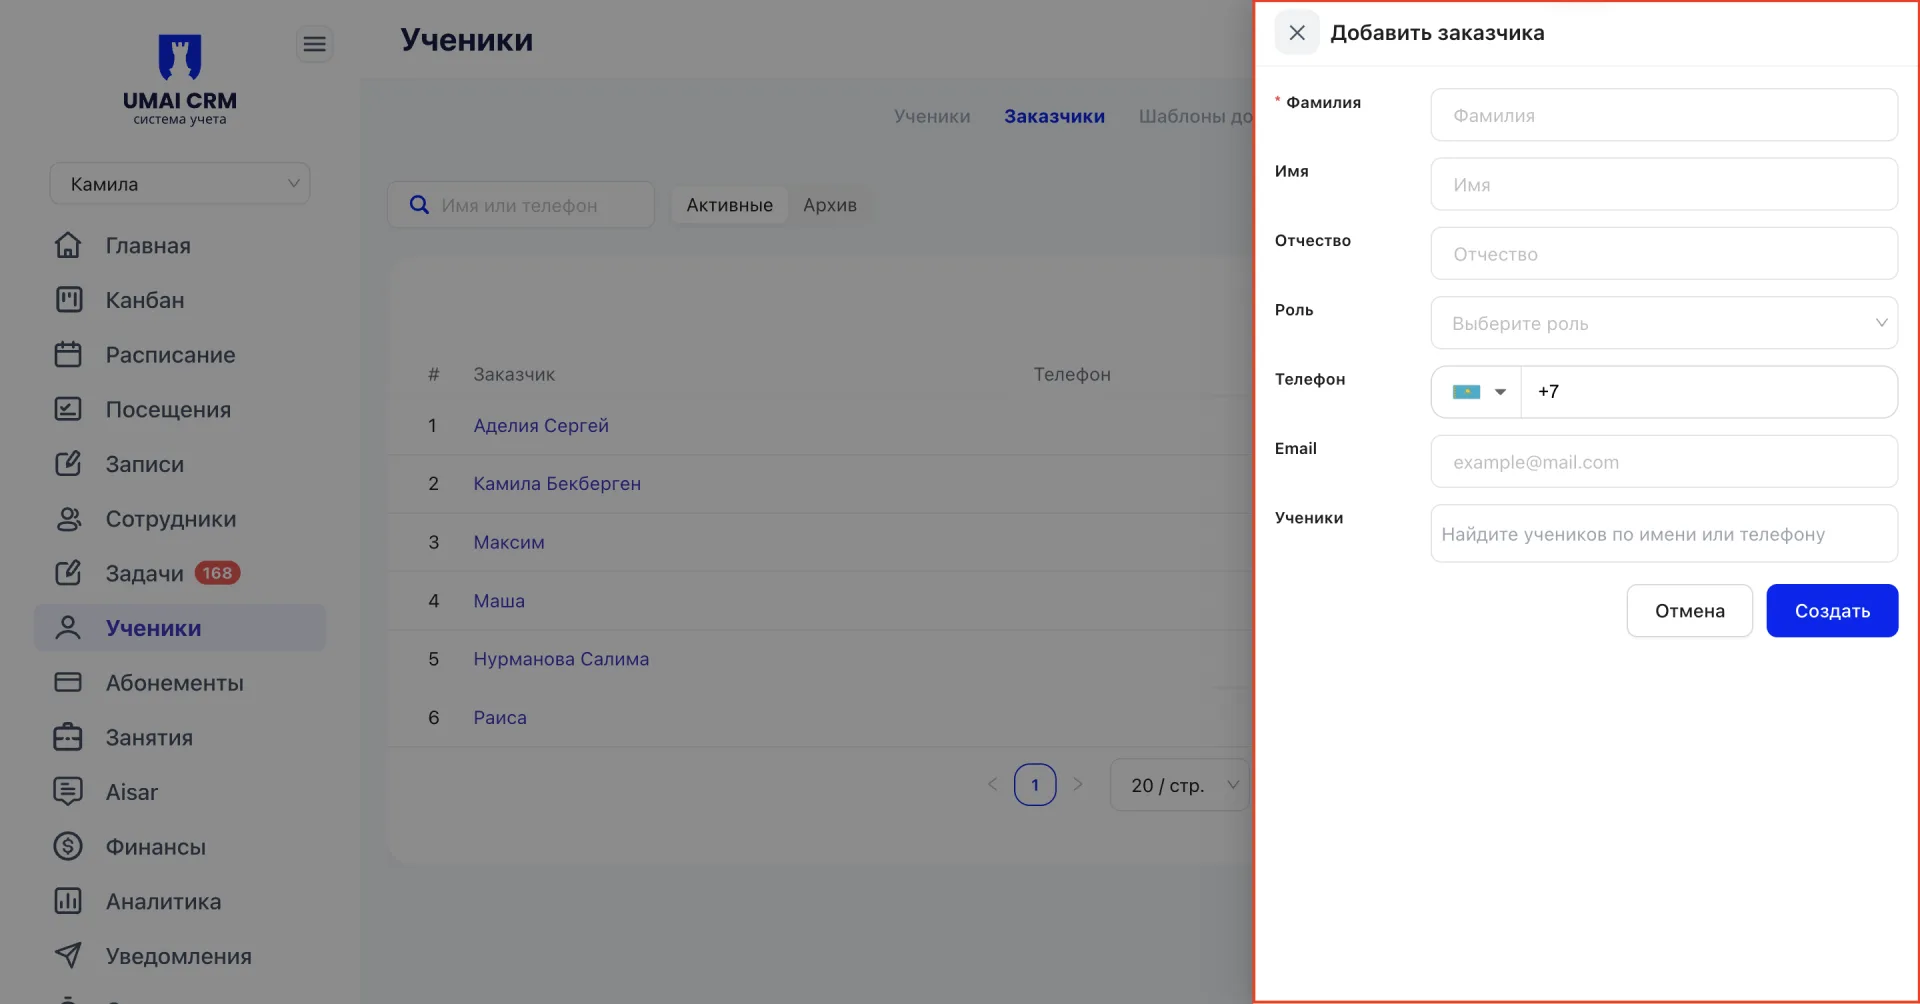
To add a new client, click the «+ Add client» button at the top of the page. A client creation form will open.
The form requires the following data:
- Last name — required field.
- First name.
- Middle name.
- Role — the client's relation to the Student, selected from a dropdown (mother, father, guardian, the Student themself, other).
- Phone — contact number with the country code.
- Email — the client's email address.
- Students — allows linking one or more Students to the client immediately via search by name or phone.
After filling in the data click «Create». The new client will appear in the table and become available for work.
The new client will appear in the table and become available for work.
4. Tab «Contract templates (Шаблоны договоров)»
The tab is intended for creating and storing document templates used when concluding contracts with Students and clients.
4.1 Templates table
The page displays a table with a list of all created templates. Above the table there is a search field for templates, a «Download examples» button that allows you to download ready-made contract templates already available in the system, and a «+ Add template» button for creating a new one.
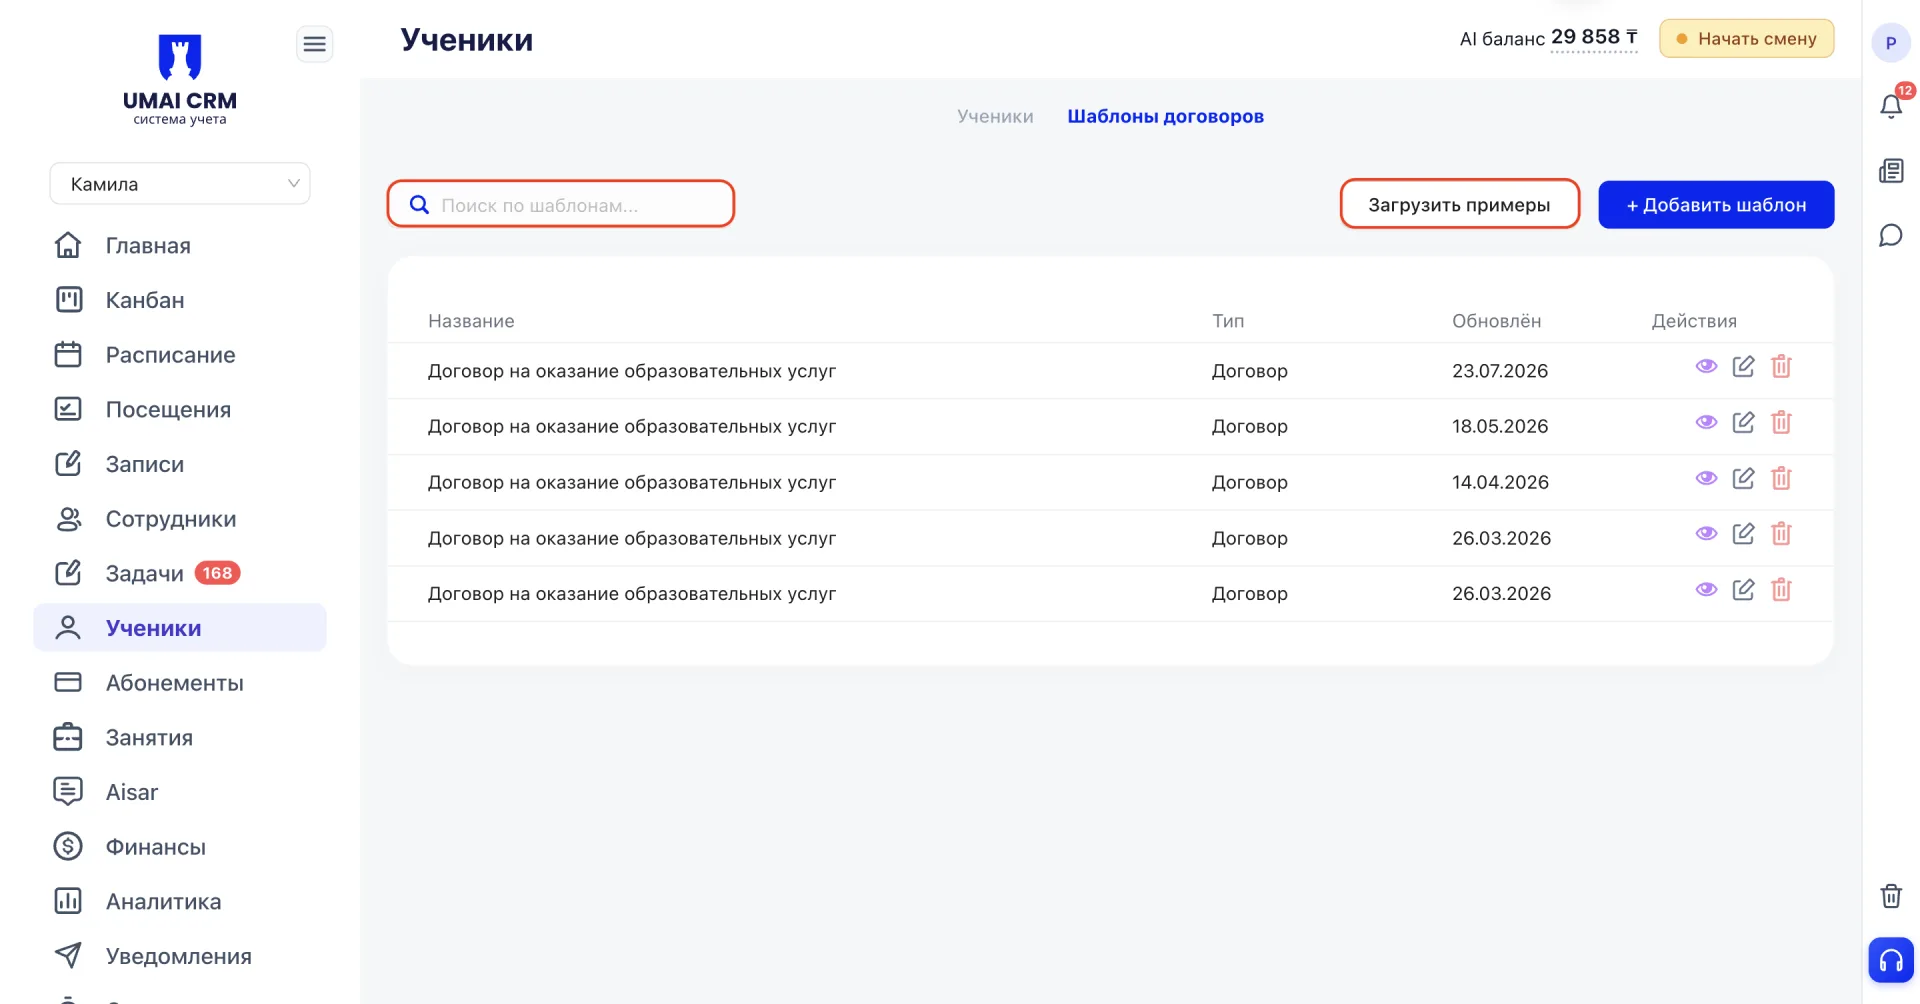
The table shows the main data:
- Title — the template title.
- Type — document type (Contract, Consent or Consent to data processing).
- Updated — the date of the last template change.
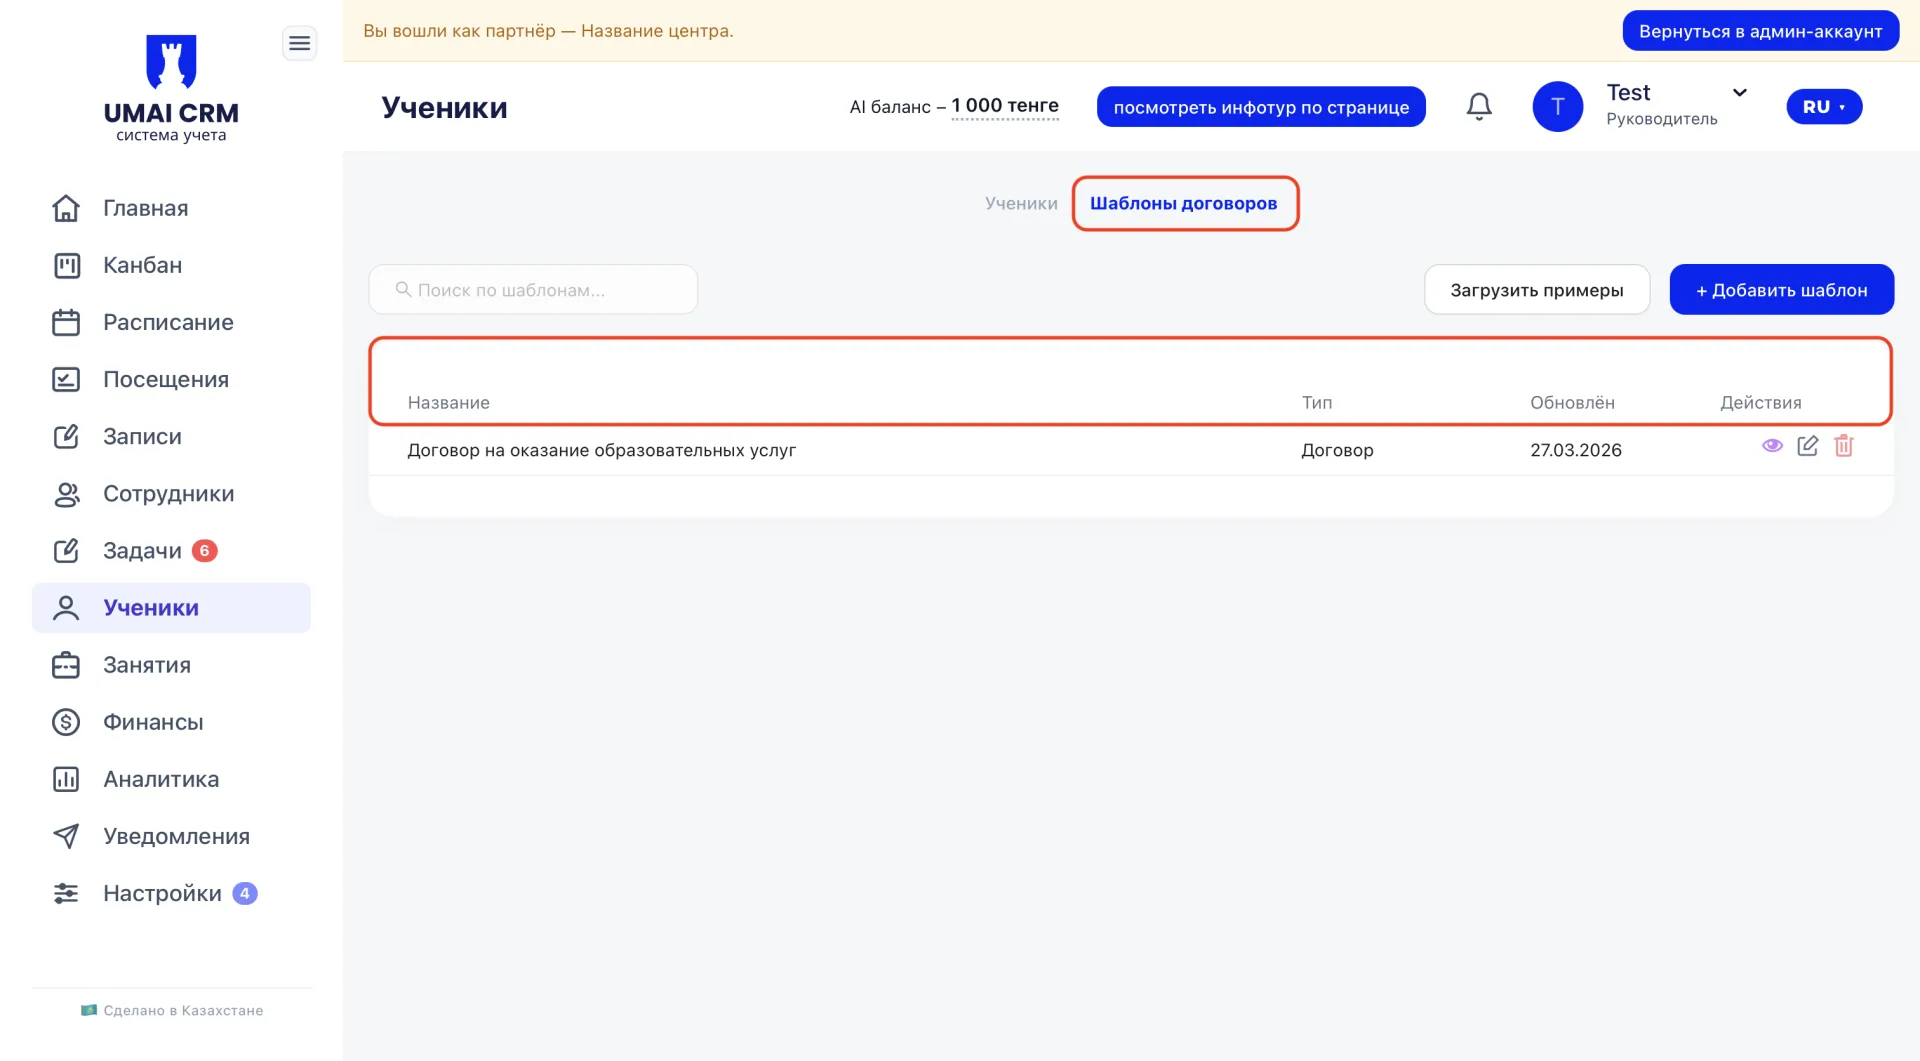
On the right there is an «Actions» column with three buttons:
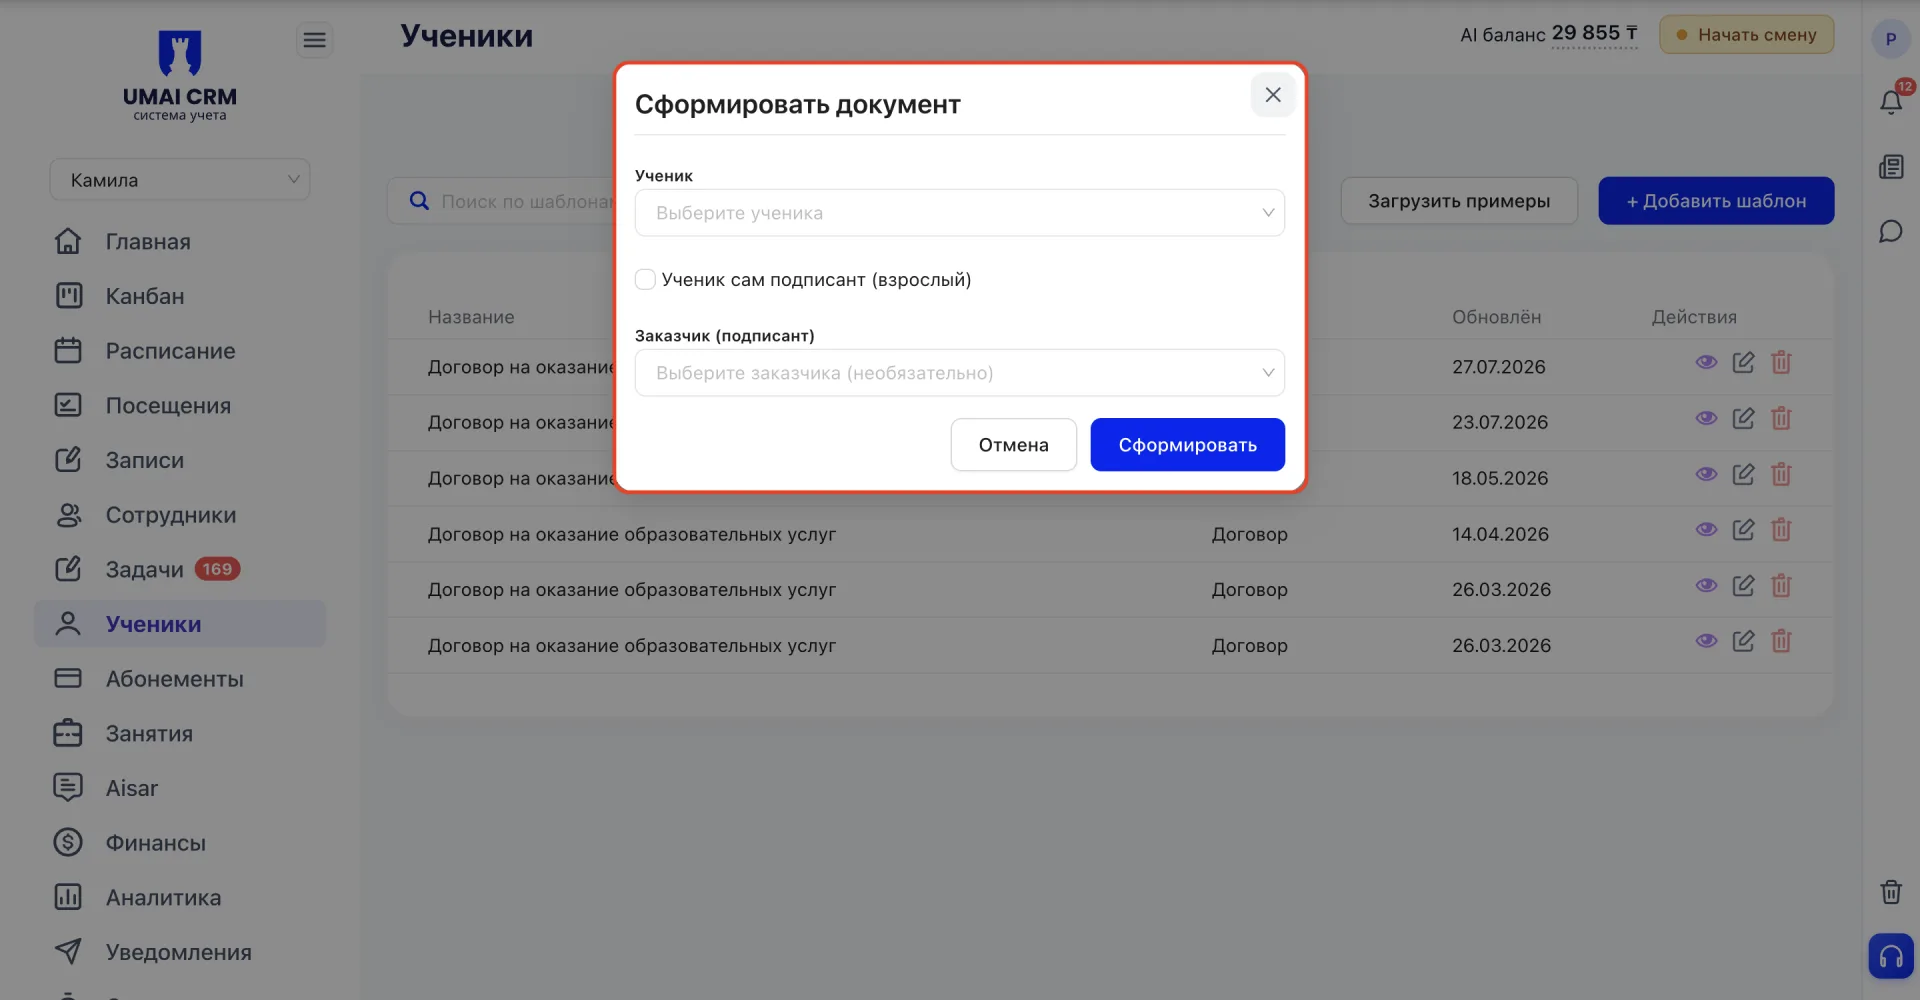
- Eye icon — opens the «Generate document» window. In the window you choose the Student for whom the document is being generated. If the Student is of legal age and is the signer themself, check the «Student is the signer (adult)» checkbox. You can also select a client (signer) — this field is optional. After filling in the required fields the document is generated with the «Generate» button: the system automatically substitutes the Student, client and company data in place of the template variables and creates a ready document.
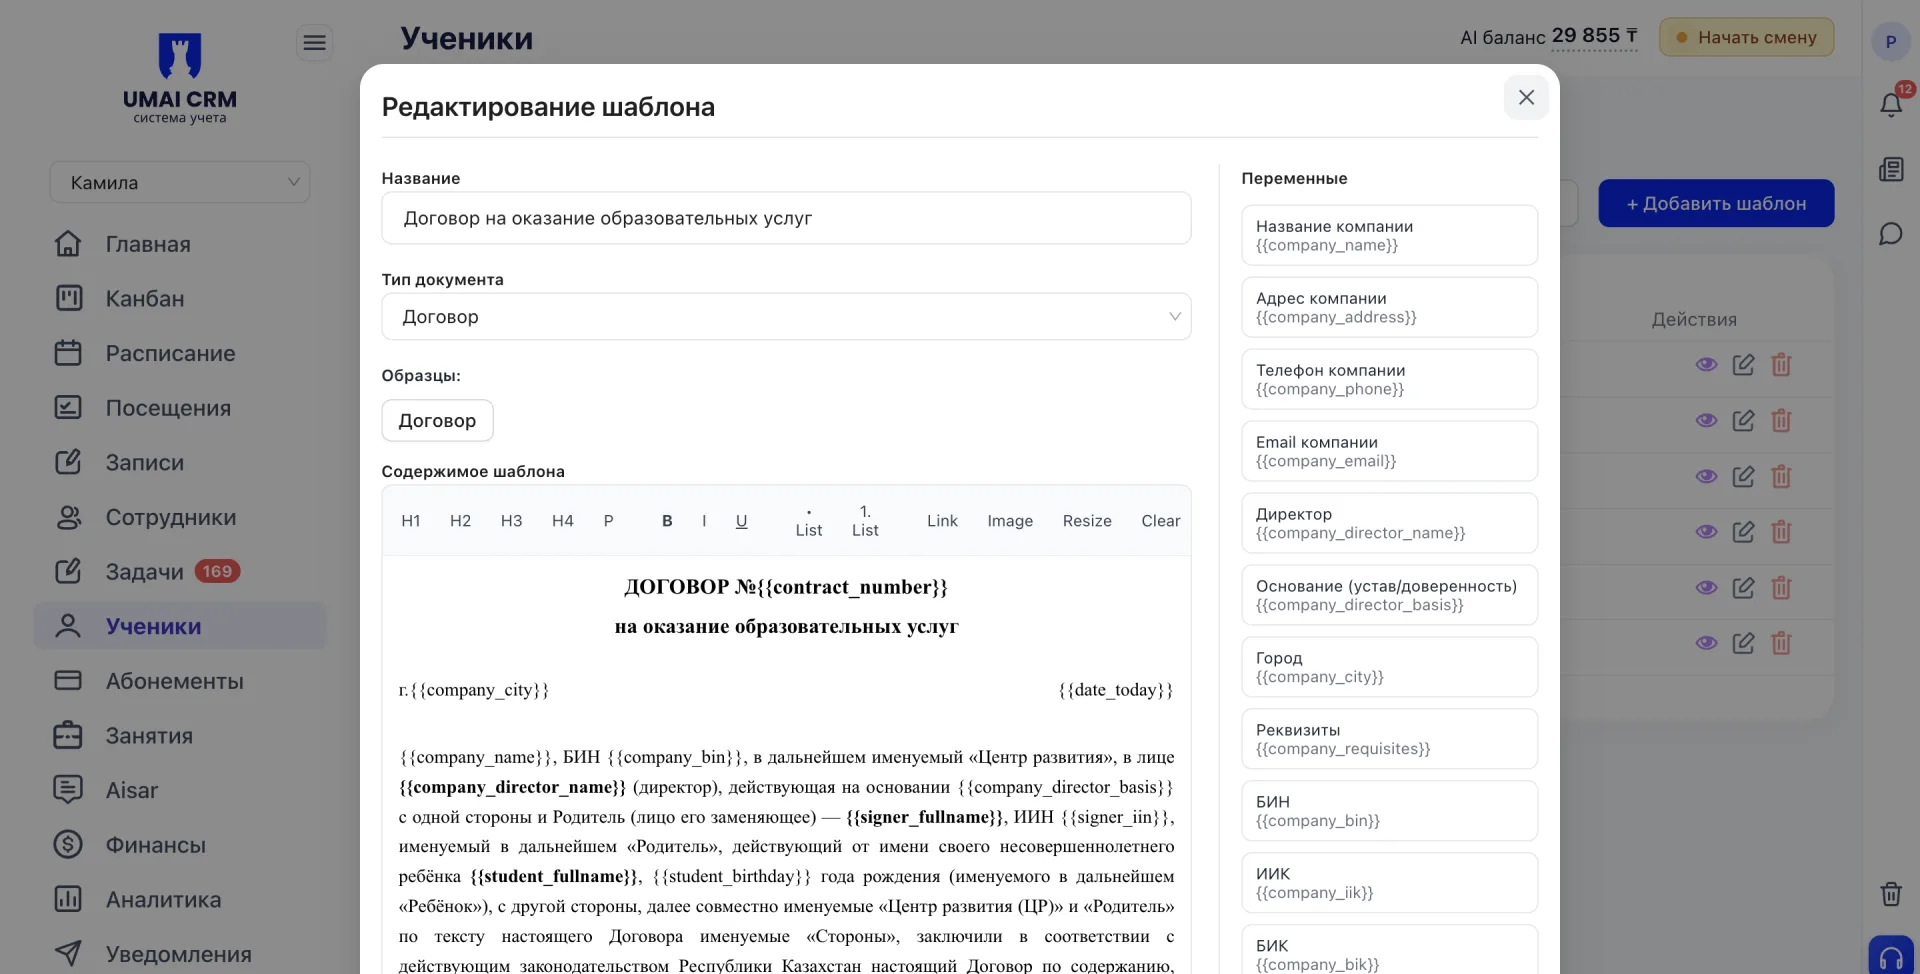
- Pencil icon — opens the template for editing.
- Trash icon — deletes the template. When selecting this action a confirmation window appears with the template title and «Cancel» and «Delete» buttons. The template is deleted immediately and permanently, without the possibility of recovery.
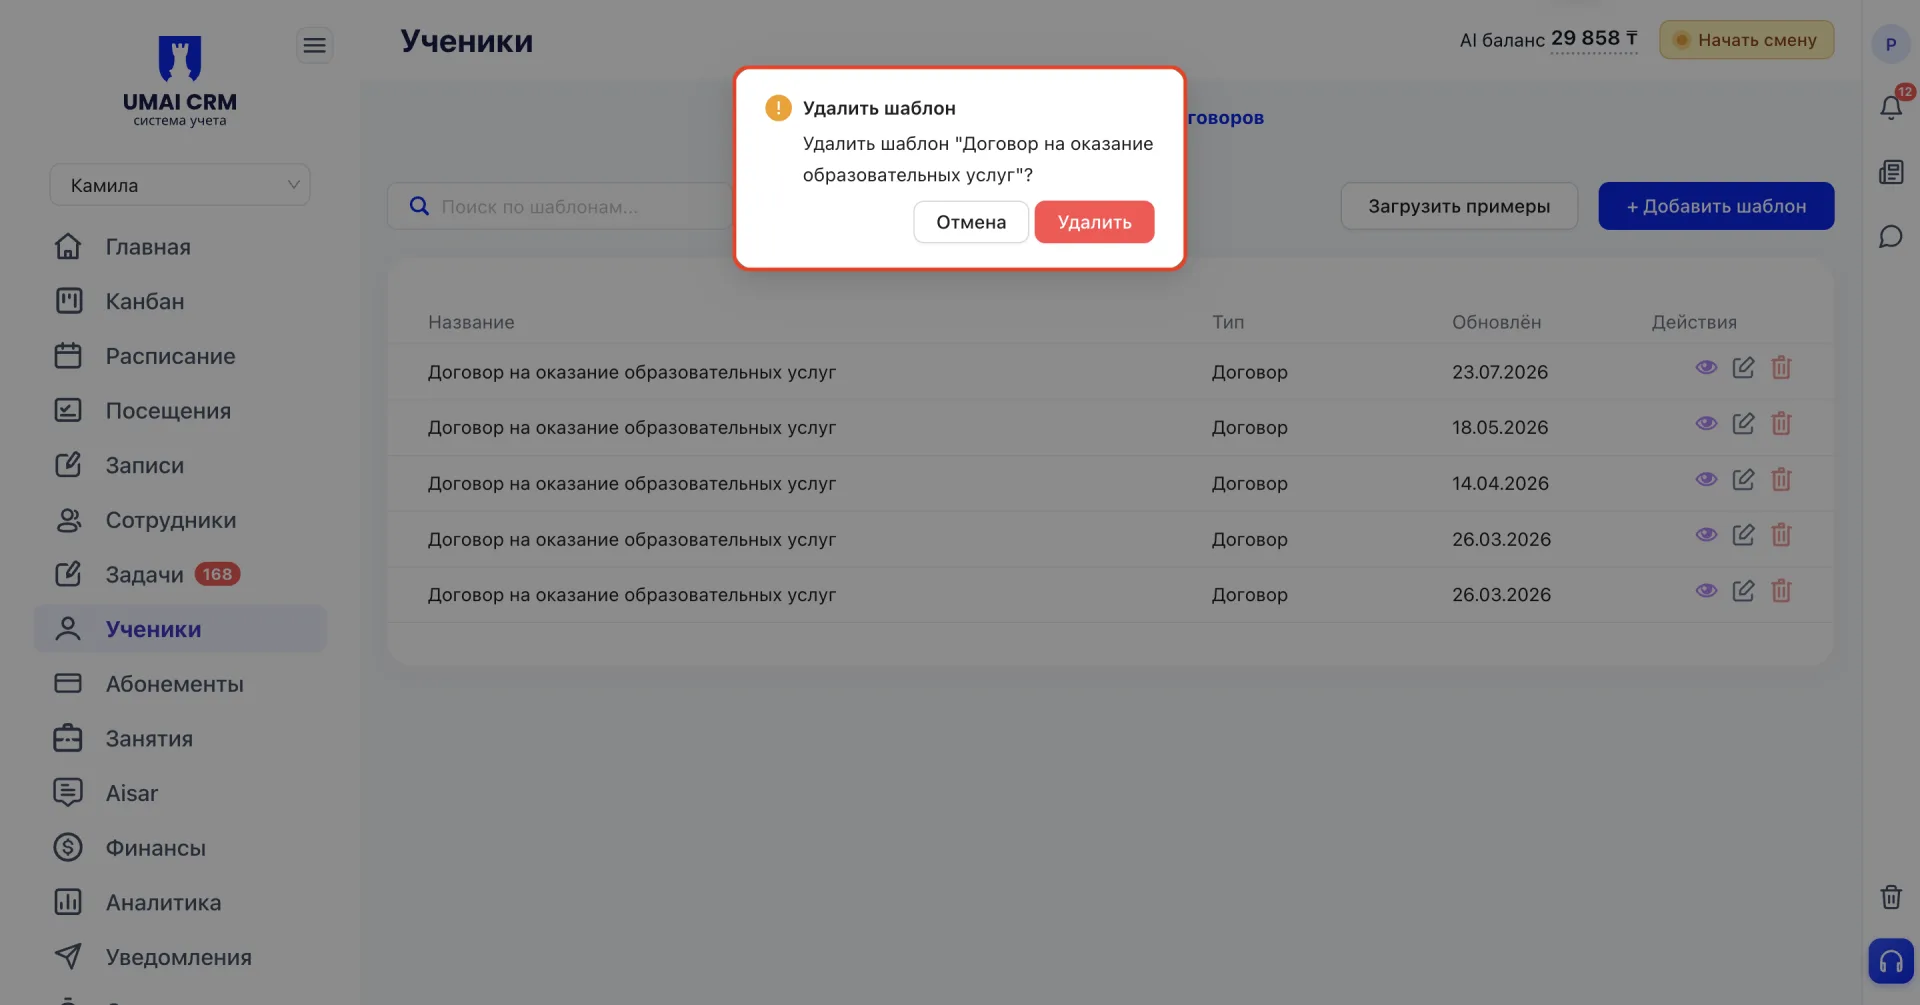
The choice of action depends on the task. To get a ready document for a specific Student, use the eye icon. To change the text or variables of the template use the pencil icon. And if the template is no longer needed, delete it with the trash icon.
4.2 Creating and editing a template
To create a new document template, click the «+ Add template» button. A form will open in which you must fill in the following fields:
- Title — specify the template title.
- Document type — choose from the dropdown. Three fixed types are available: Contract, Consent, Consent to data processing. You cannot add your own document type, but the content of any template can be freely changed and supplemented.
- Samples — allows choosing a ready-made document template if it exists in the system. After selecting a sample, the template text may be auto-filled.
- Template content — the main field where the document text is entered.
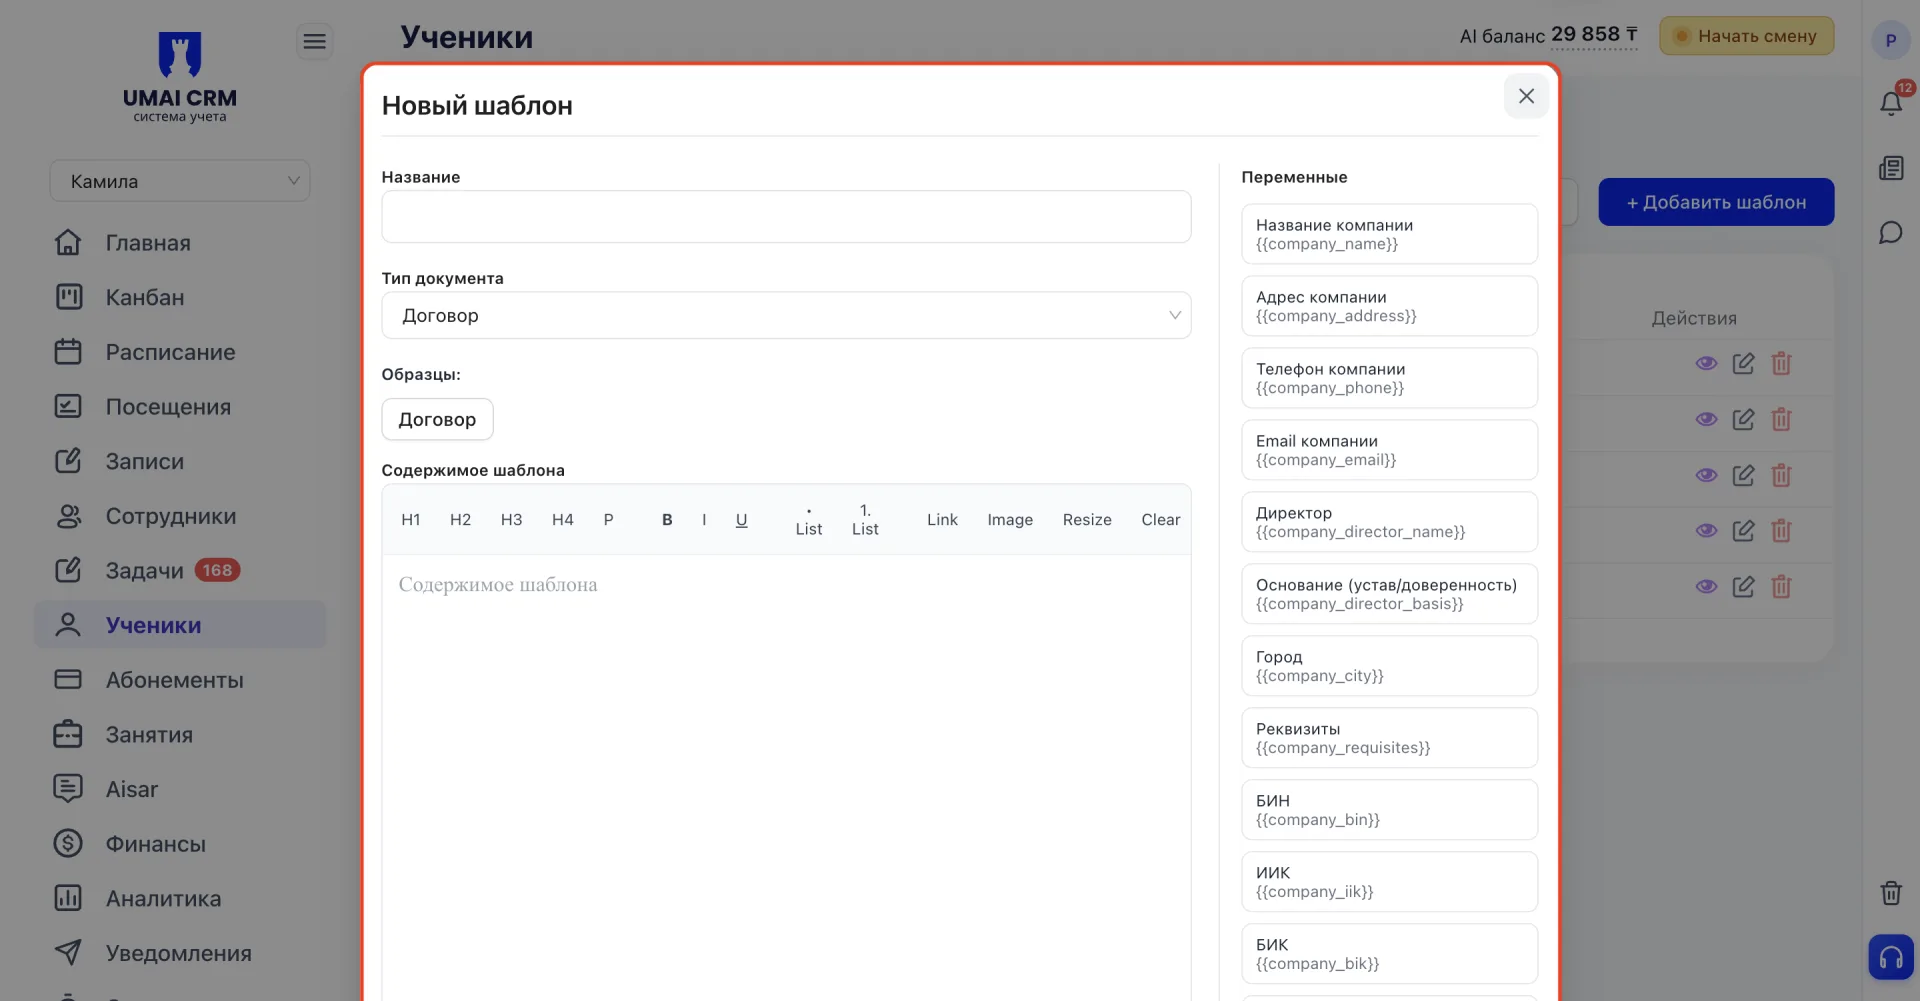
To the right of the text editor there is a «Variables» block — a list of placeholders like {{company_name}}, which copy and paste into the desired place in the template text when clicked. When generating a document for a specific Student, the system automatically replaces these variables with real data. Available variables include company data (name, address, phone, email, director, basis, city, details, BIN, IIC, BIC), Membership data (price, period, payment terms), signer data (full name, last name, first name, middle name, phone, email, role), as well as today's date and contract number.
After filling in the template, save it with the «Save» button.
Important to note
- You cannot send a Student to the archive without specifying a reason for leaving. This is a required field.
- A deleted Student is moved to the trash. Only a user with the director role can restore them.
- Viewing via «Details» and via «Quick view» shows different amounts of information about the Student. For full information, open the card via «Details».
- Invitations via the «Invite» button (WhatsApp or Email) are sent not to manually selected Students but automatically to all active Students without a linked app account. You cannot choose specific recipients in this window.
- A Student can be linked to a client. In this case the client's contact details are used for communication and displayed when working with the Student.
- One client can be associated with several Students. This is convenient when multiple children belong to the same family.
- The link between a Student and a client affects working with contacts and helps to quickly find the required information when working with Students.
- Sending a client to the archive, unlike sending a Student, does not require specifying a reason.
- Deleting a client, unlike deleting a Student, is immediate and final. The client is not moved to the trash and cannot be restored.
- Deleting a contract template also occurs immediately and without the possibility of recovery.
- Template document type (Contract, Consent, Consent to data processing) is fixed. You cannot add your own type, but the content of any template can be freely edited and supplemented.