
This section is designed to record the actual presence of Students at Classes. It notes who attended a Class and who was absent, and for what reason.
This section is directly connected to the Schedule, Finance reports and Gamification (Геймификация). A Class is first created in the Schedule, and in the Visits section its actual holding is confirmed and the attendance mark is recorded. This mark determines whether the Class is deducted from the Student's Membership, how the data is reflected in Finance reports, the awarding of points, coins and stickers, as well as statistics and management analytics. If attendance is not marked or is marked incorrectly, all of these data will also be incorrect.
Main blocks:
- Access to the section
- Top control panel
- Selecting a Class
- Class card
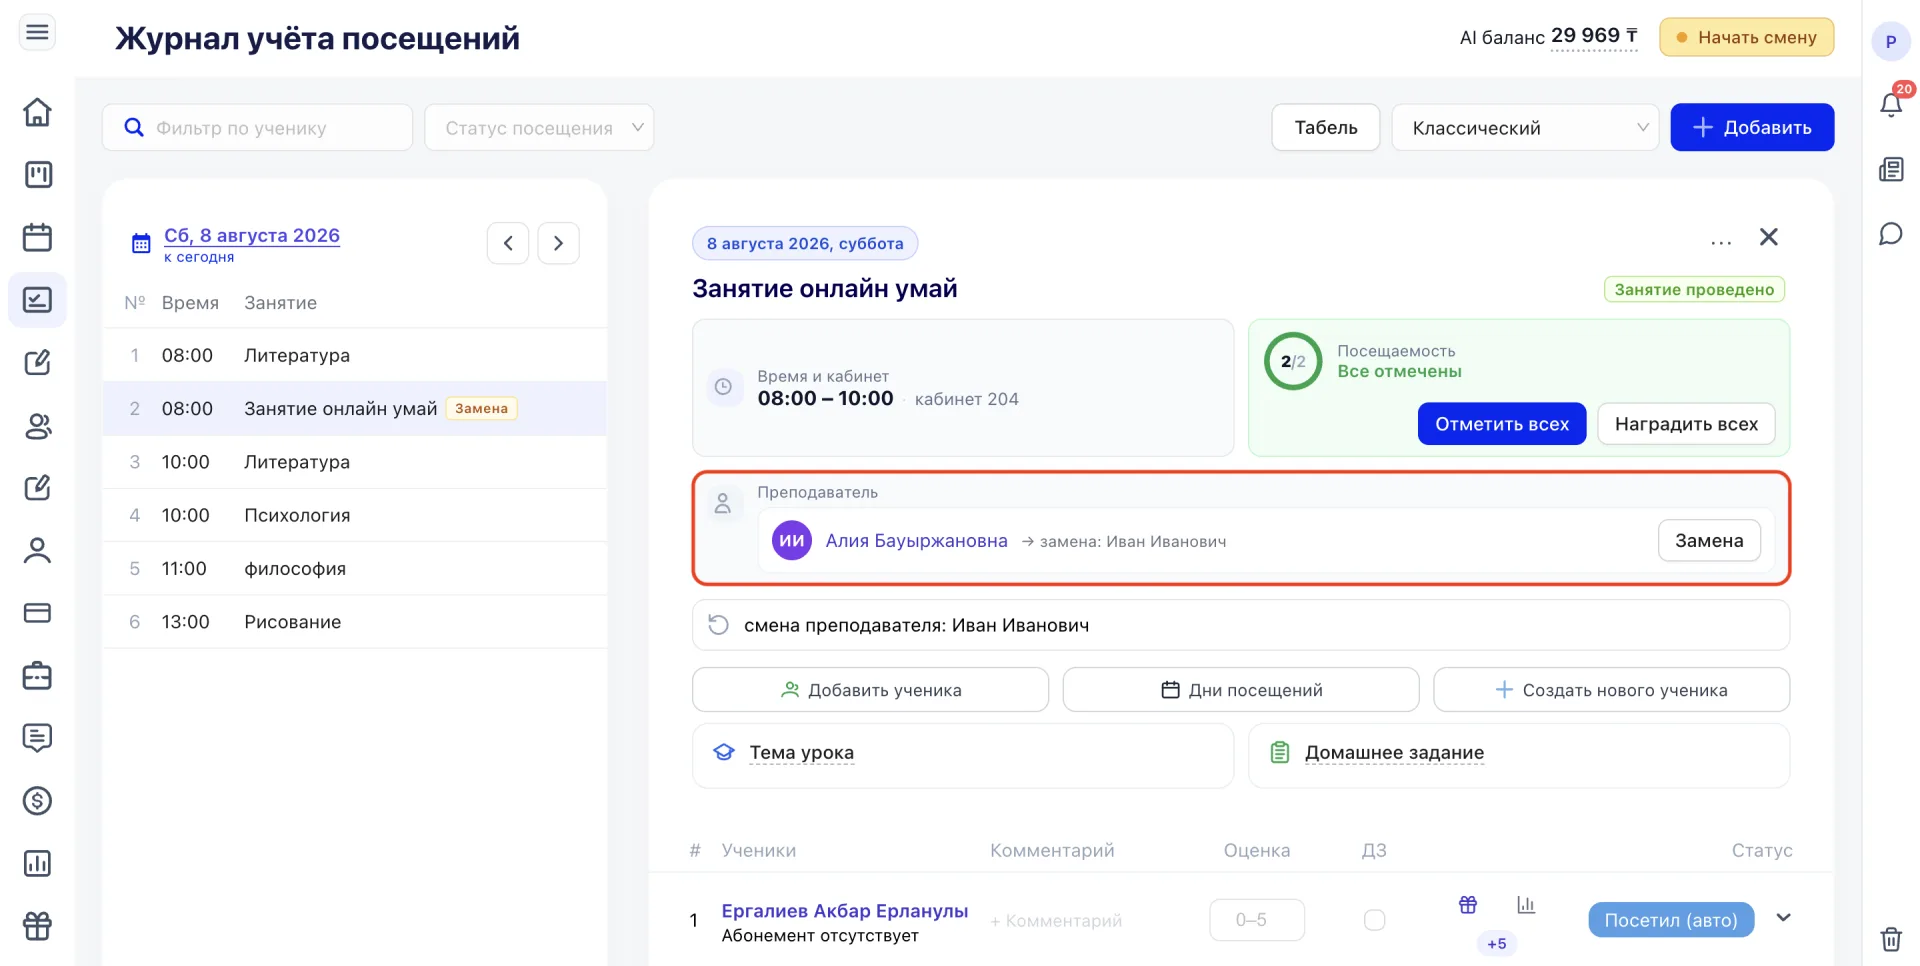
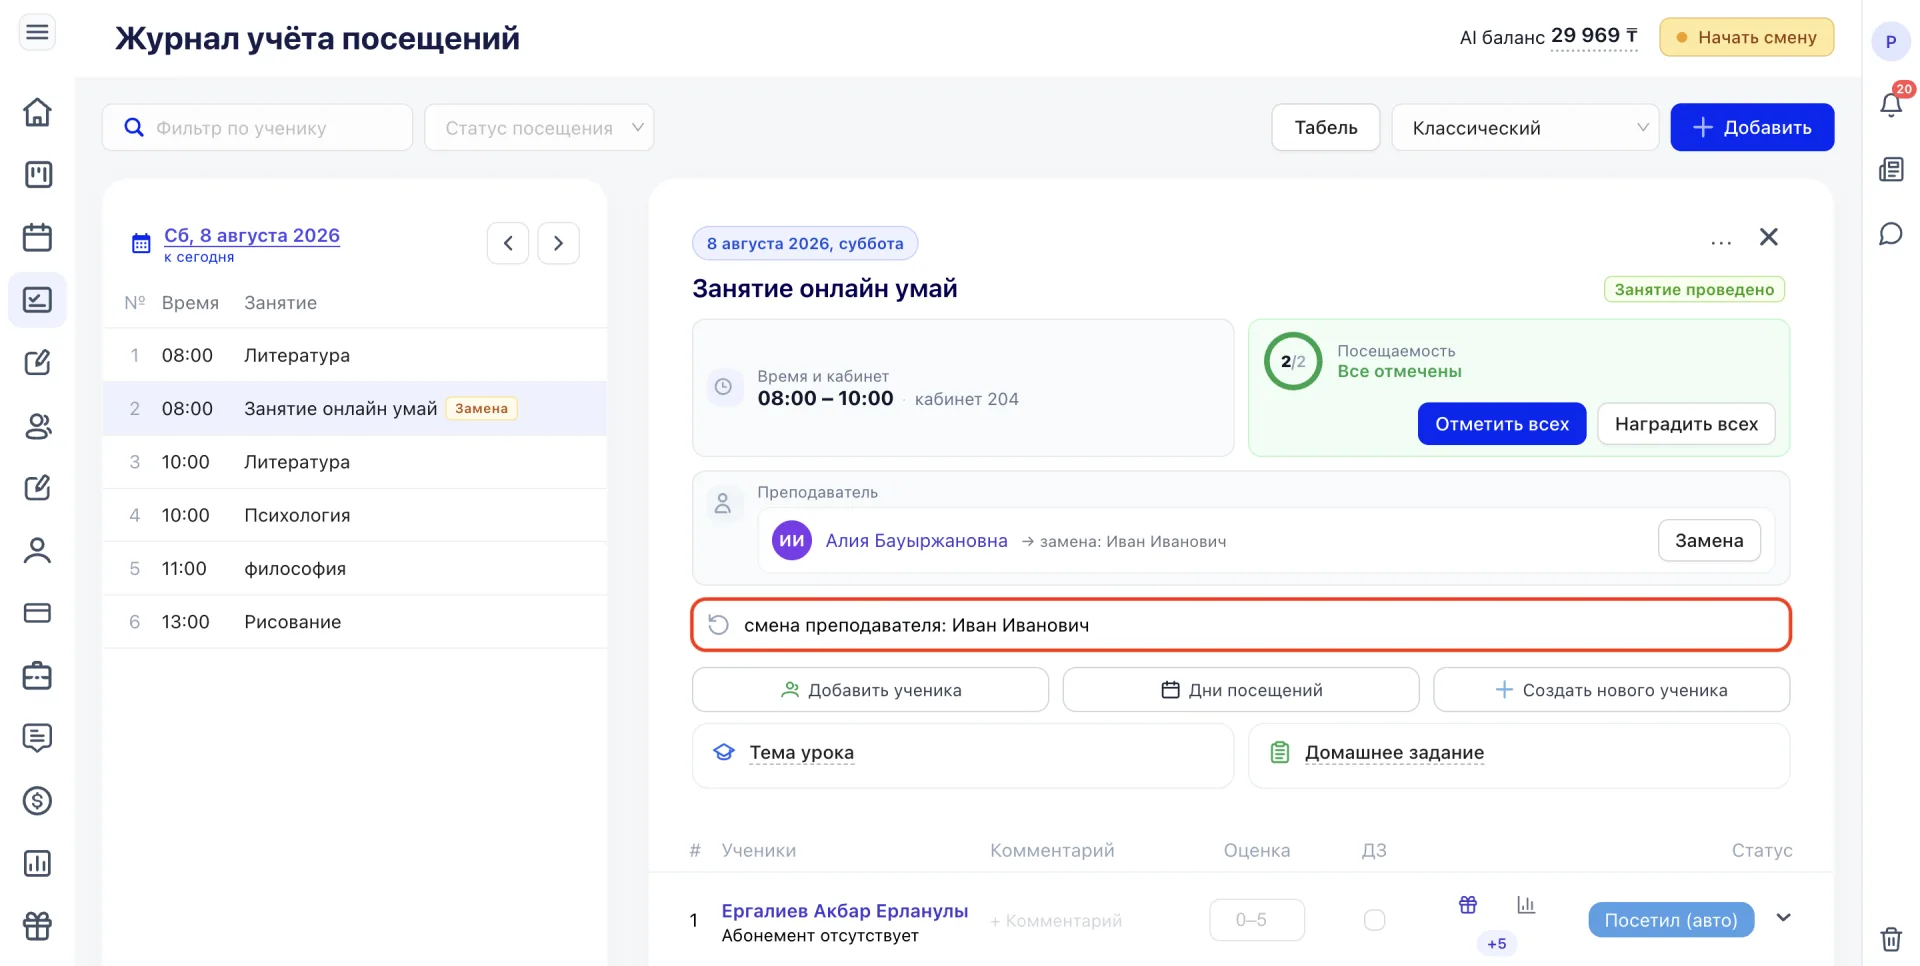
- Teacher substitution
- Attendance marking
- Rewarding Students
- Grade and homework in the students table
- Adding a Class manually
1. Access to the section
The section is opened via the side menu "Visits".
After navigation, the list of Classes for the selected date is displayed. By default the current day is shown.
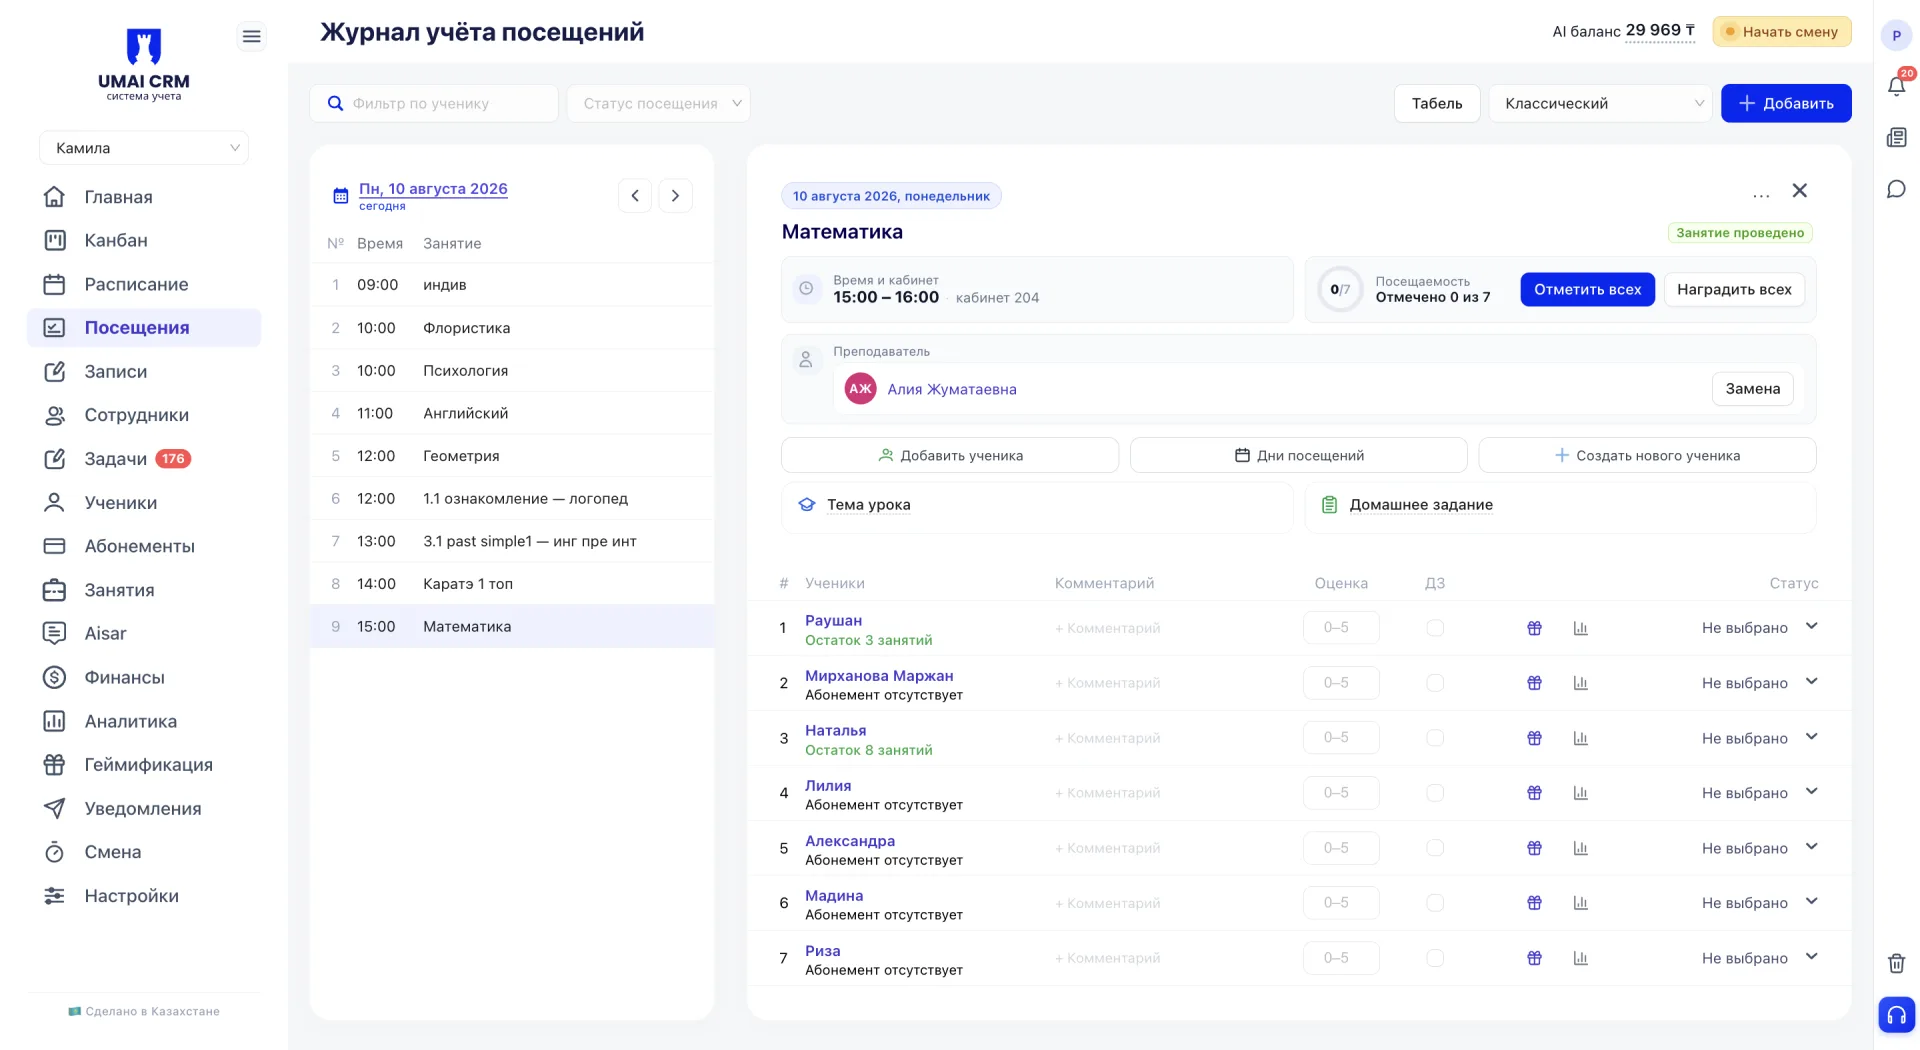
The Classes and which attendance marks will be shown on the right side of the screen depend on the selected date.
On the left there is a list of Classes with time and title, on the right the details of the selected Class.
2. Top control panel
Control elements are located at the top of the page:
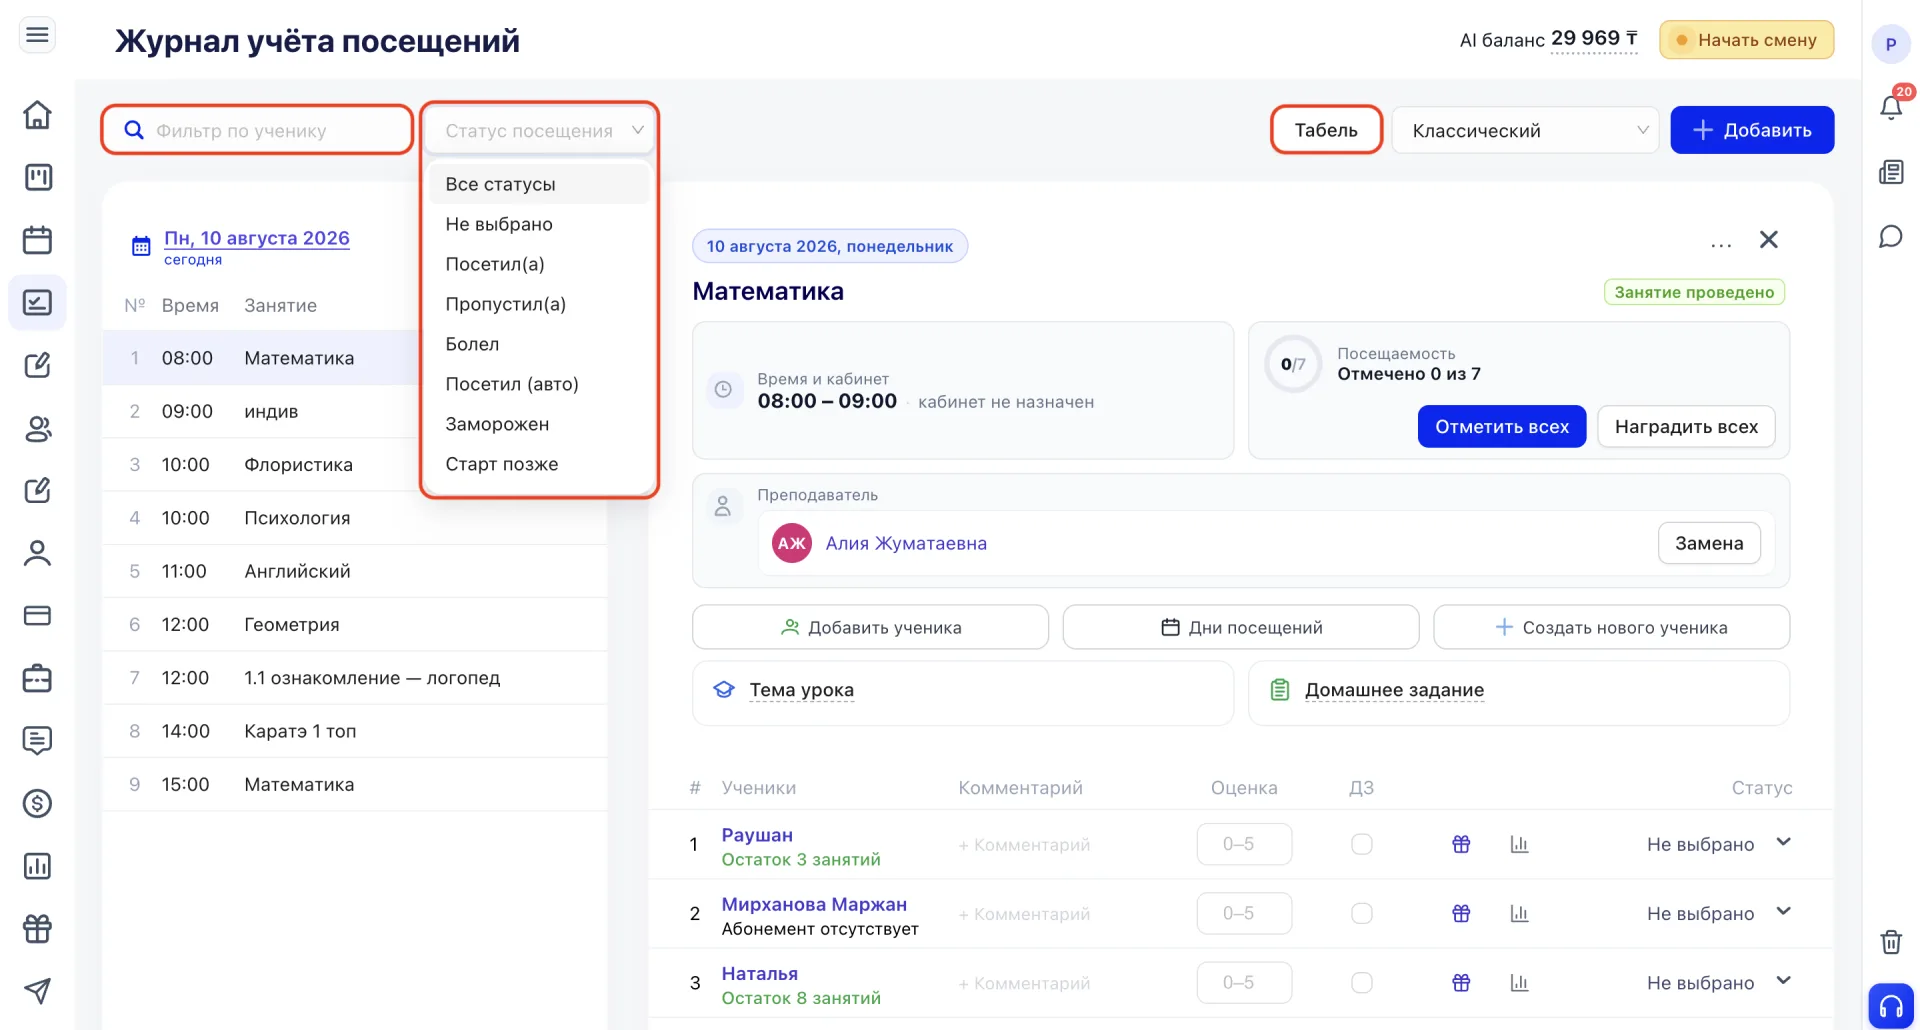
- Student filter — narrows the list of Classes to those in which a specific Student participates;
- Status filter — displays only Classes with selected attendance marks, which is convenient for searching, for example, all absences;
- "Tabel" button — opens the attendance register, where data from this section are collected in a consolidated view.
- "Classic" — list of Classes by time;
- "By Teachers" — grouping by Teachers;
- "+ Add" — manual addition of a Class to the journal (журнал посещений).
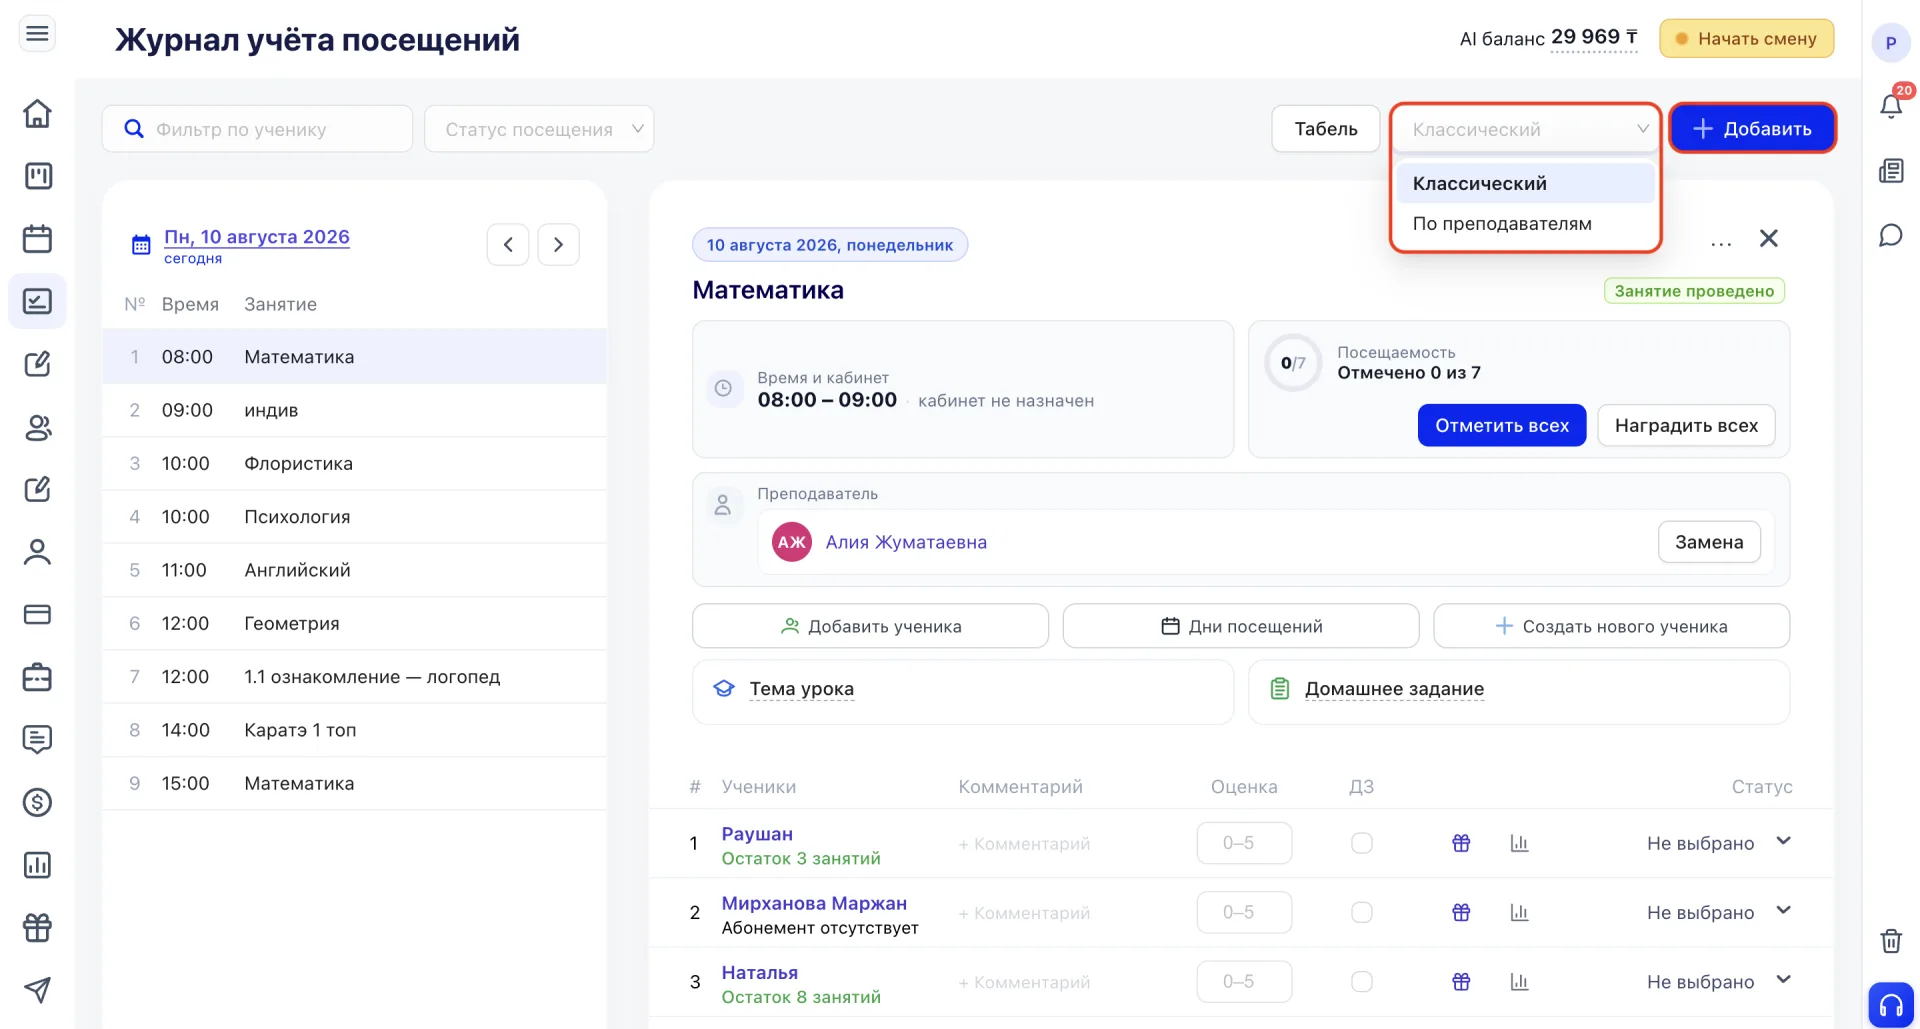
These filters help quickly find the needed Class or analyze attendance.
3. Selecting a Class
The left column displays the list of Classes for the selected day with time and title. This is a quick way to see the full schedule for a specific date.
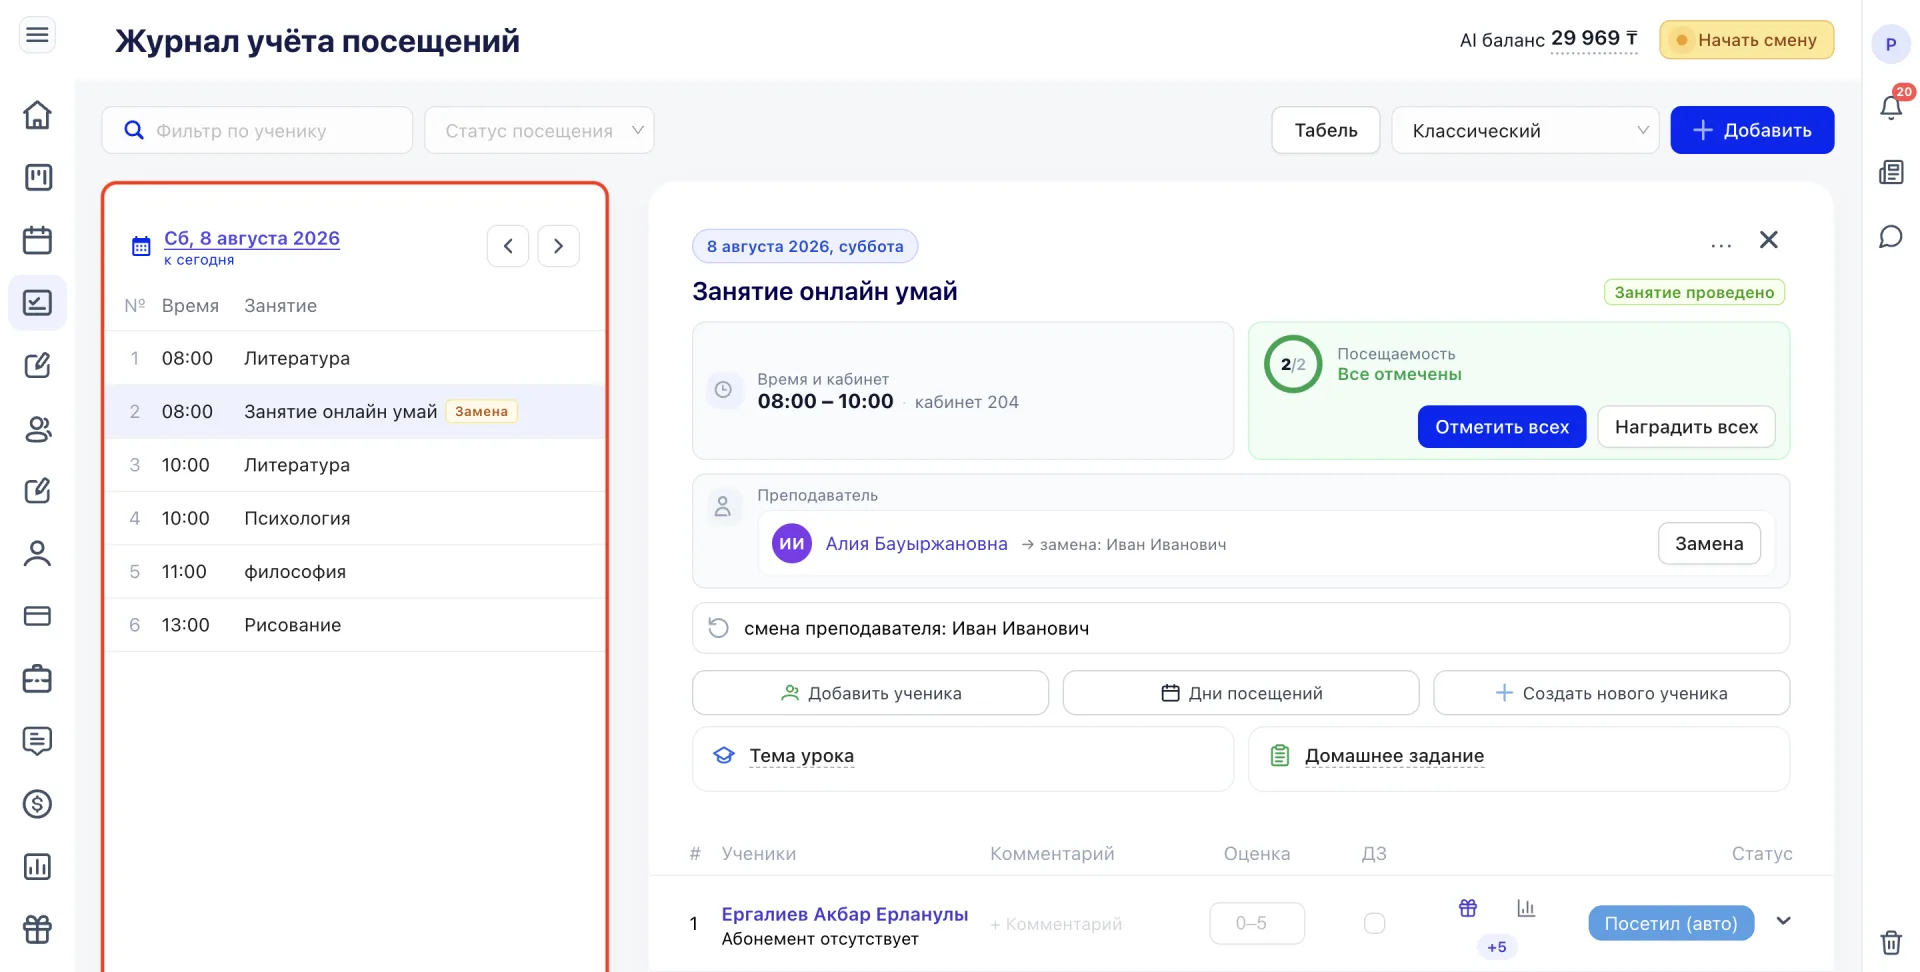
If a Teacher substitution took place for a Class, a "Substitution" tag appears next to its title in the list.
4. Class card
Clicking any Class opens its detailed card on the right side of the screen. It displays the date and time, assigned room, Teacher, and the status of the Class (for example, "Class held").
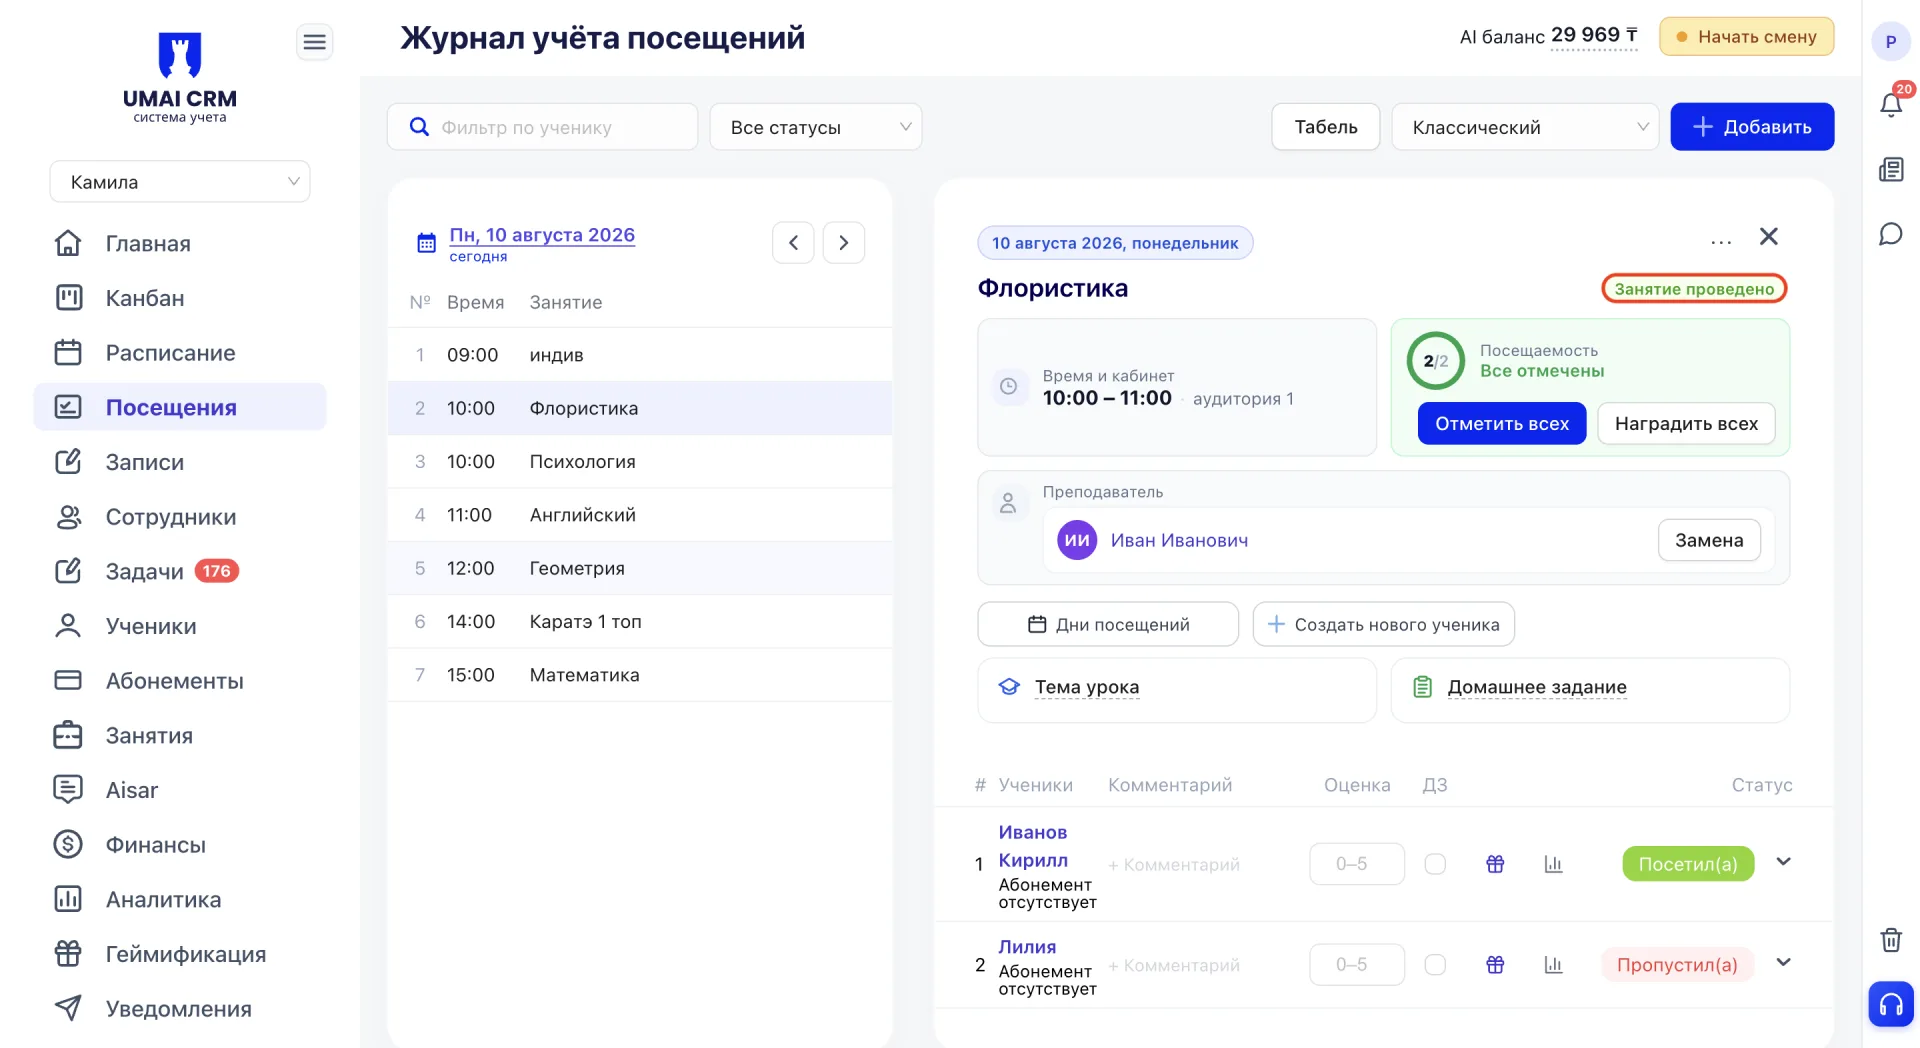
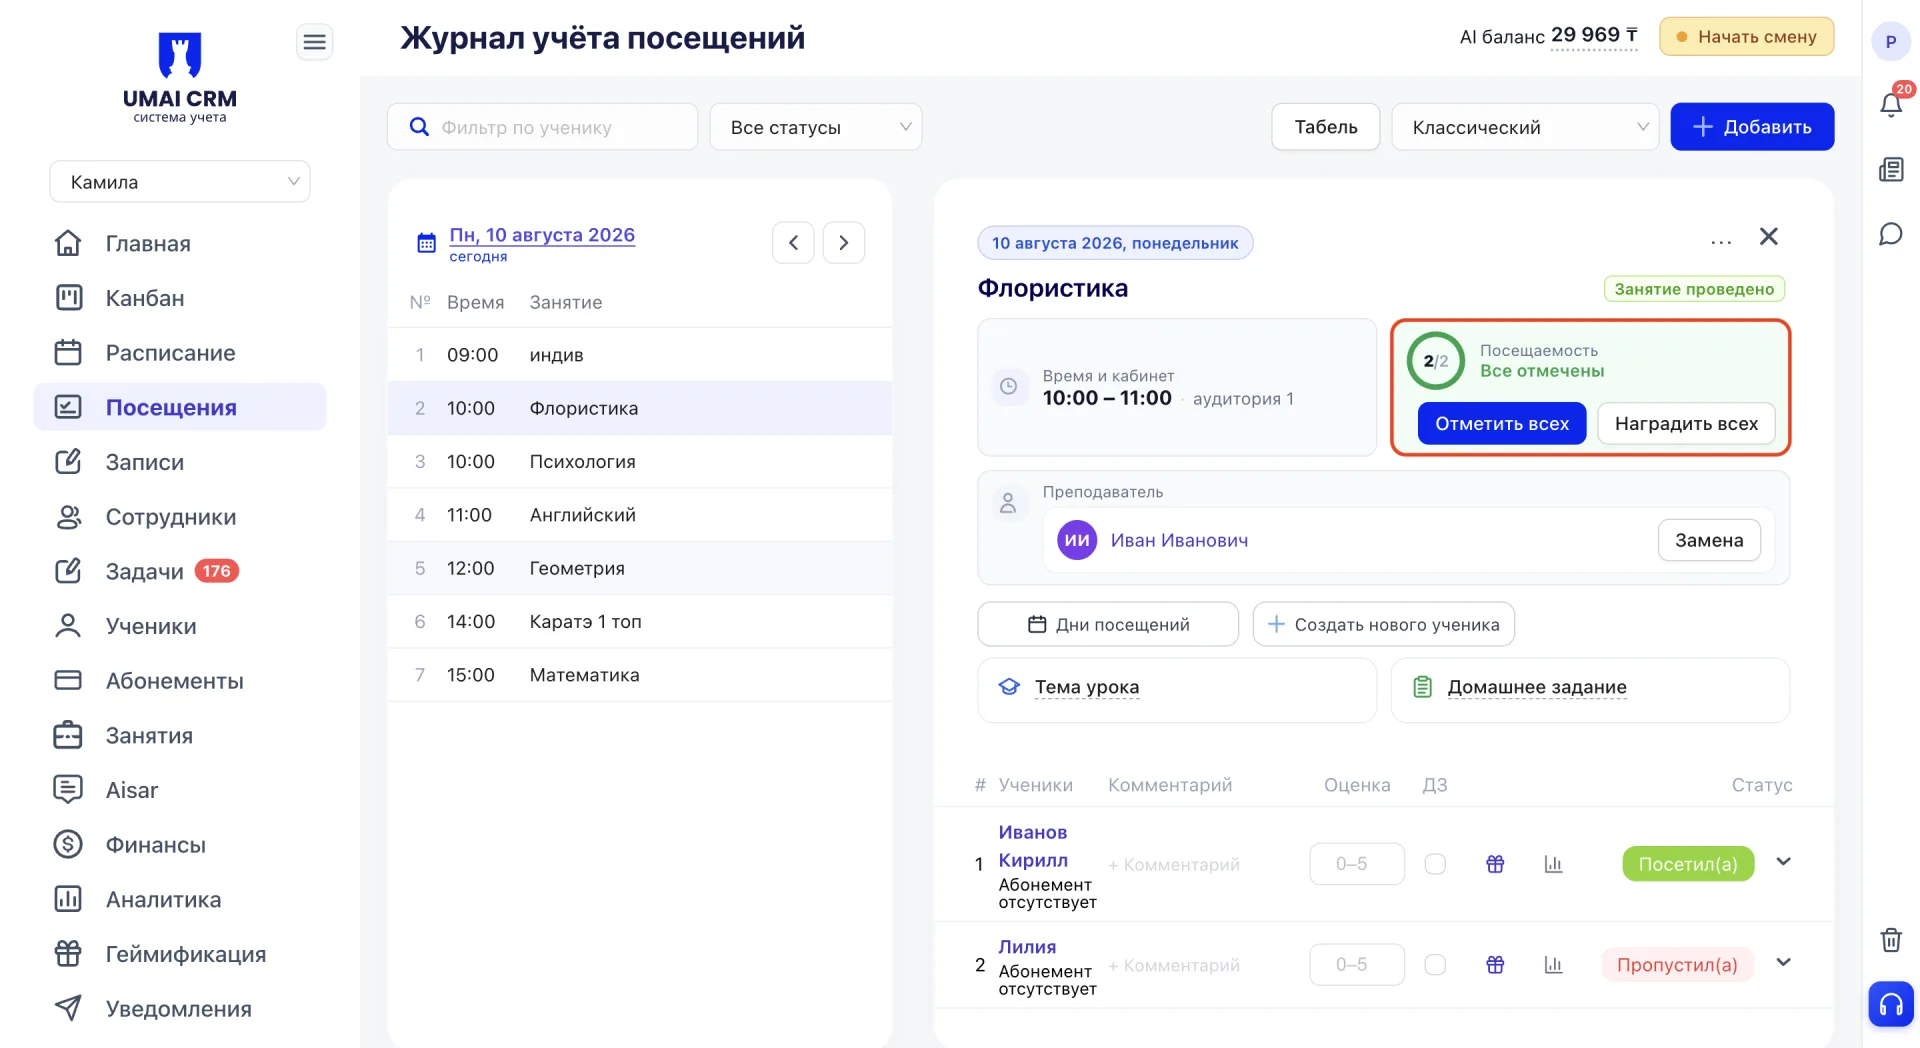
Additionally, a summary of attendance is shown: a circular indicator and a counter of marked Students out of the total, for example "Marked 5 of 9". This counter is formed based on Students' marks and updates automatically as they are applied. When all Students are marked, the indicator and label turn green and change to "All marked".
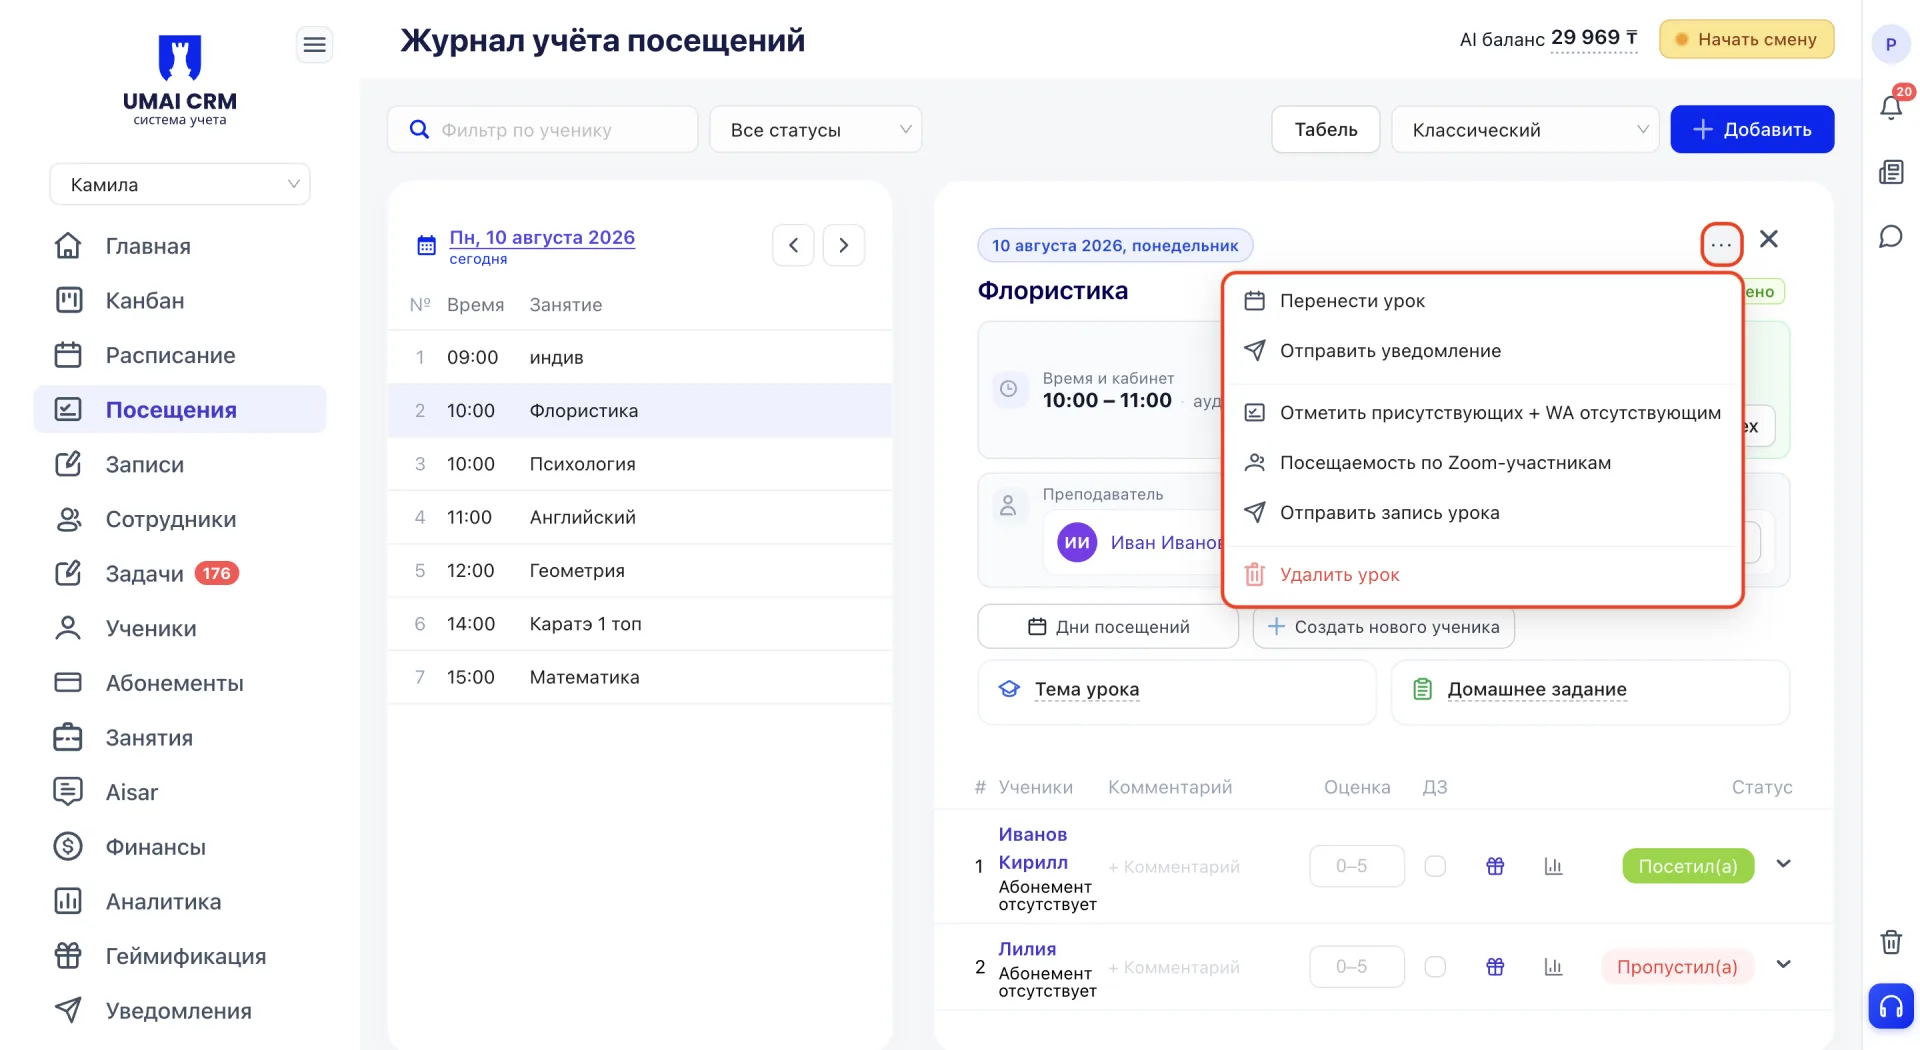
In the top right corner of the card there is an additional menu. Through it you can move the lesson to another date or time, send a notification to Students or delete the Class.
Also in this menu there are three functions available that require a pre-connected Zoom integration.
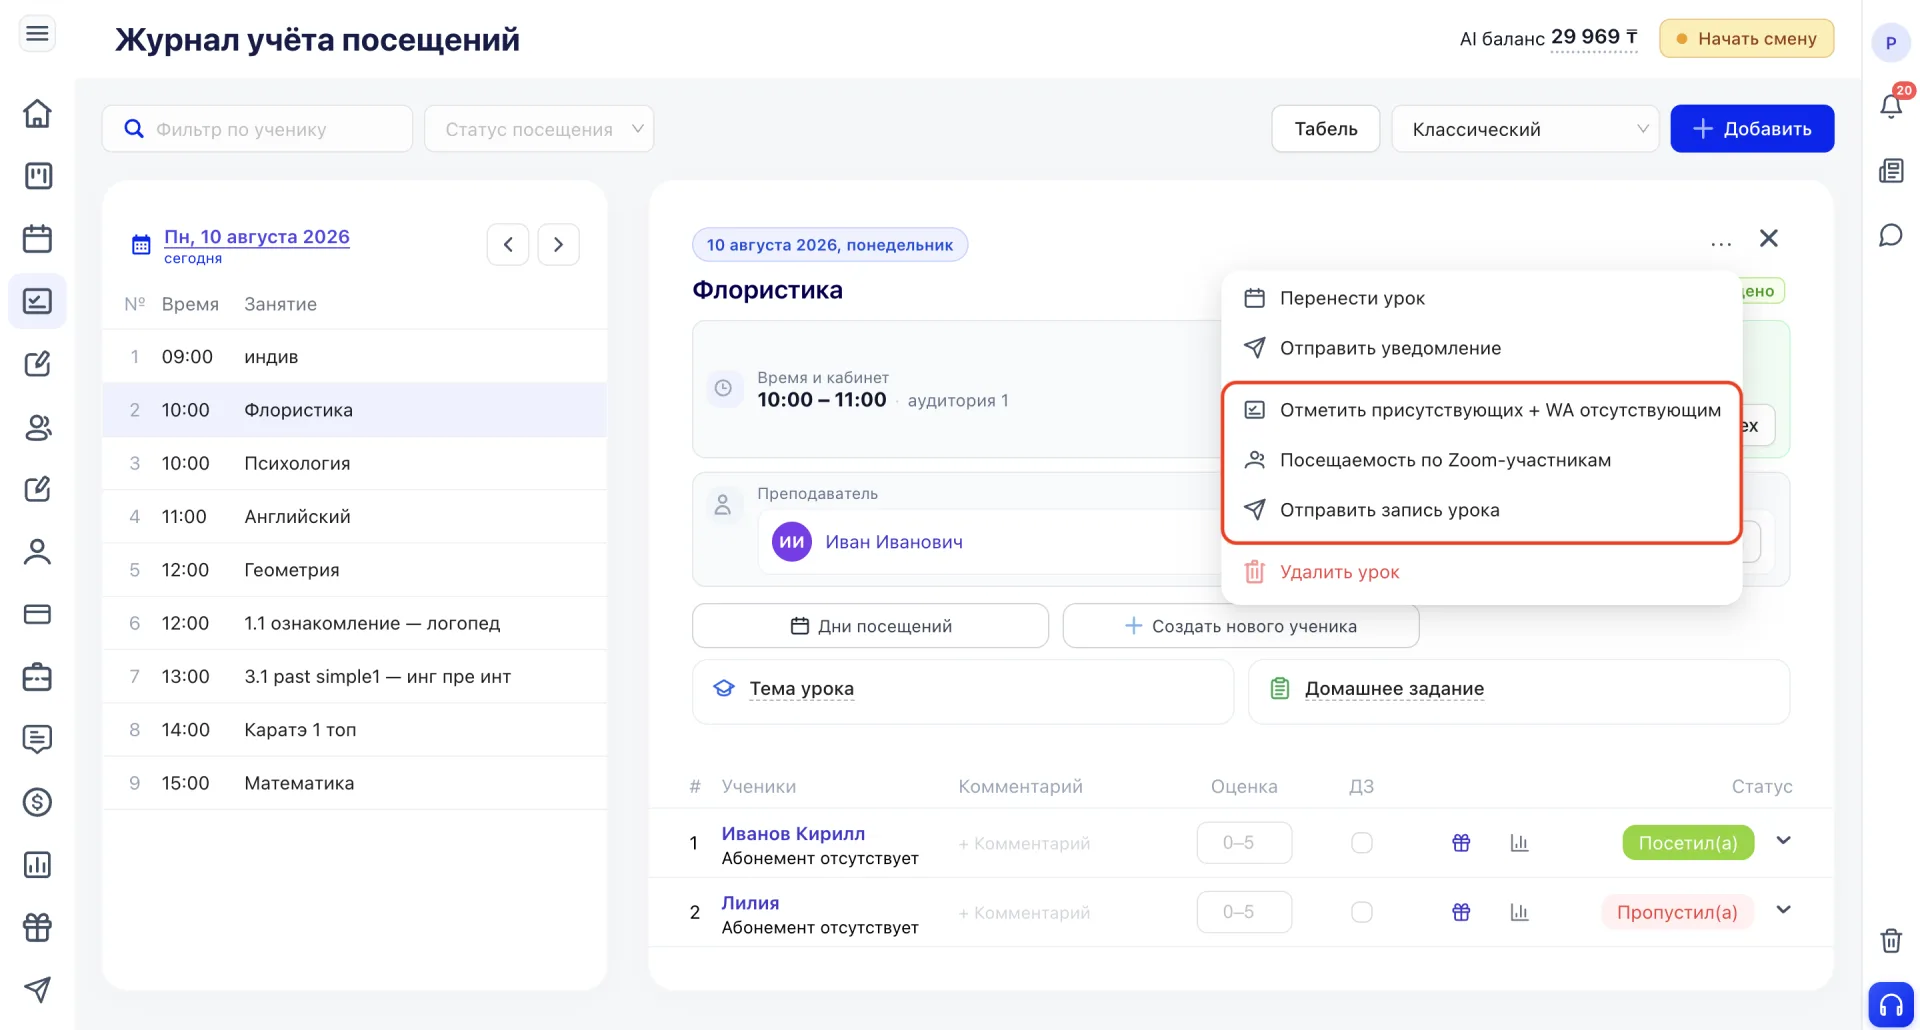
For them to work, the Class must have a Zoom conference link specified. It is added in the Classes section, in the card of the specific lesson, when creating or editing it. The link can be connected either through the Zoom integration or manually by pasting a permanent link into the corresponding field.
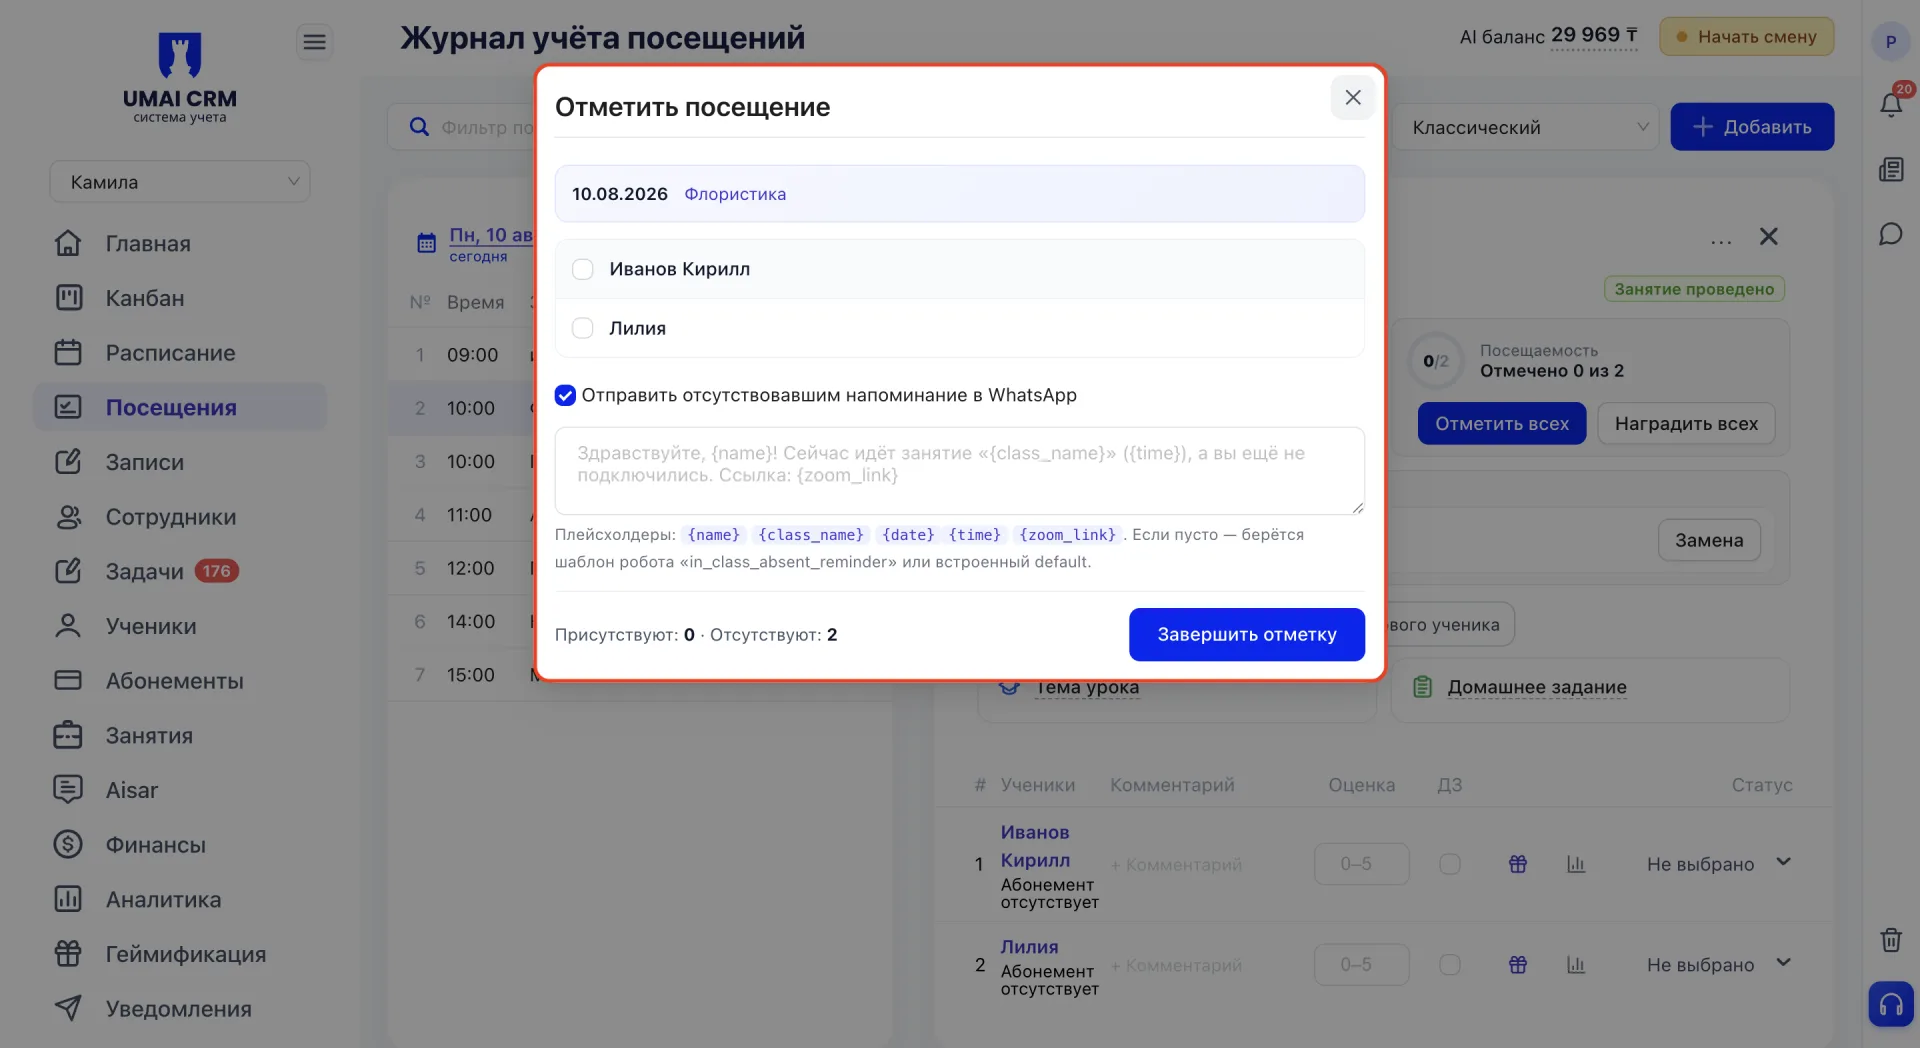
- "Mark attendees + WA to absentees" — opens the "Mark attendance" window with a list of the Class's Students where you mark those present. A separate checkbox allows sending a reminder to absent Students via WhatsApp. The reminder text can be set manually using placeholders {name}, {class_name}, {date}, {time}, {zoom_link}, which the system will substitute automatically. If the text field is left empty, the standard notification template is used. The window shows a counter of present and absent Students, and the action is completed with the "Finish marking" button.
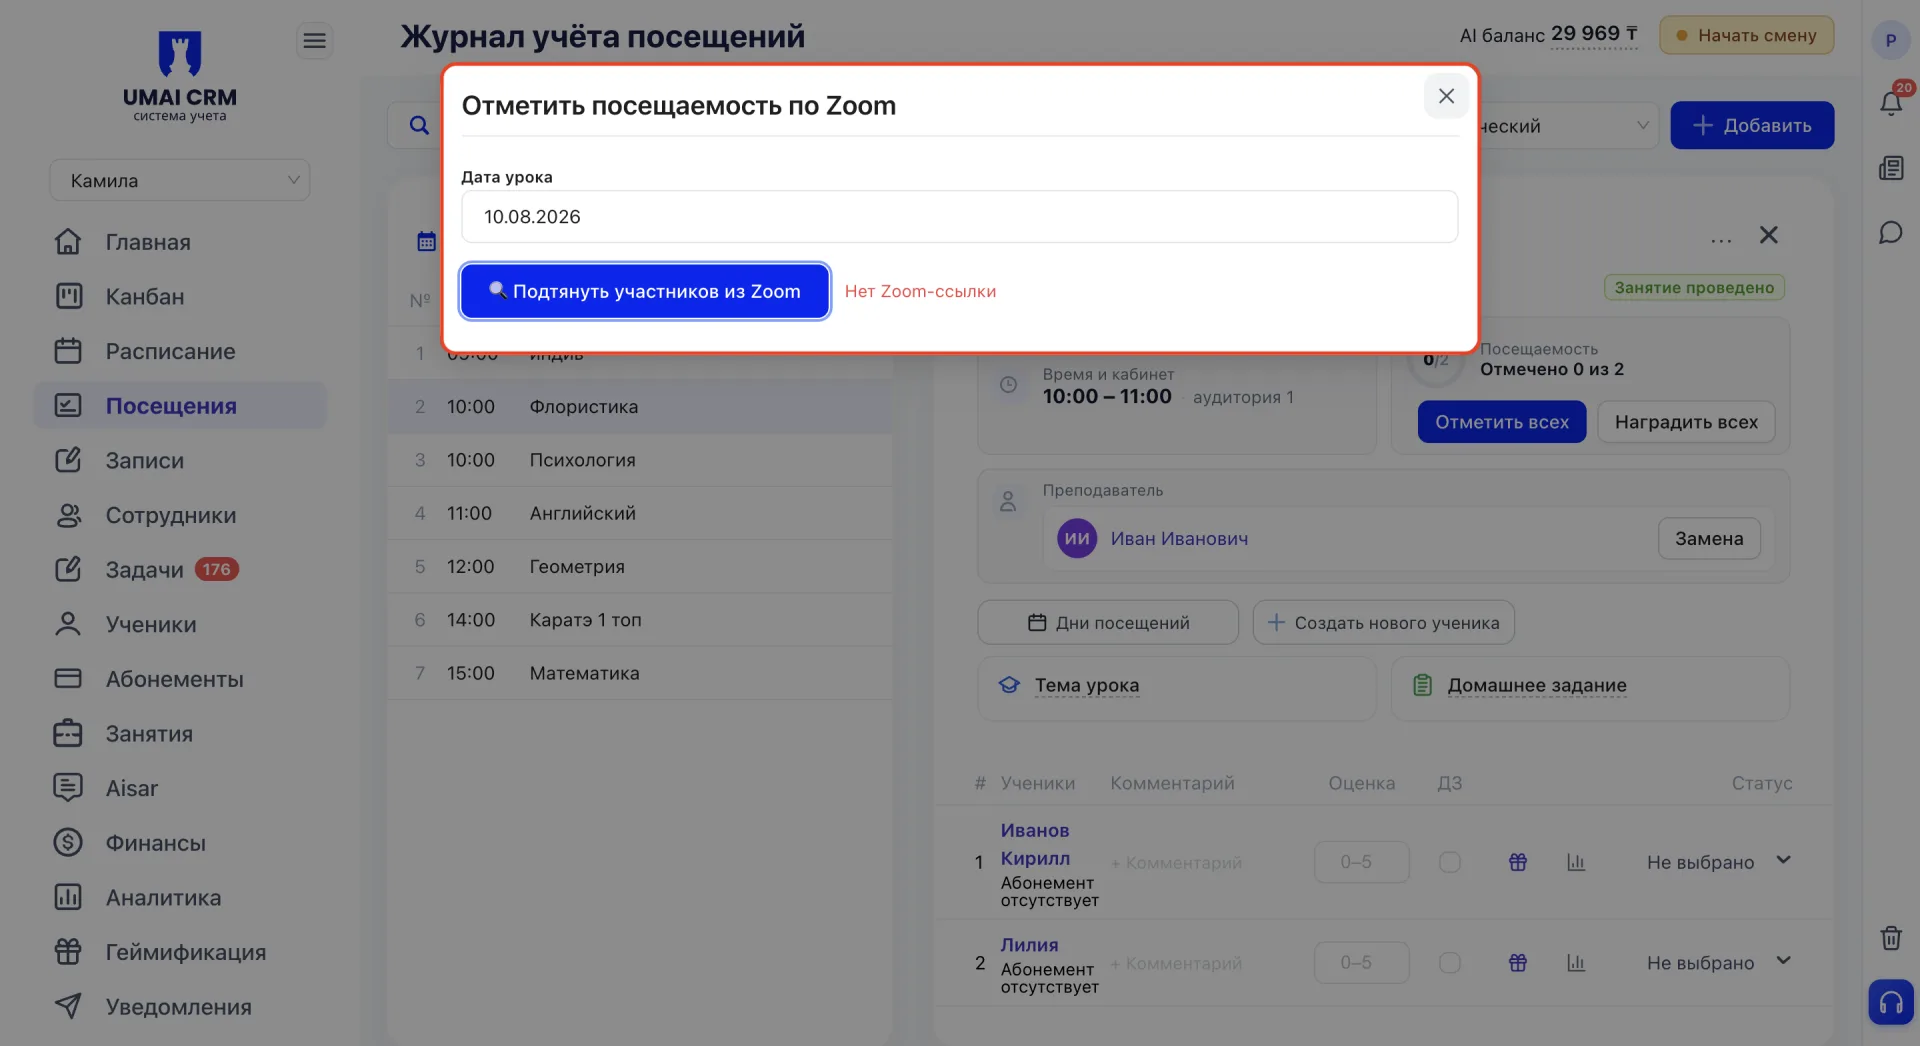
- "Attendance by Zoom participants" — opens the "Mark attendance by Zoom" window where you specify the lesson date and press the "Pull participants from Zoom" button. The system matches the conference participants' emails with Students' emails in their cards and automatically sets attendance marks based on matches. If a Zoom conference link was not attached to the Class, the system displays the message "No Zoom link" and participants cannot be pulled.
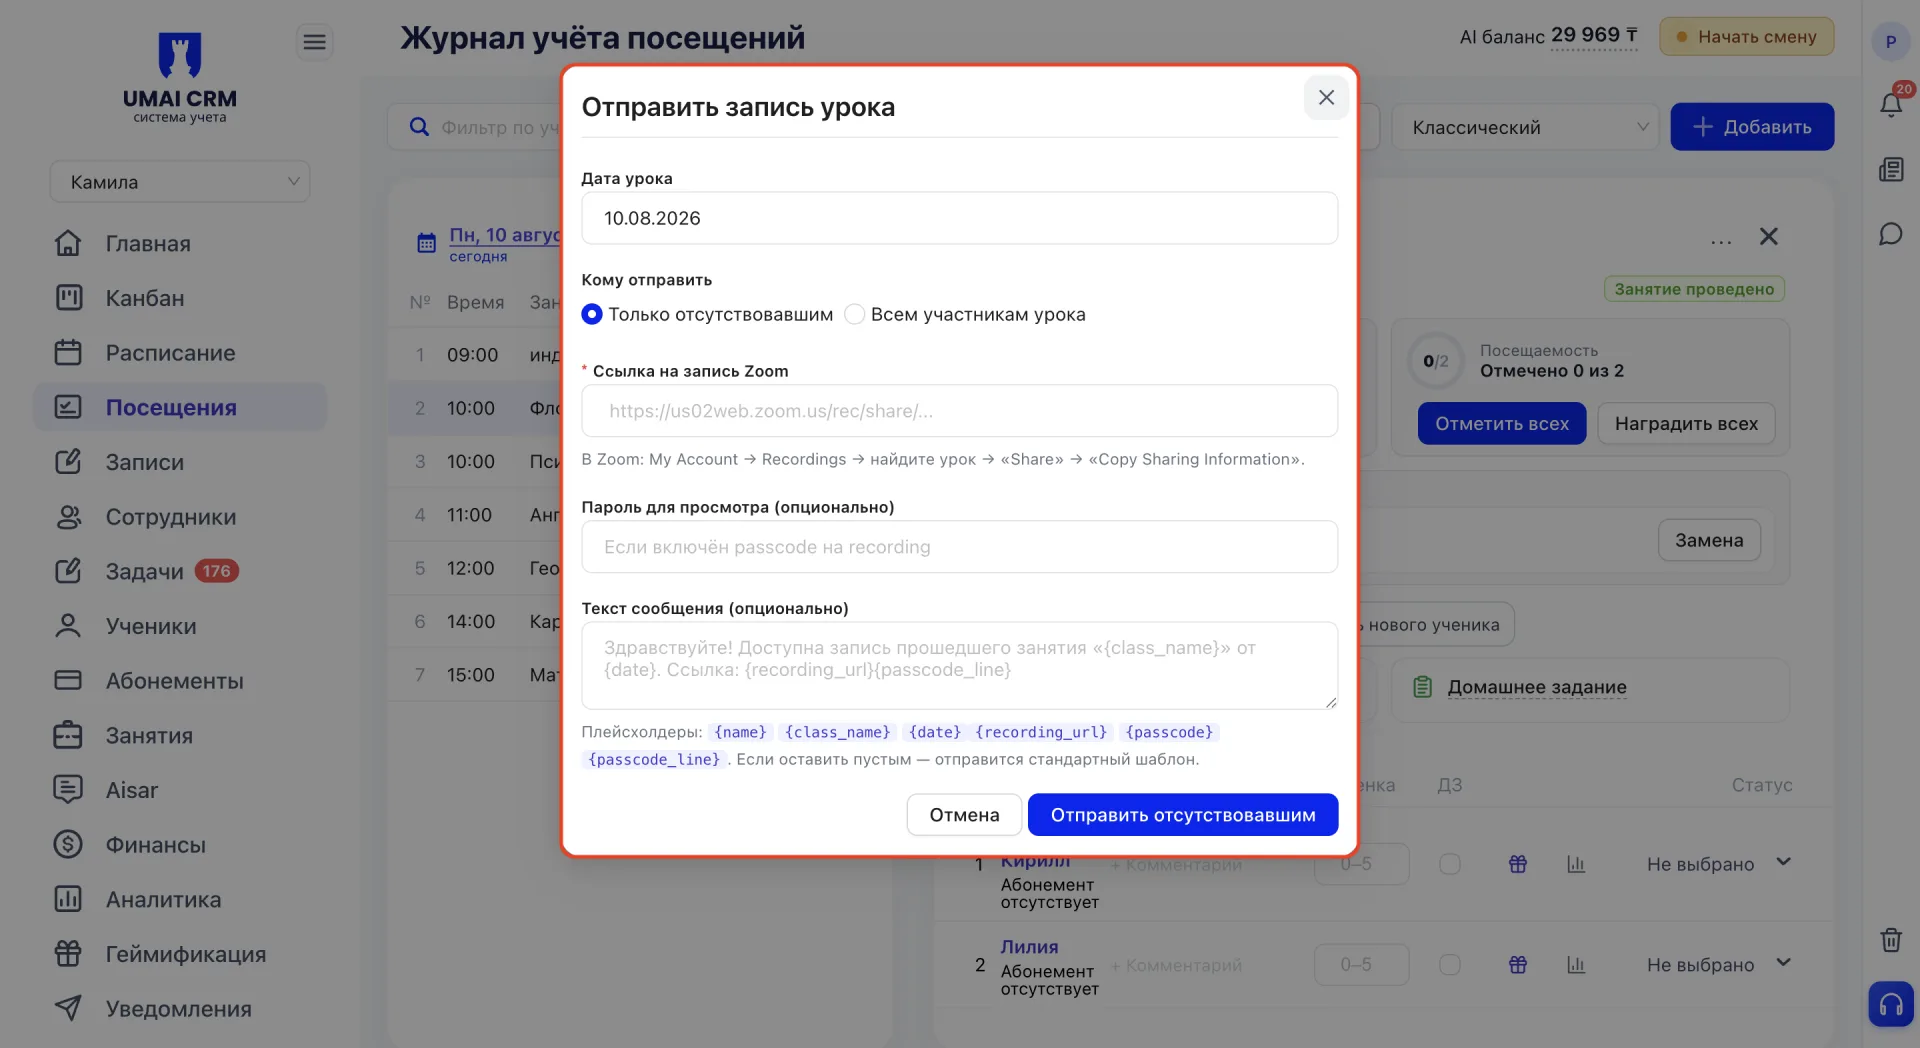
- "Send lesson recording" — opens the "Send lesson recording" window where you specify the lesson date and recipients: only those absent from the Class or all participants of the lesson. The required field is the link to the recording in Zoom, which can be copied in your Zoom account (Recordings section, the lesson, "Share", then "Copy Sharing Information"). You can also specify a viewing password if enabled, and write your own message text using placeholders {name}, {class_name}, {date}, {recording_url}, {passcode}, {passcode_line}. If the text is not filled, the standard template is sent.
All these actions allow you to manage the Class promptly without going to other sections of the system.
Below are the buttons "Add Student", "Attendance days" and "Create new Student".
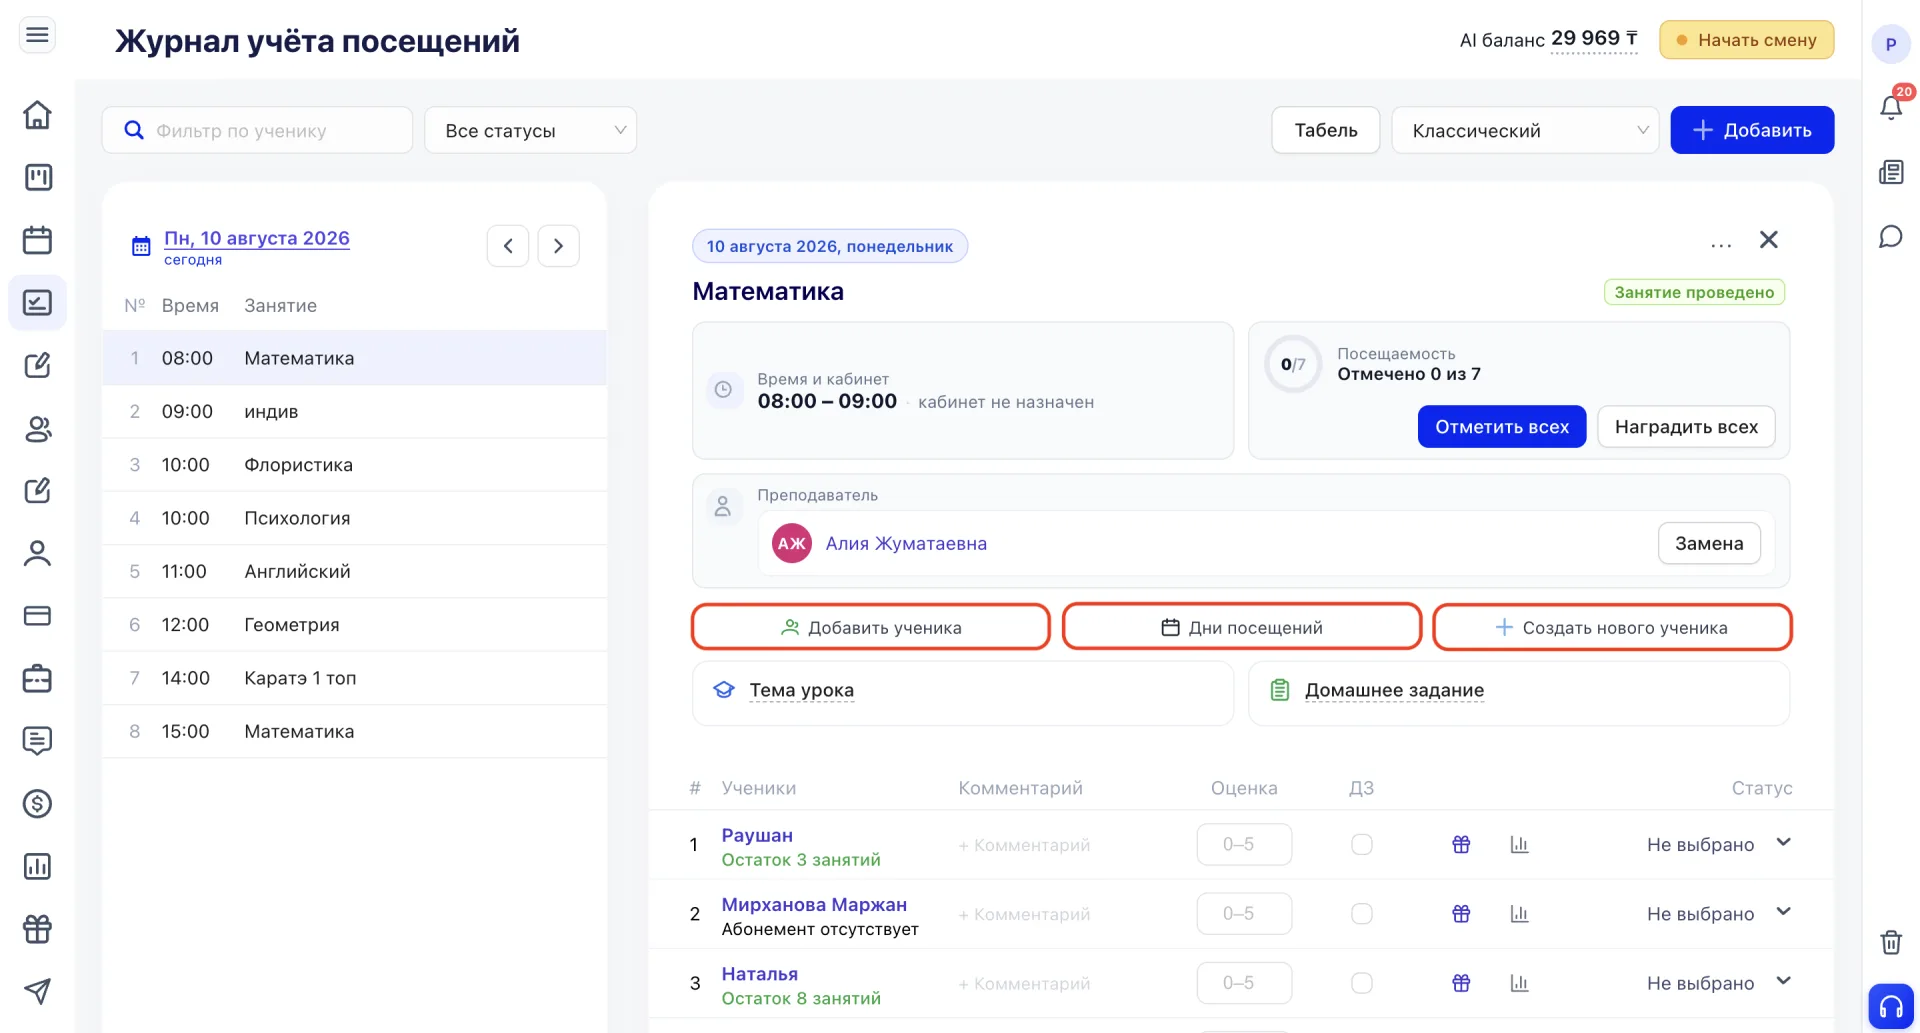
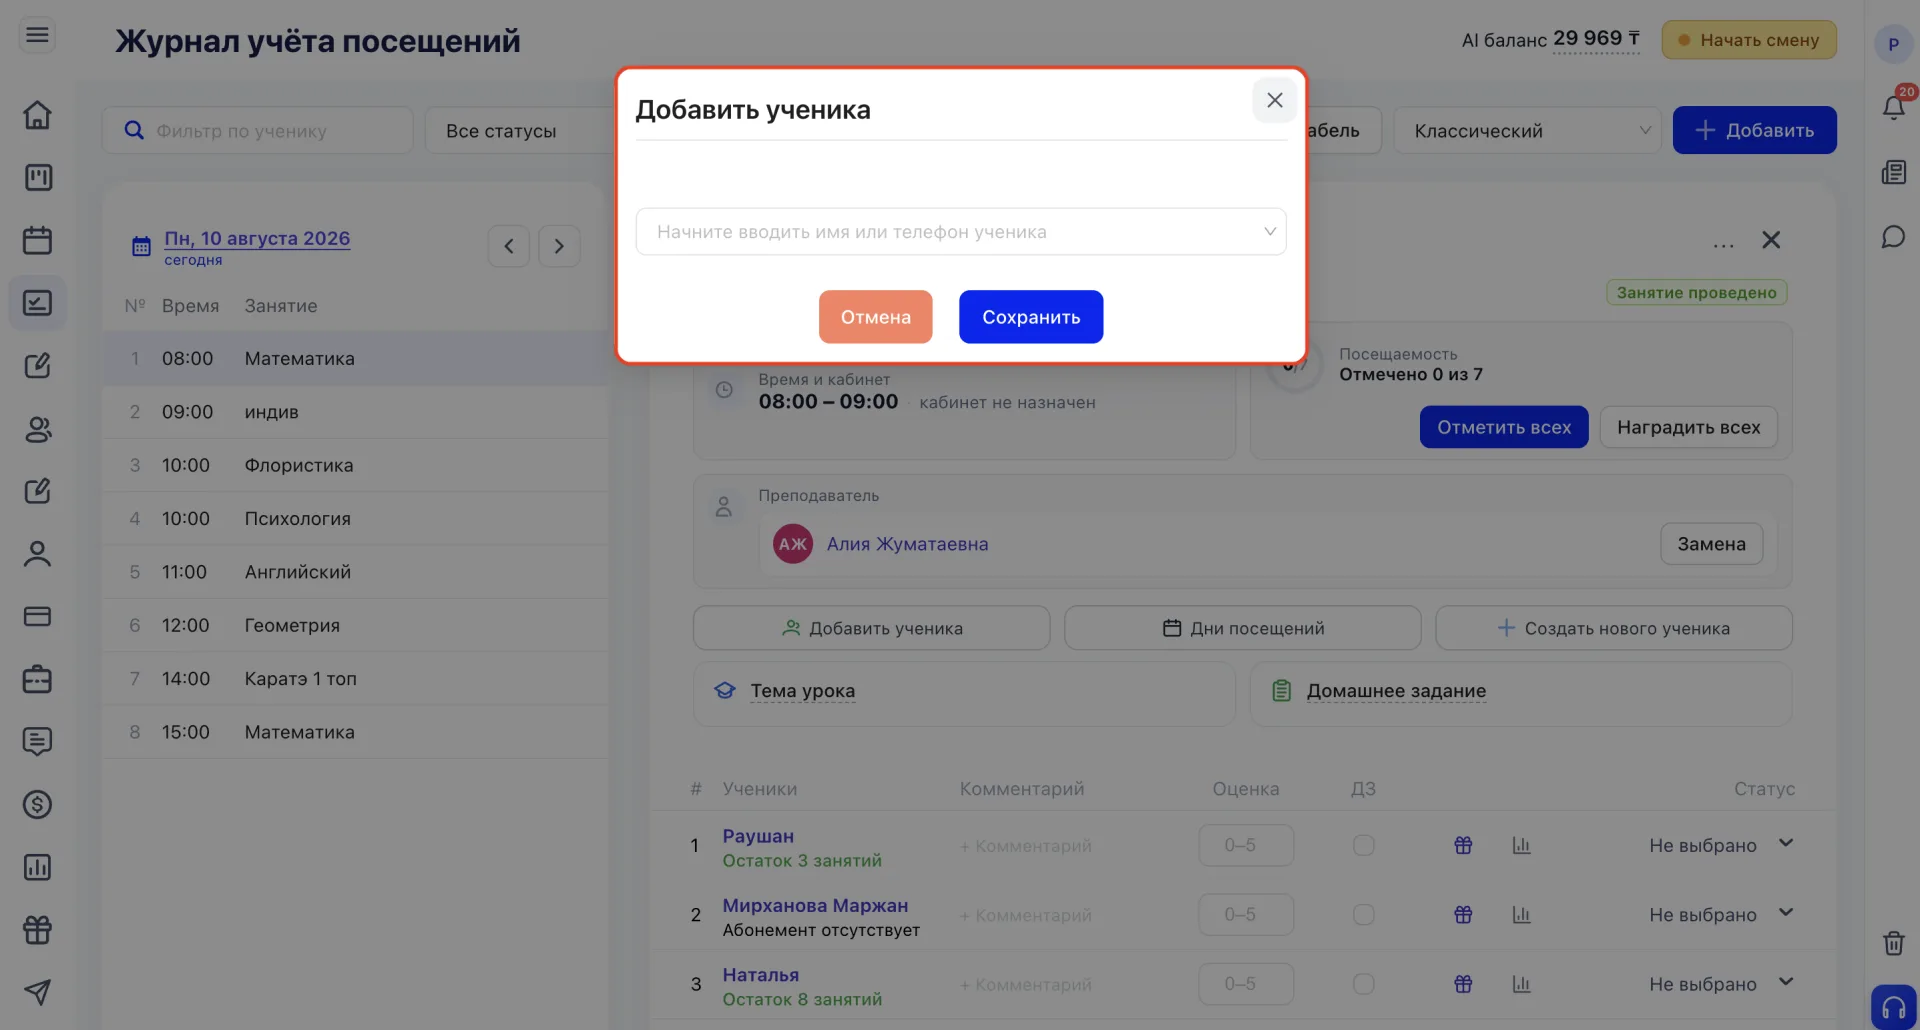
- "Add Student" — assigns an existing Student in the system to this Class via search by name or phone.
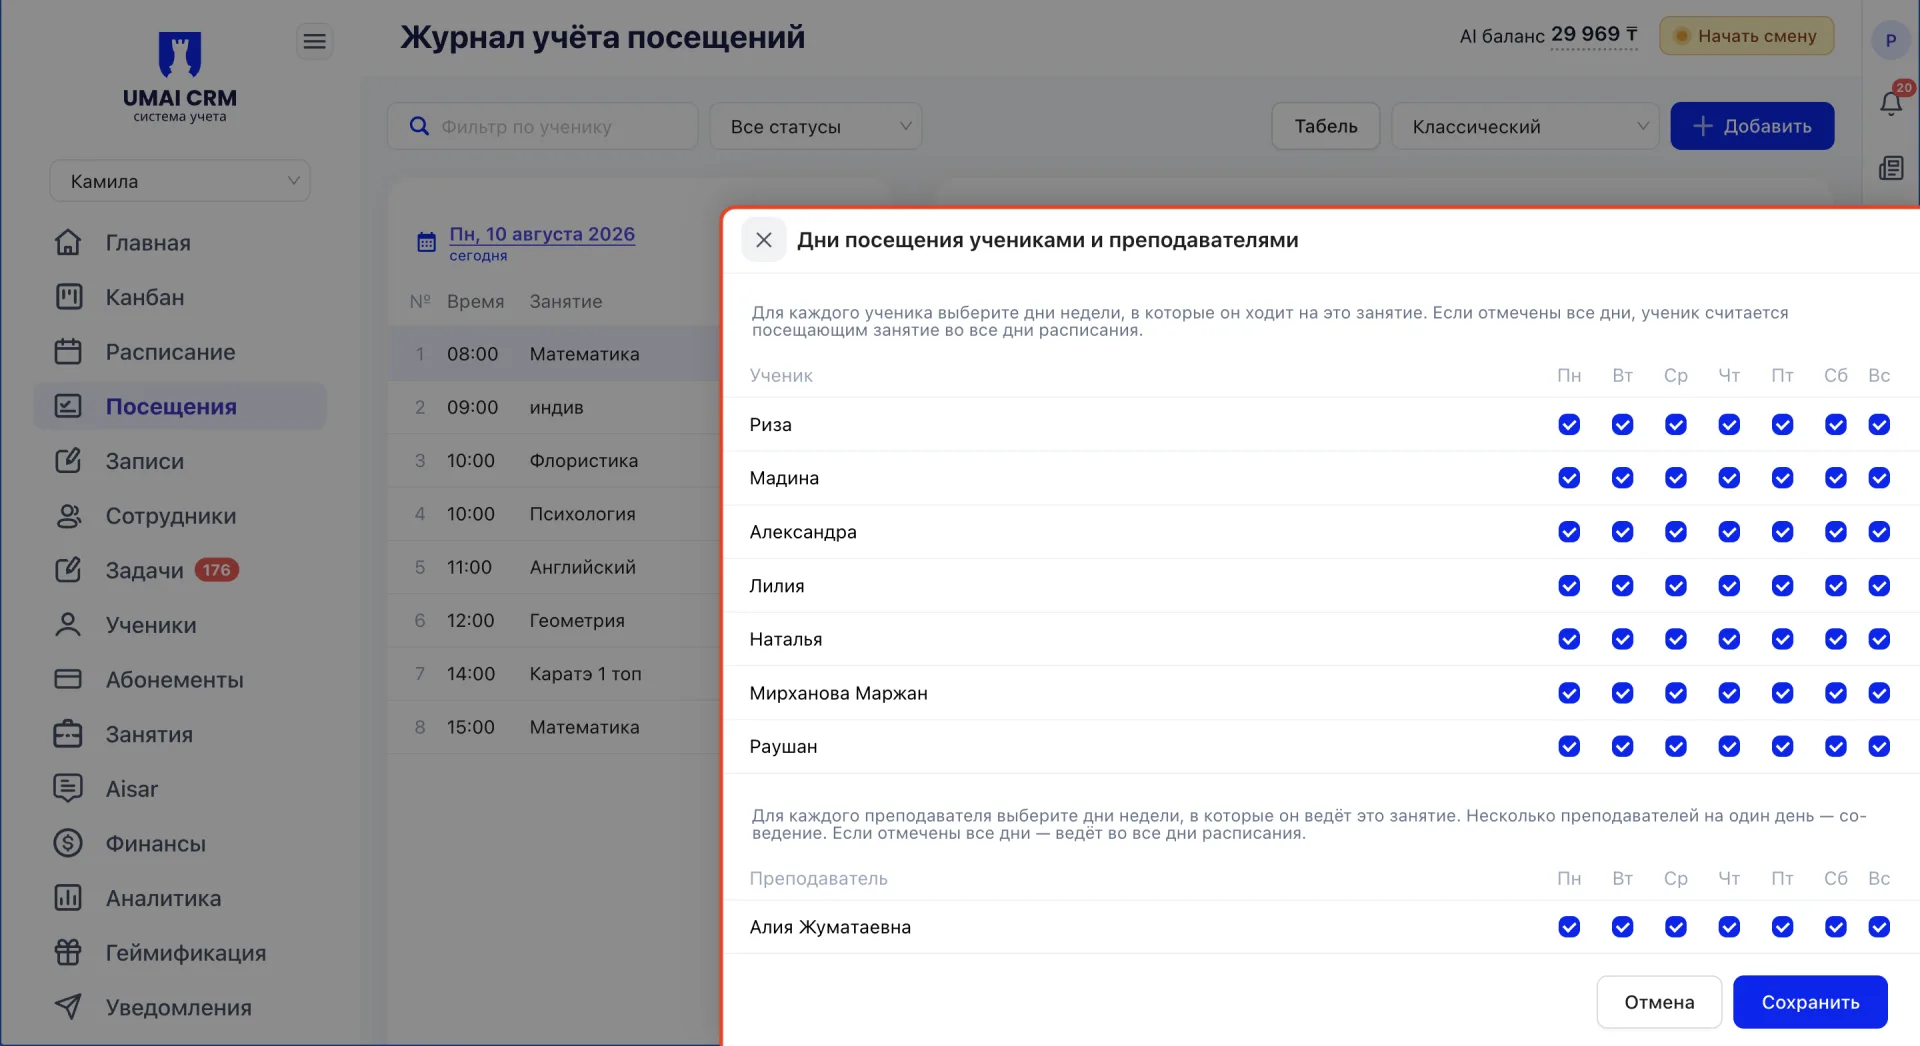
- "Attendance days" — opens the "Attendance days for Students and Teachers" window. In it you can mark the days of the week each Student and each Teacher attends or teaches this Class.
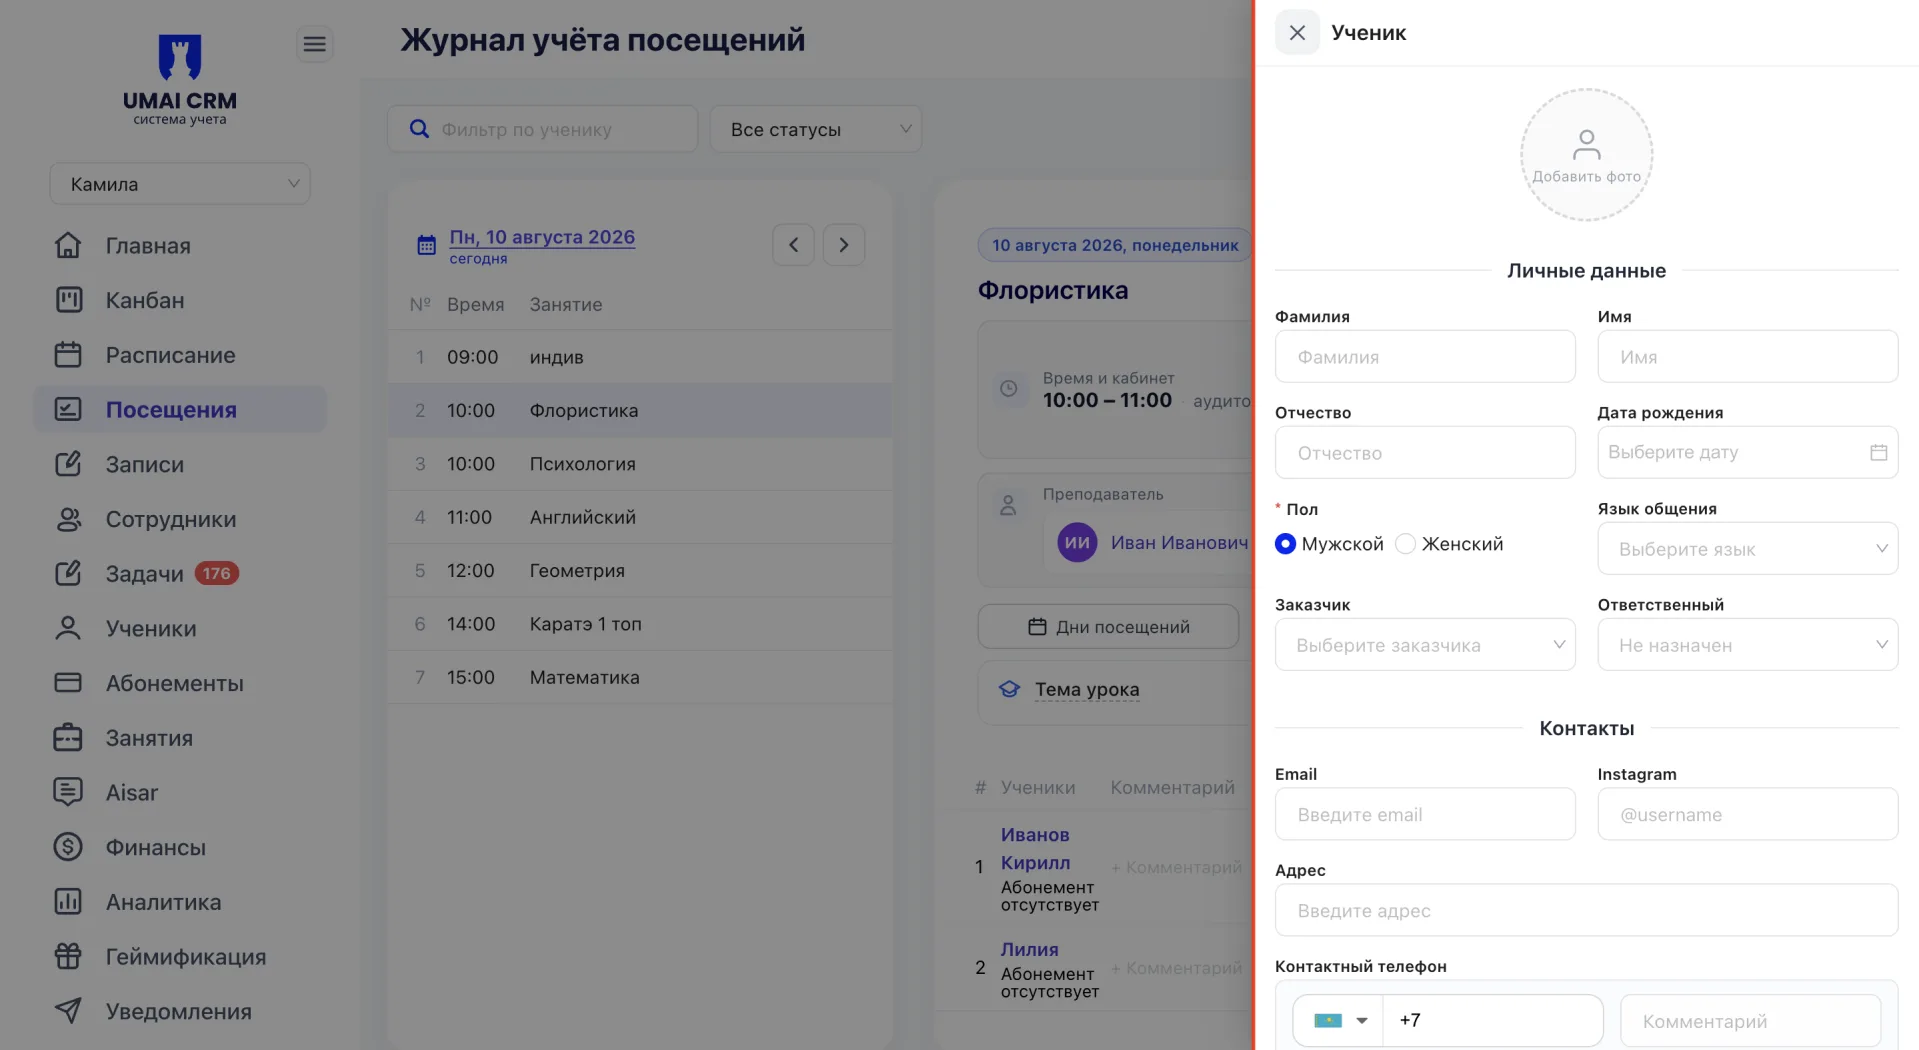
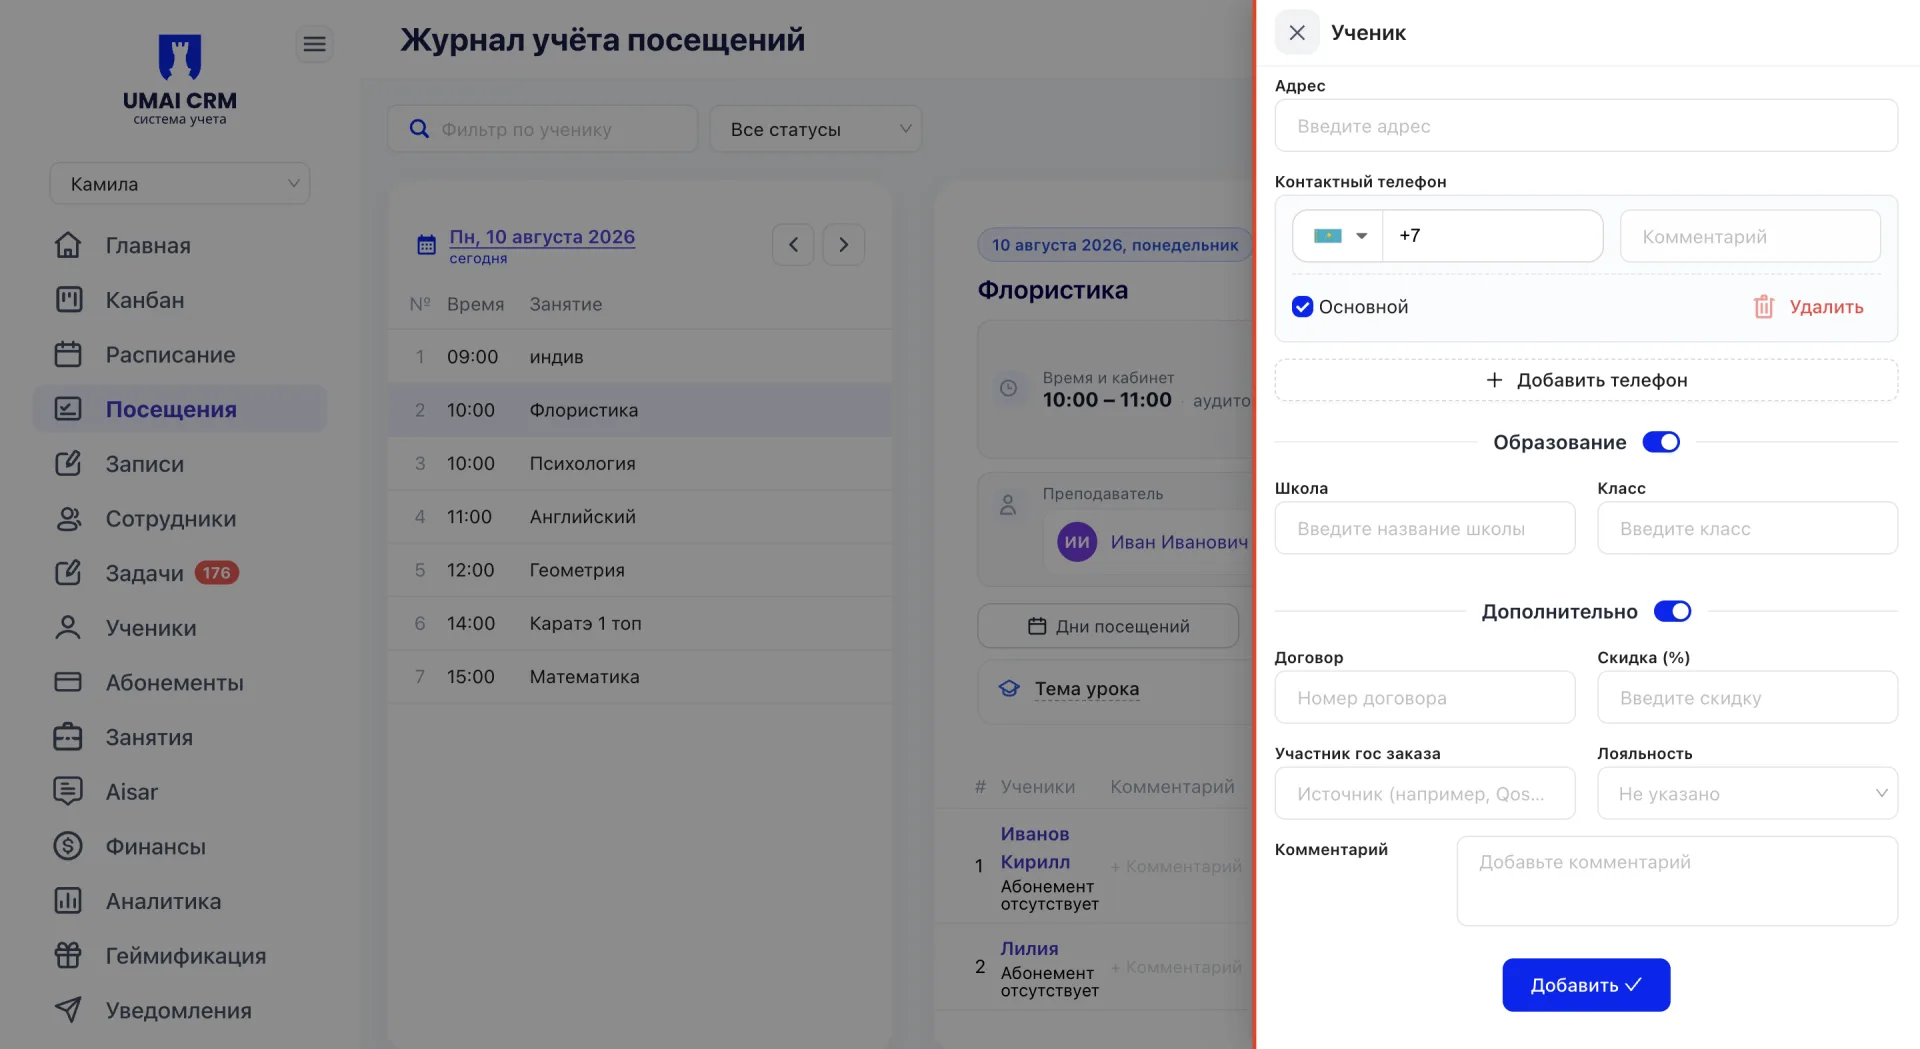
- "Create new Student" — opens the full form to create a Student card right from the attendance journal (журнал посетений), with sections "Personal data", "Contacts", "Education" and "Additional". After saving the new Student is assigned to this Class without leaving the journal.
Lesson topic and homework
In the Class card you can additionally fill in the lesson topic and homework. These two fields are saved independently of each other, each with its own button.
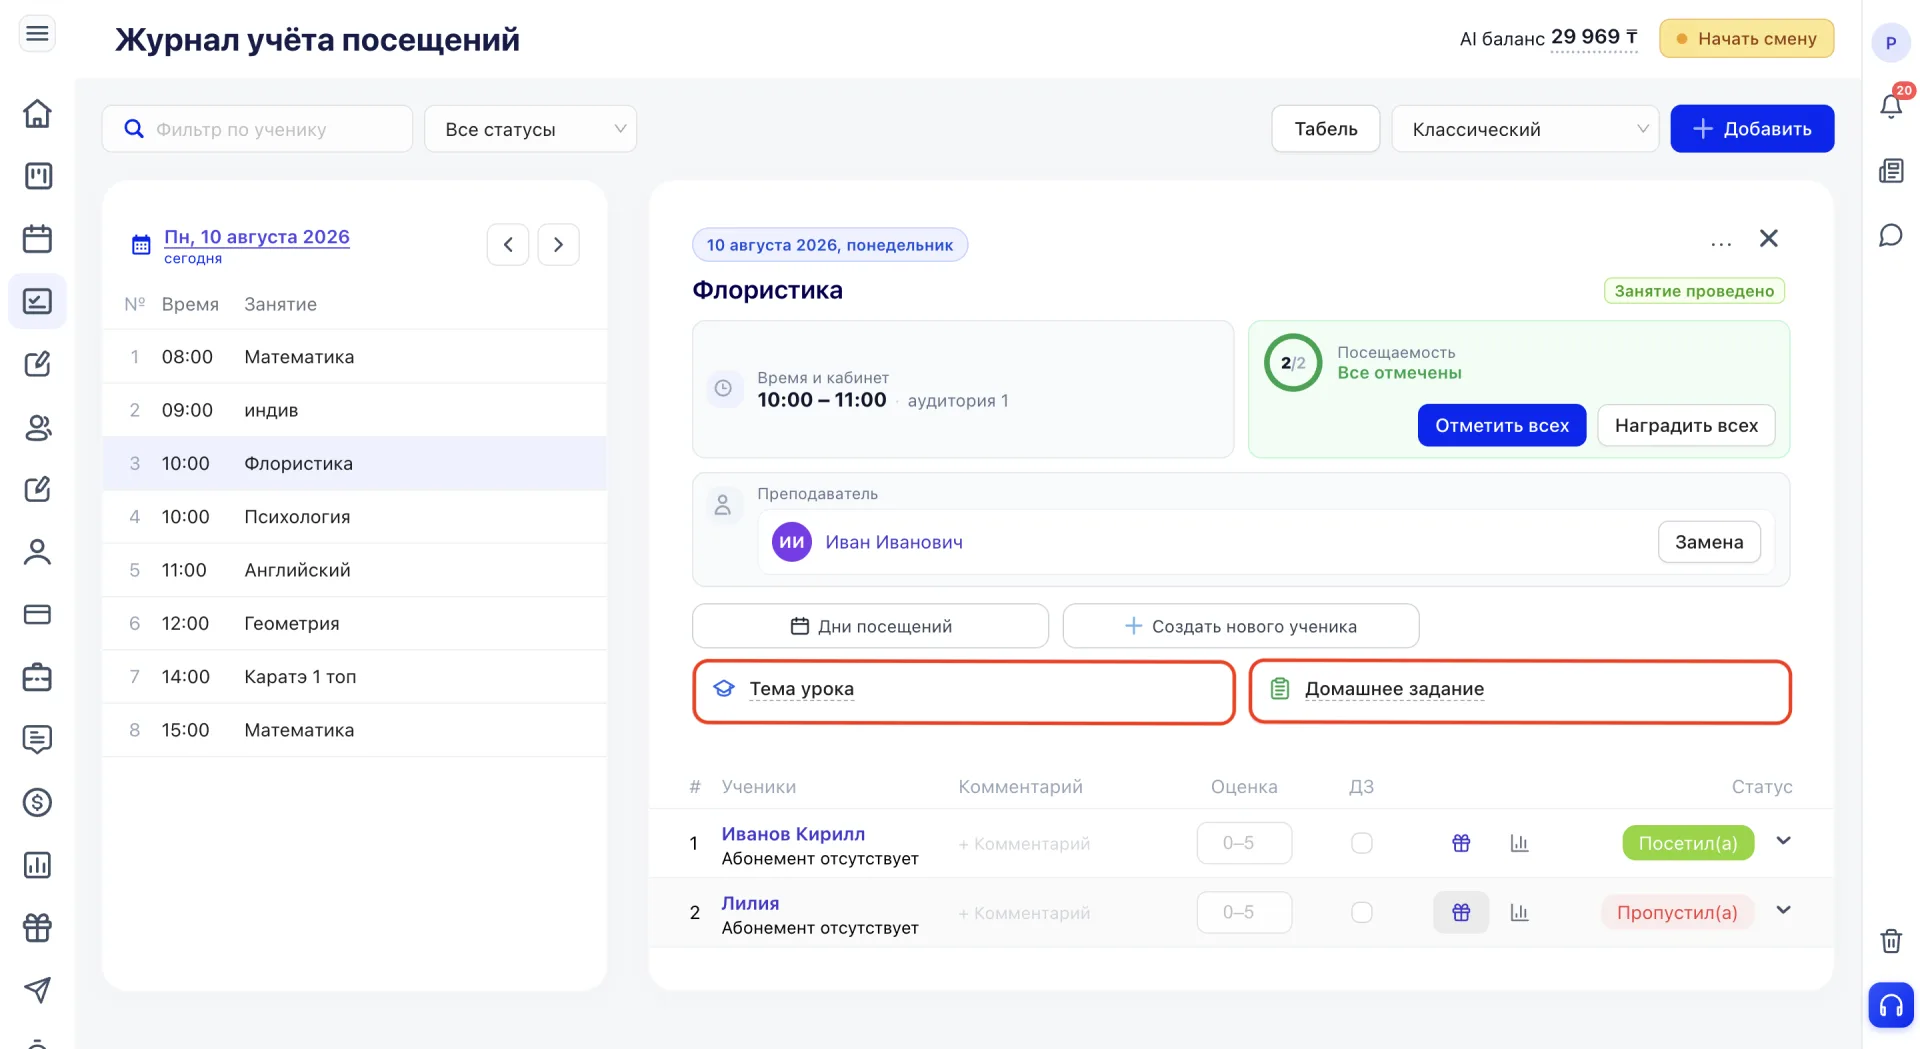
The lesson topic can be entered manually in a text field or chosen from a ready lesson via the "Select lesson from learning stages" button. In this case the topic is pulled automatically from a pre-made training plan in the Learning stages (Ступени обучения), which avoids re-entering it for each Class. After filling, the topic is saved with the "Save topic" button.
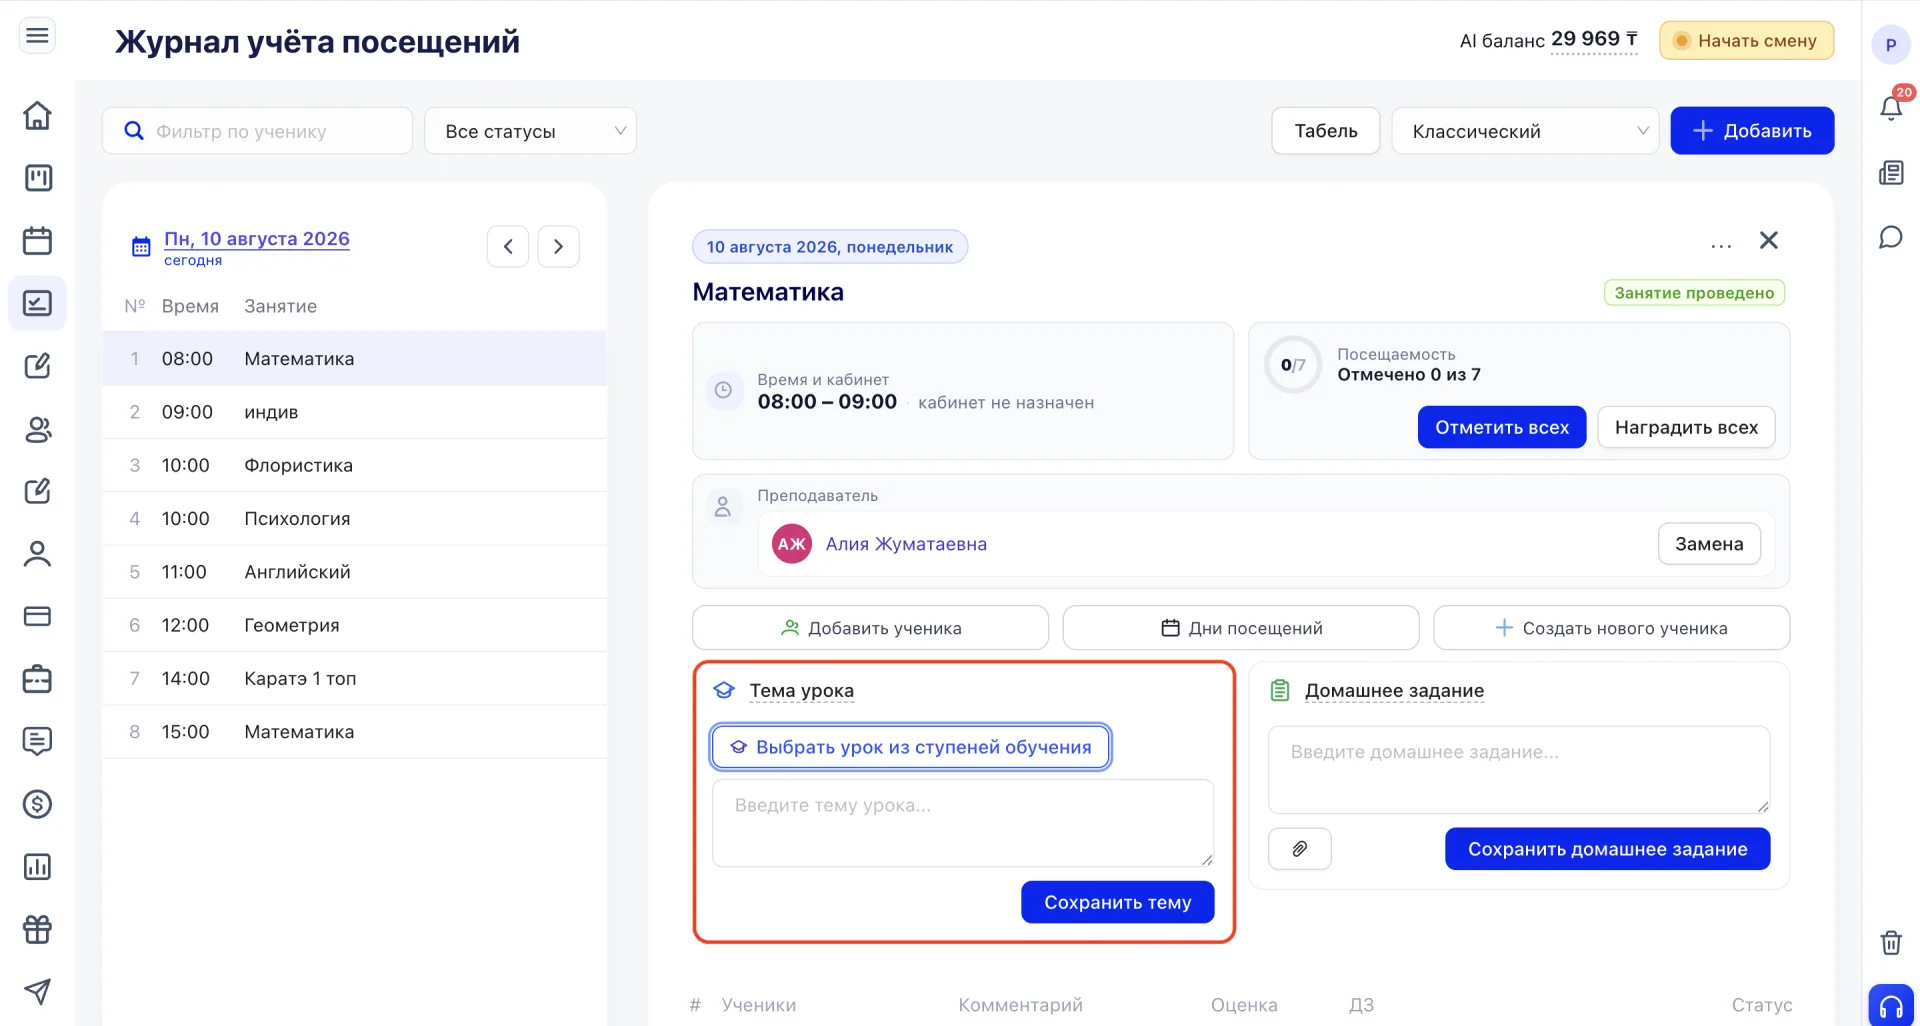
Homework is entered in a separate text field. A file can be attached to the homework via the paperclip icon. After filling, the homework is saved with the "Save homework" button.
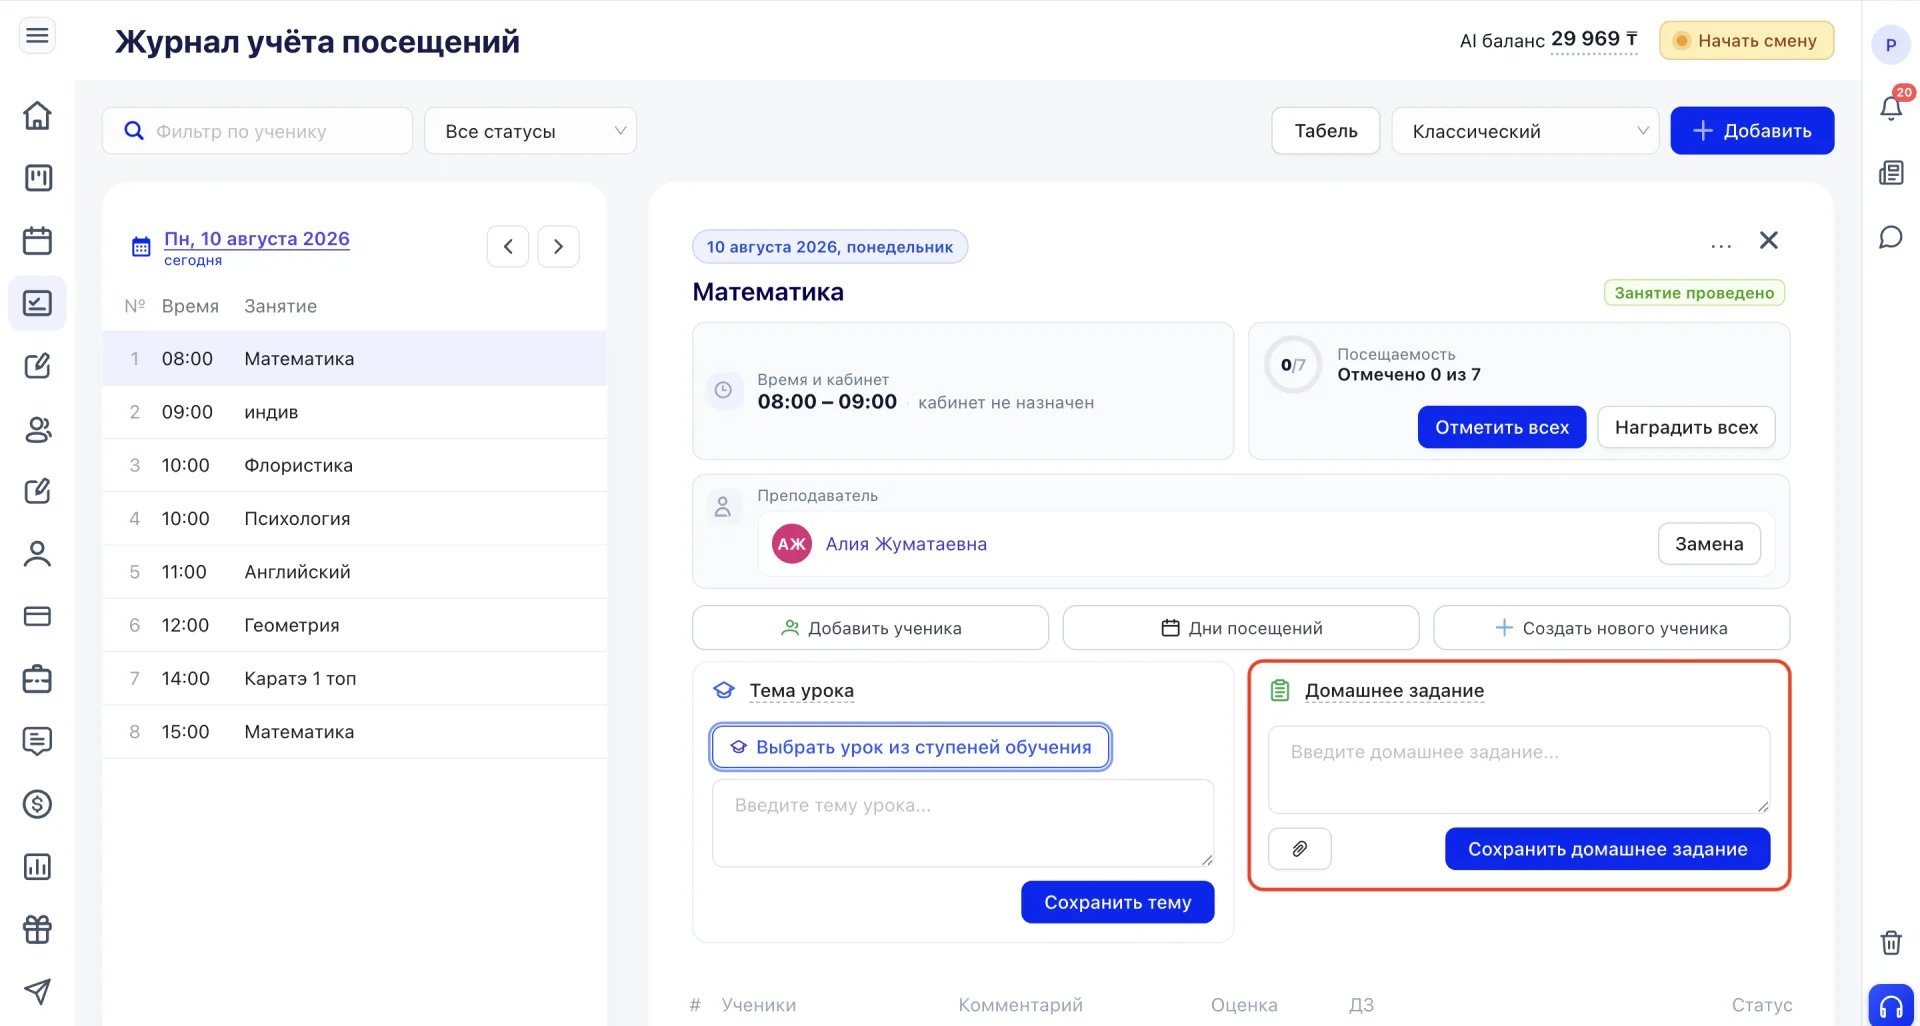
These fields help maintain methodological records and preserve lesson history.
The list of Students assigned to the Class is located below. Clicking a name opens the Student's personal account, where you can view their Memberships, visit history, Payments and other information.
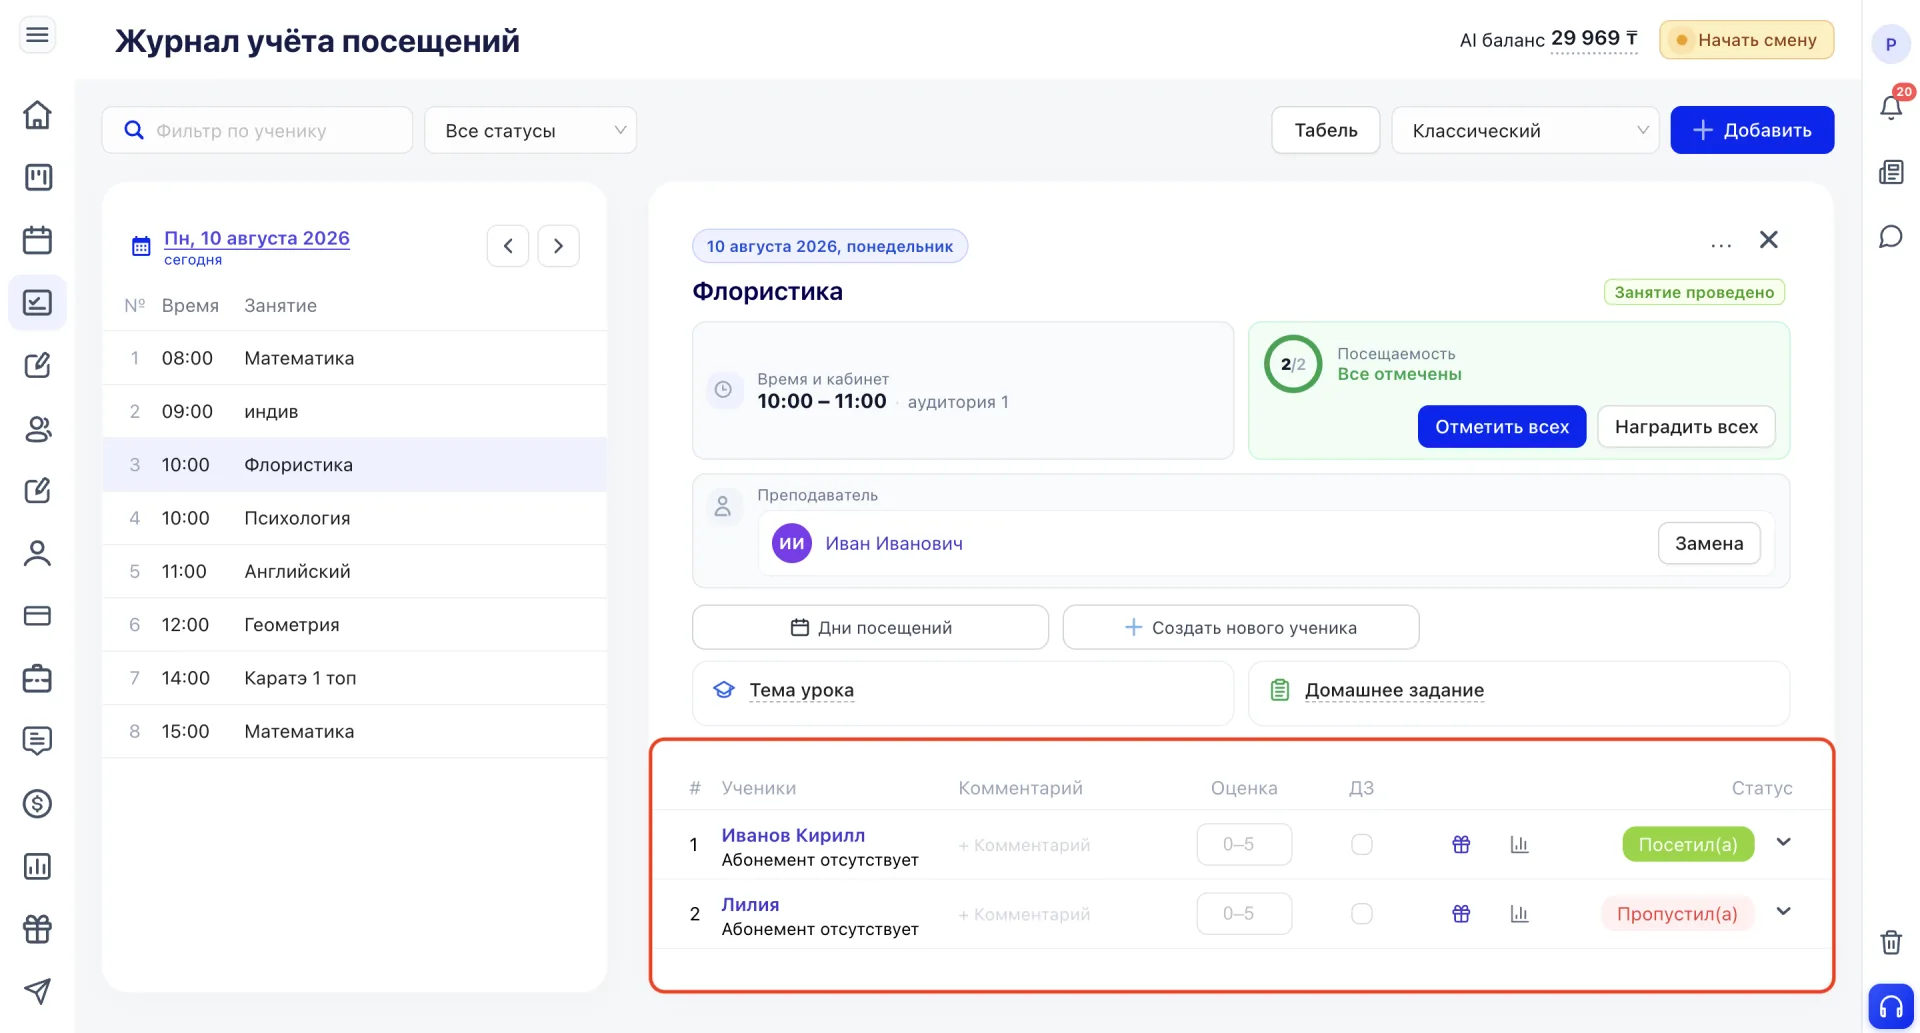
Under the Student's name the status of their Membership is displayed, for example "No Membership" or "Remaining N Classes". Whether a Class will be deducted when marking attendance depends on the presence and remaining balance of the Membership.
5. Teacher substitution
6. Attendance marking
The list of Students is displayed at the bottom.
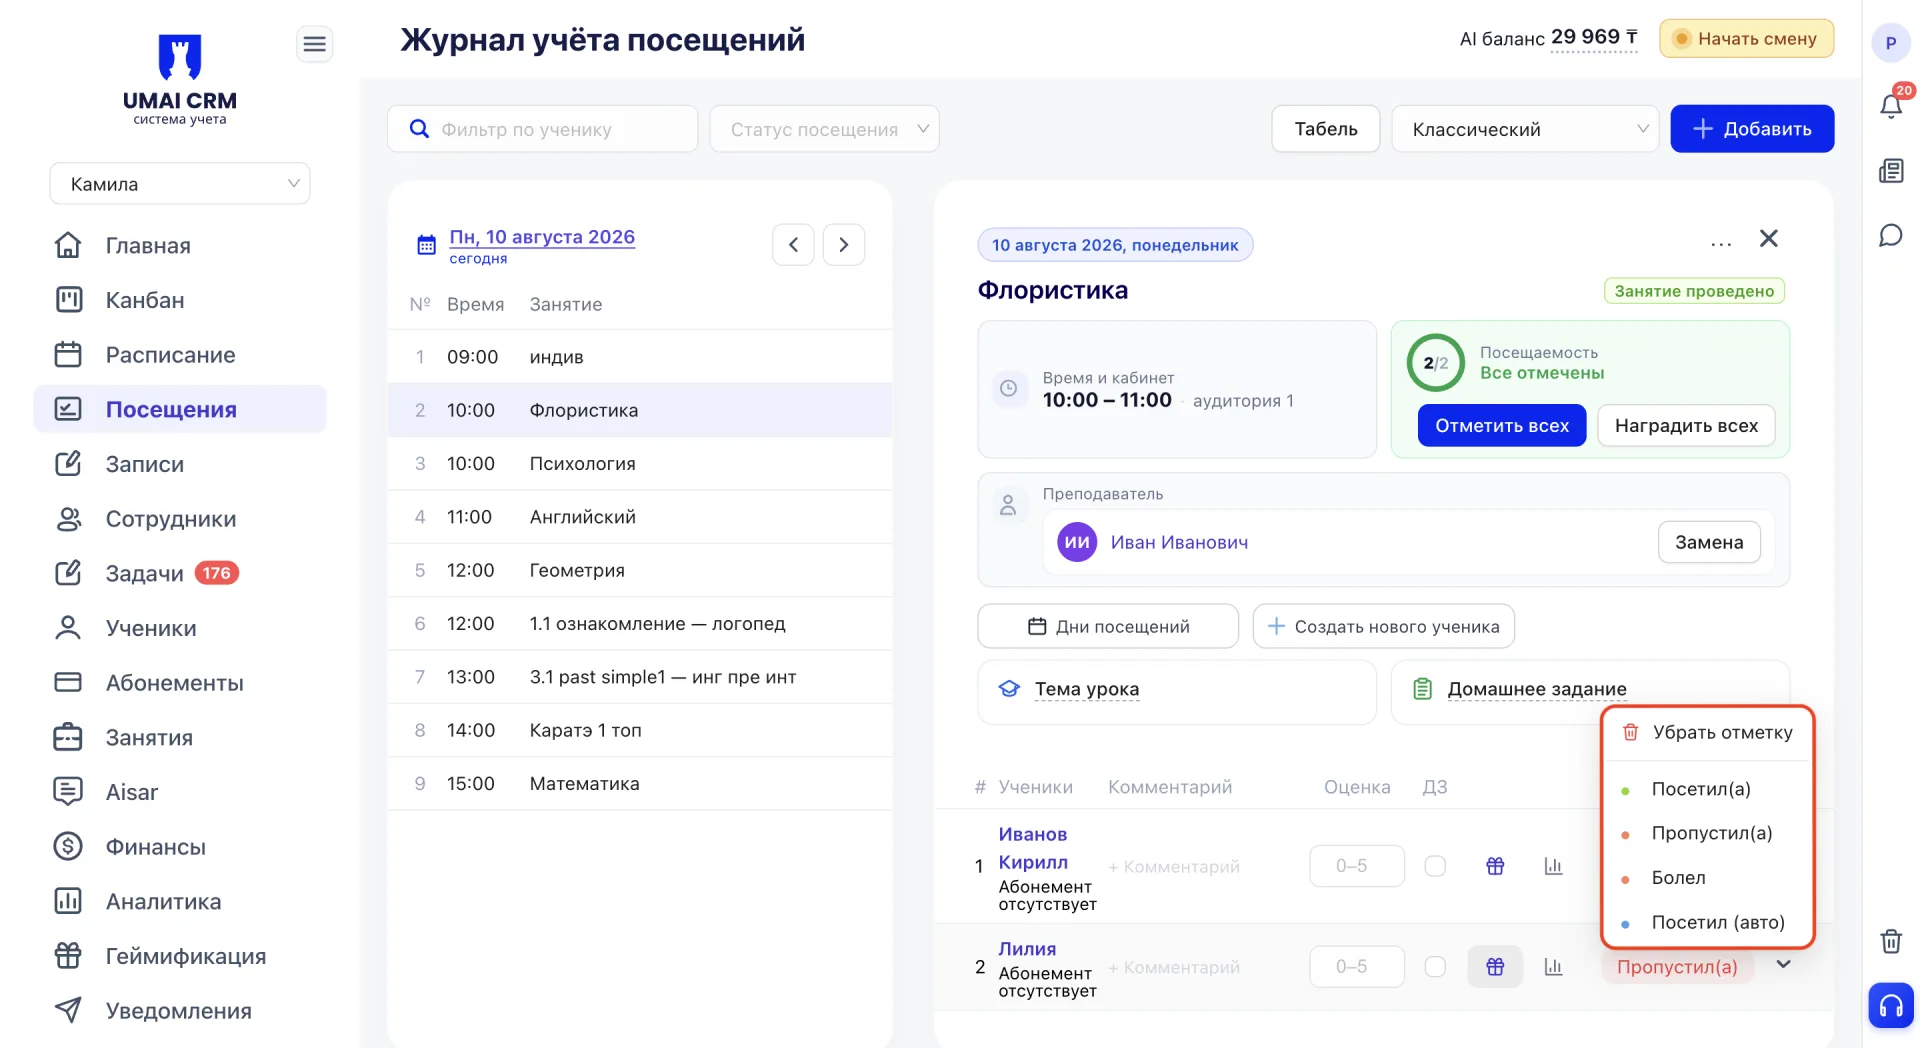
For each Student you can select an attendance status:
- Attended;
- Missed;
- Sick;
- Attended (auto) — automatically marked presence;
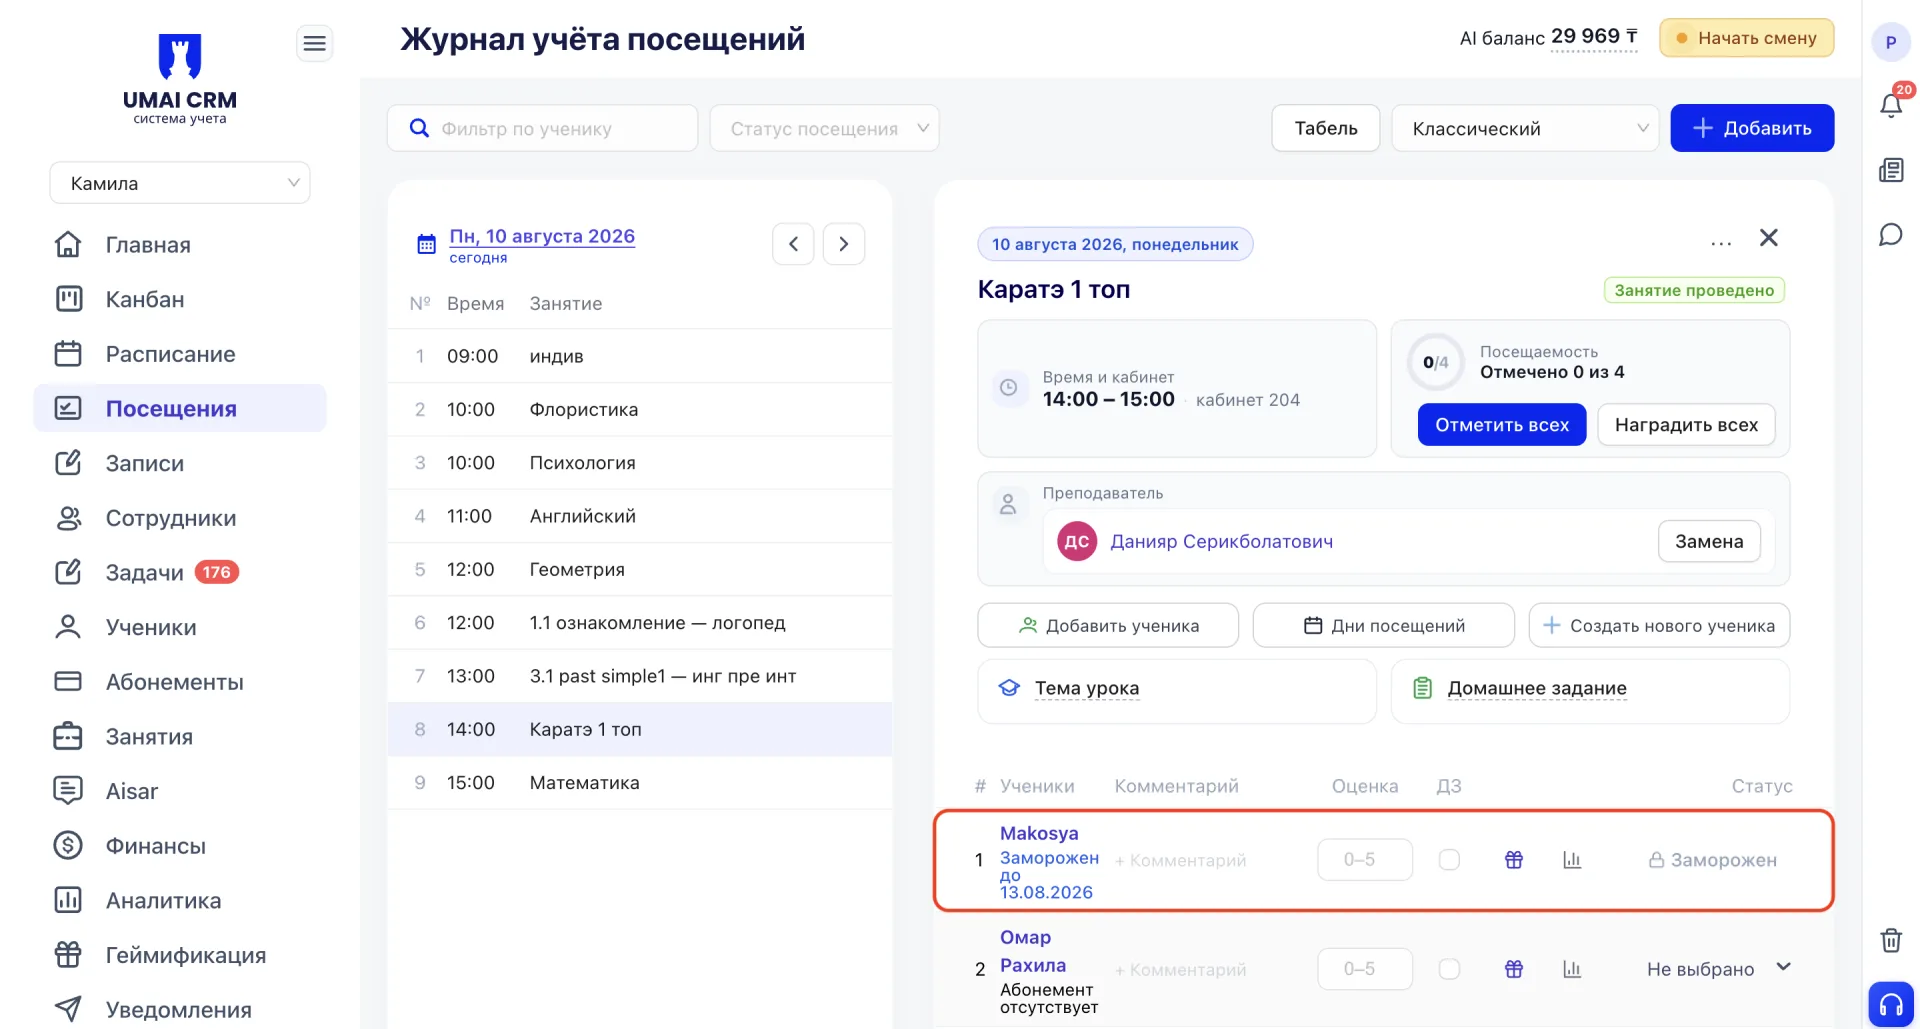
If a Student has a Membership freeze active at the time of the Class, the status is displayed automatically and highlighted in gray. Such a status cannot be changed manually; it reflects the actual state of the Student's Membership, not the Teacher's decision.
The selected status determines:
- whether the Class will be deducted from the Student's Membership;
- how this lesson will be accounted for in attendance statistics;
- which data will enter management analytics.
The "Mark all" button allows you to mass-mark attendance for the whole Group.
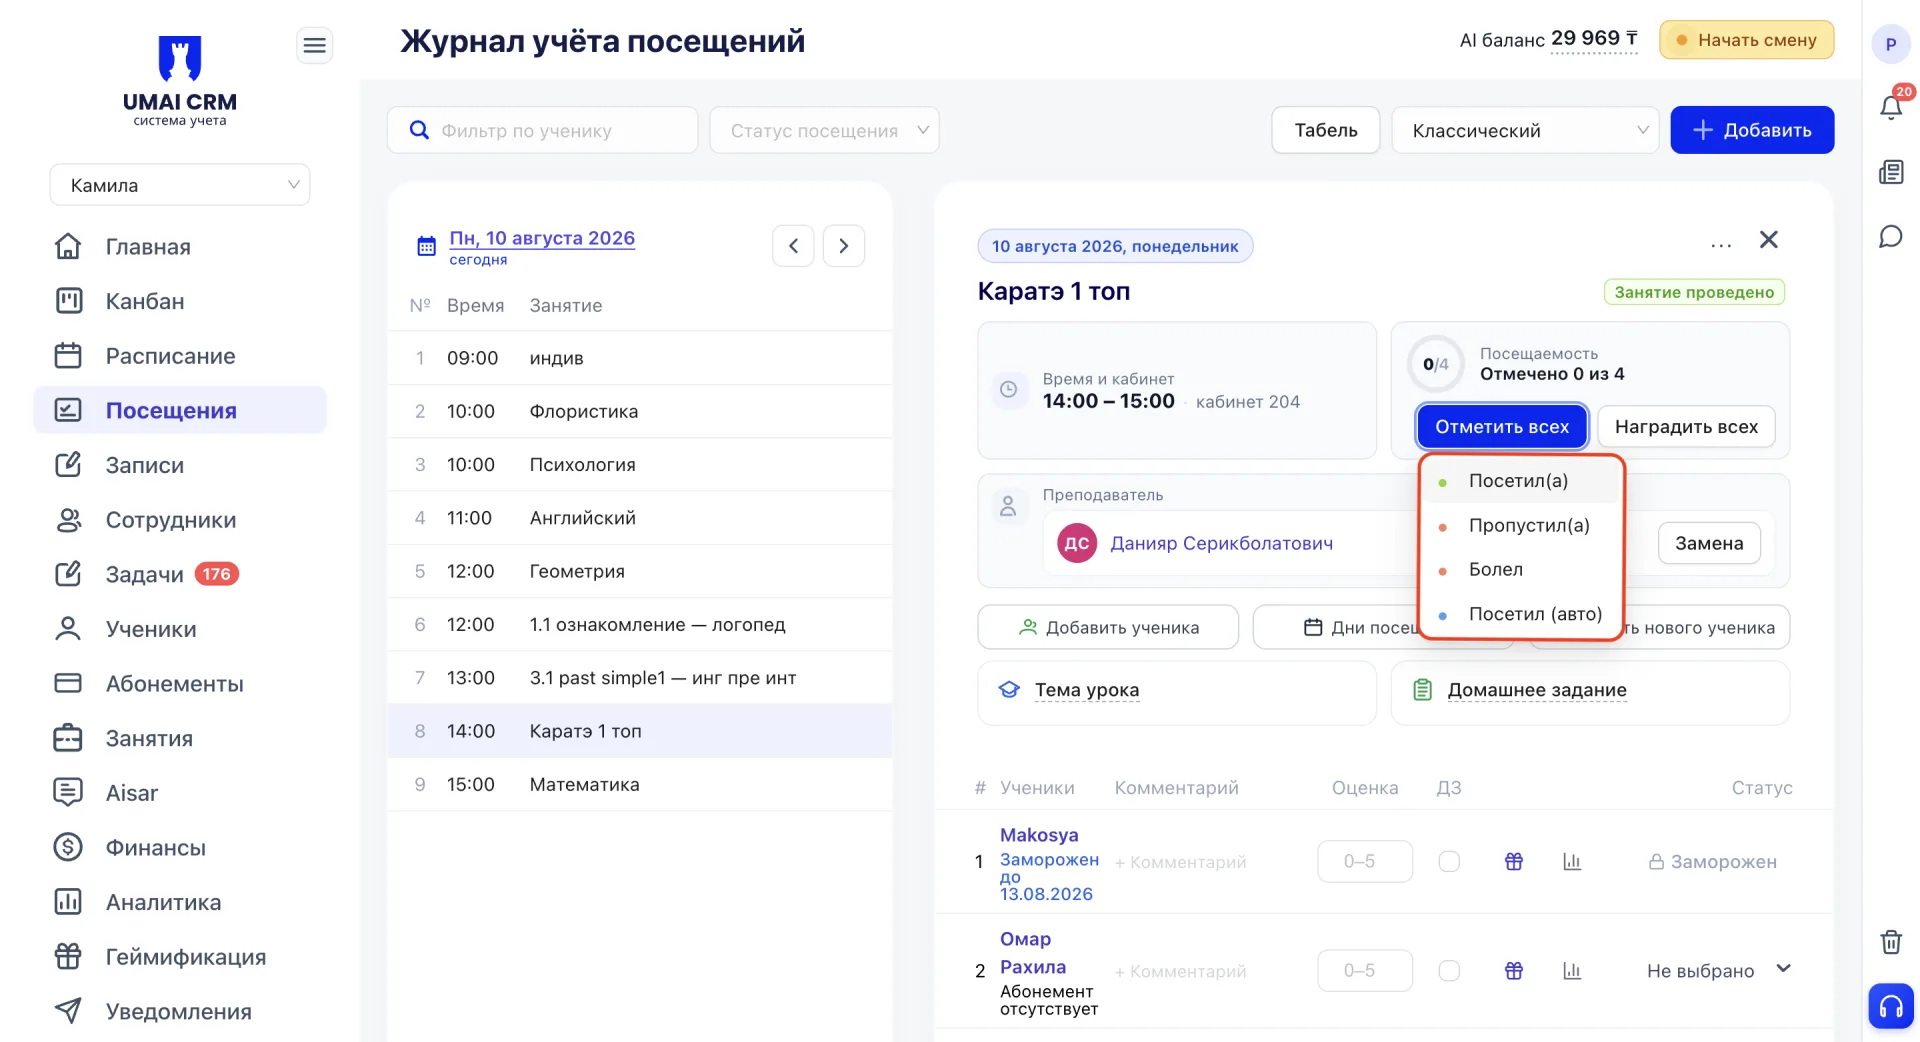
In addition to attendance marking, you can award points, coins and stickers to Students for the lesson. How to do this is described in the next block.
7. Rewarding Students
The "Reward all" button opens a panel with three reward blocks. The "Points" block contains ready-made phrases with the number of points for a specific behavior or result, for example "+5 Arrived to class on time" or "-8 Disrupted the lesson". The "Coins" block contains denominations for awarding: 1, 2, 3, 5, 10, 50, 100. The "Stickers" block contains categories of stickers with the number of available copies of each type. When selecting a specific value from any block, the reward is immediately granted to all Students of the Class.
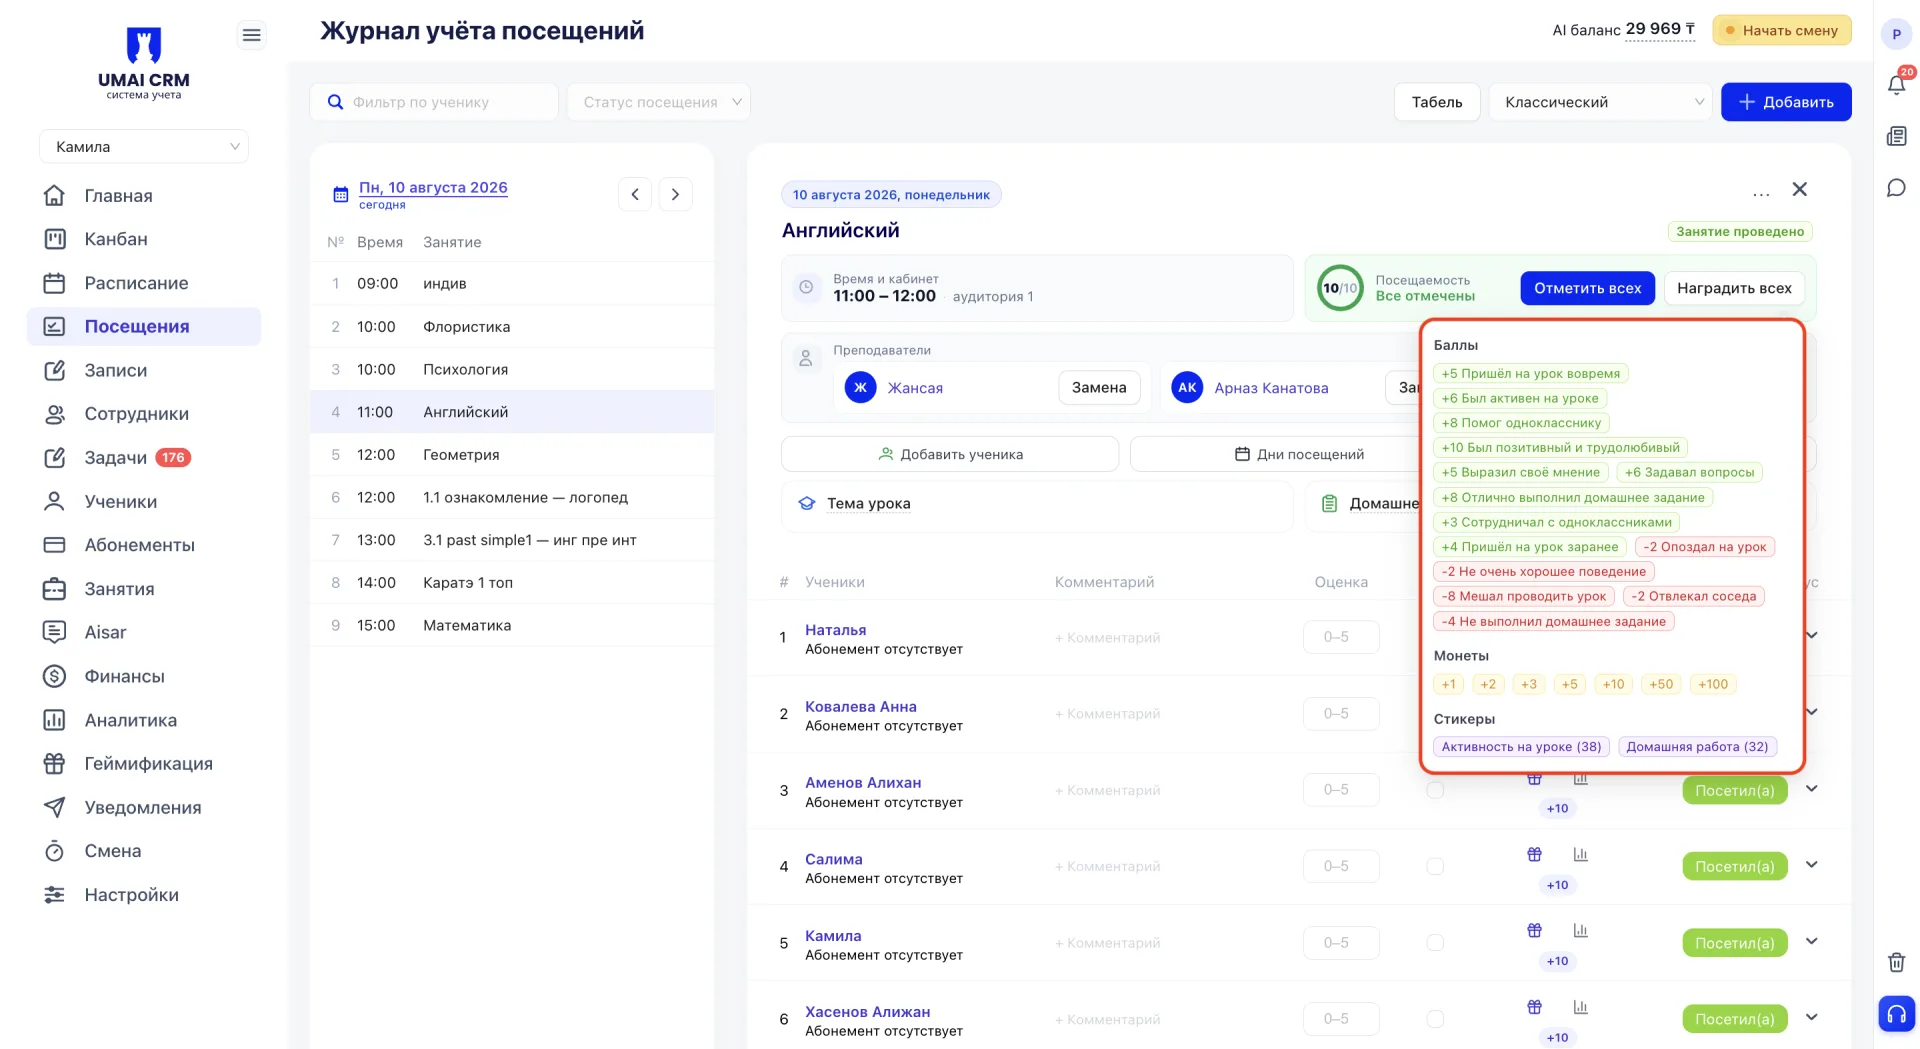
Next to each Student in the table there are two icons. The gift icon opens the same rewards panel, but the action applies only to that Student, regardless of their attendance status.
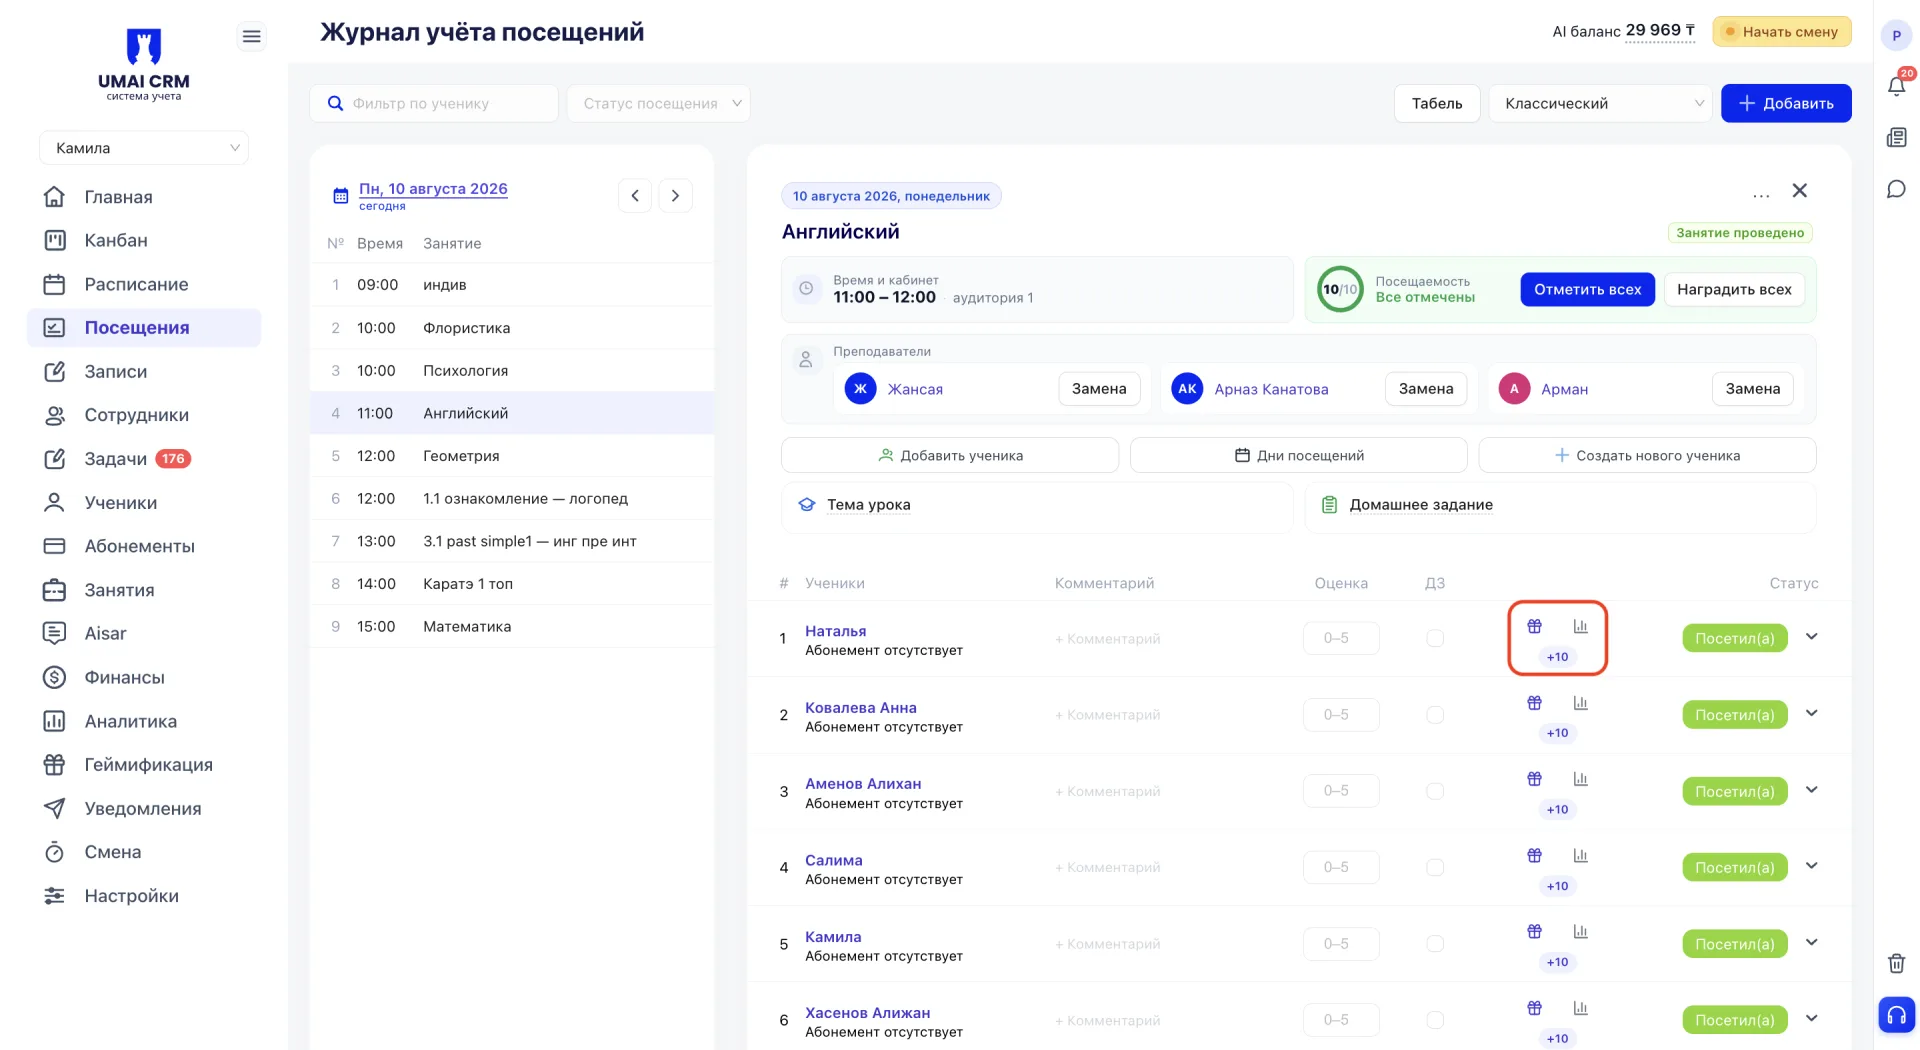
The bar-chart icon opens a brief statistics for the Student: total points, points for the current month, number of coins and number of received stickers.
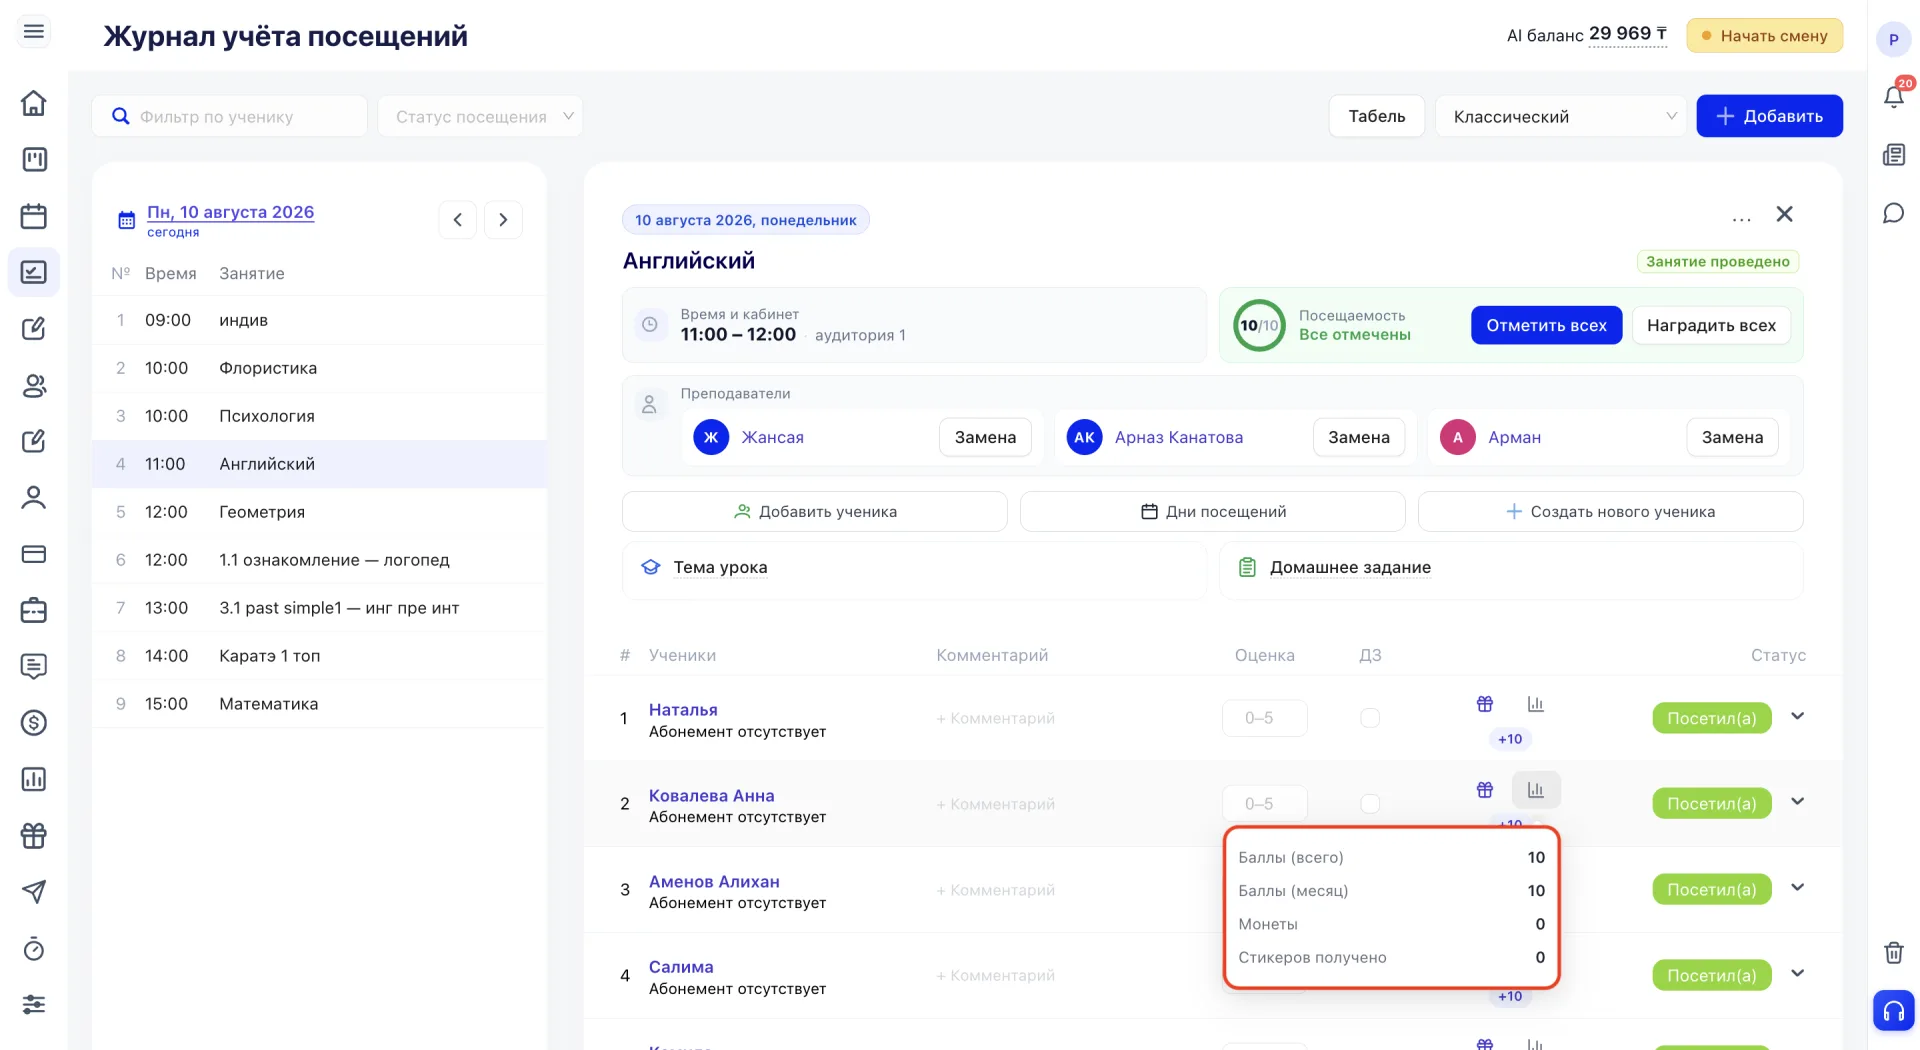
Awarded points, coins and stickers are accumulated and displayed in this statistics. If the leaderboard (Таблица лидеров) is enabled in the Gamification (Геймификация) section, these points form the Student's rating.
8. Grade and homework in the students table
In the table next to each Student there are two additional fields. "Grade" allows you to give the Student a grade for the lesson on a scale from 0 to 5. "HW" is a checkbox used to mark whether the Student completed the homework.
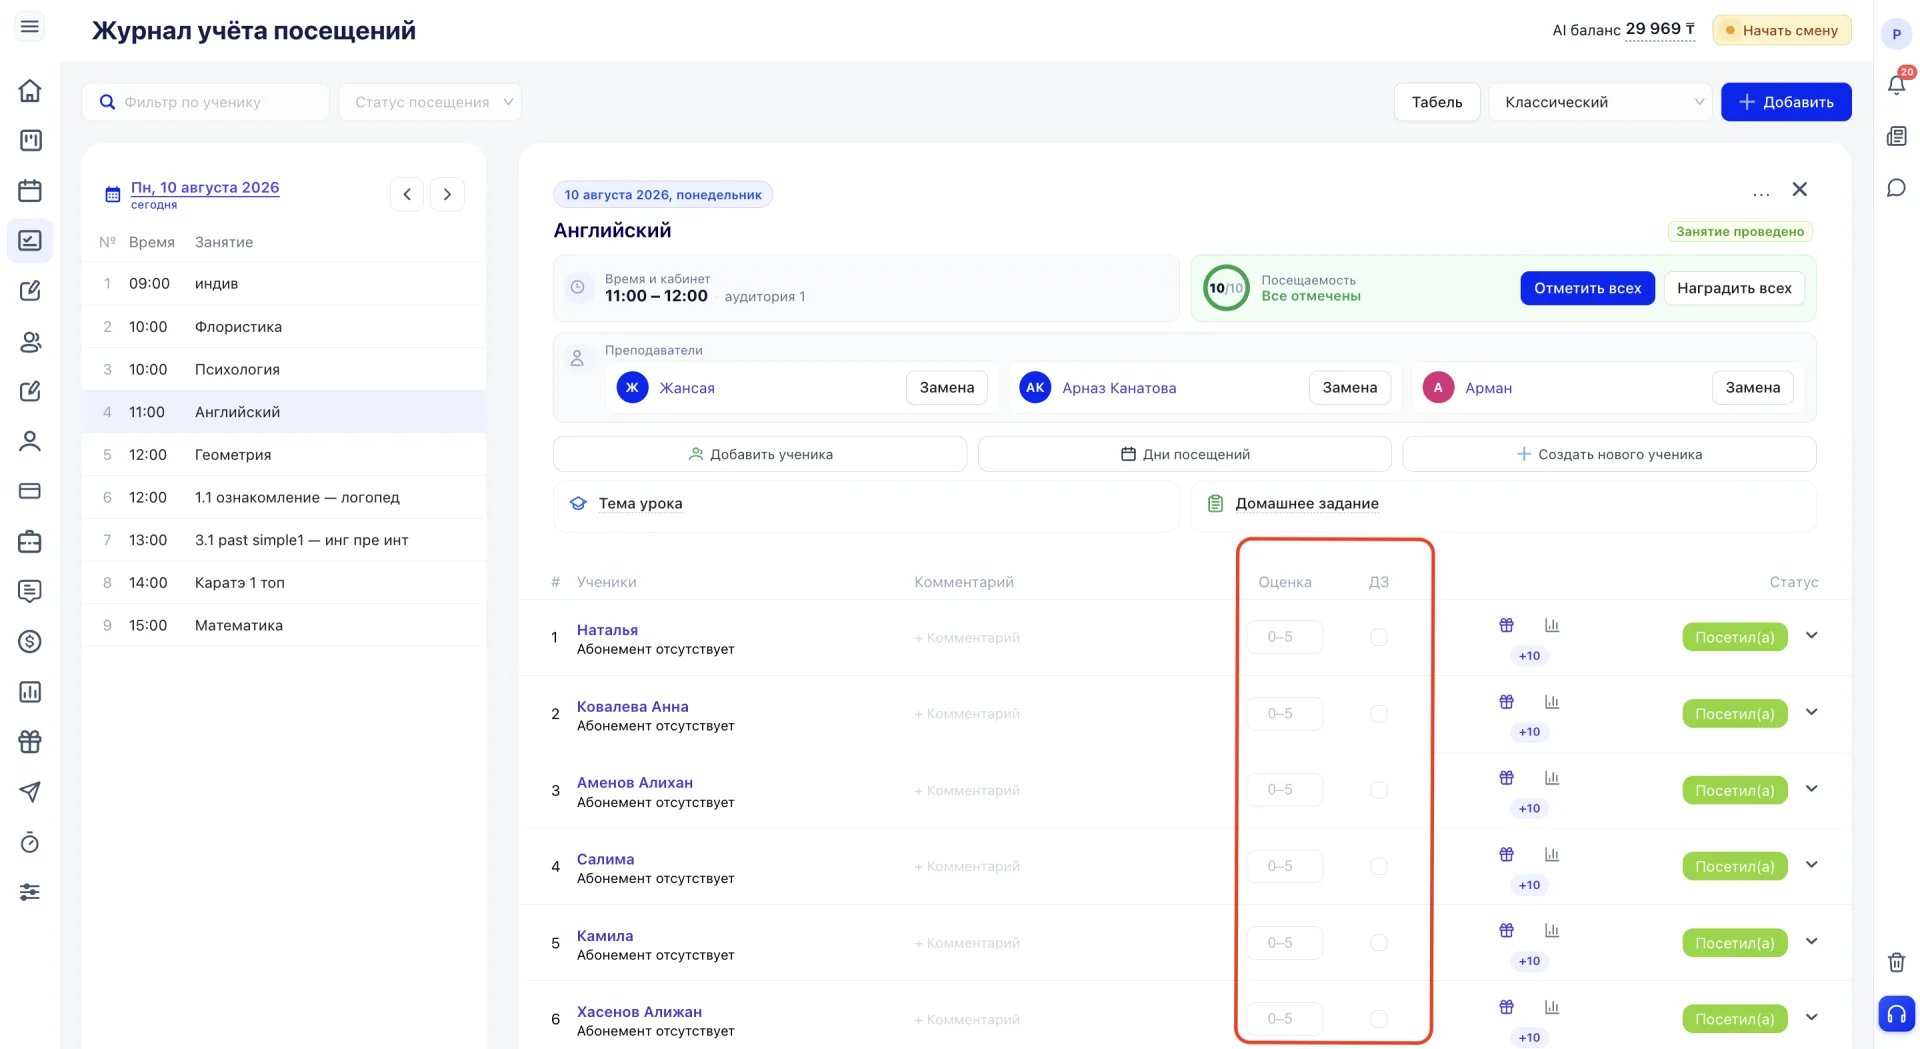
These marks do not affect Membership deduction or reward awarding; they serve for methodological accounting of performance.
9. Adding a Class manually
Using the "+Add" button you can create a Class manually in the attendance journal (журнал посещений). This is used when a Class was not created in advance via the Schedule but needs to be recorded in the system.
After pressing it, the "Add Class" window opens, which consists of three tabs: "General", "Clients" and "Teachers".
"General" tab
Here the main parameters of the Class are specified: select the Class (group or direction name), date, start and end time, room.
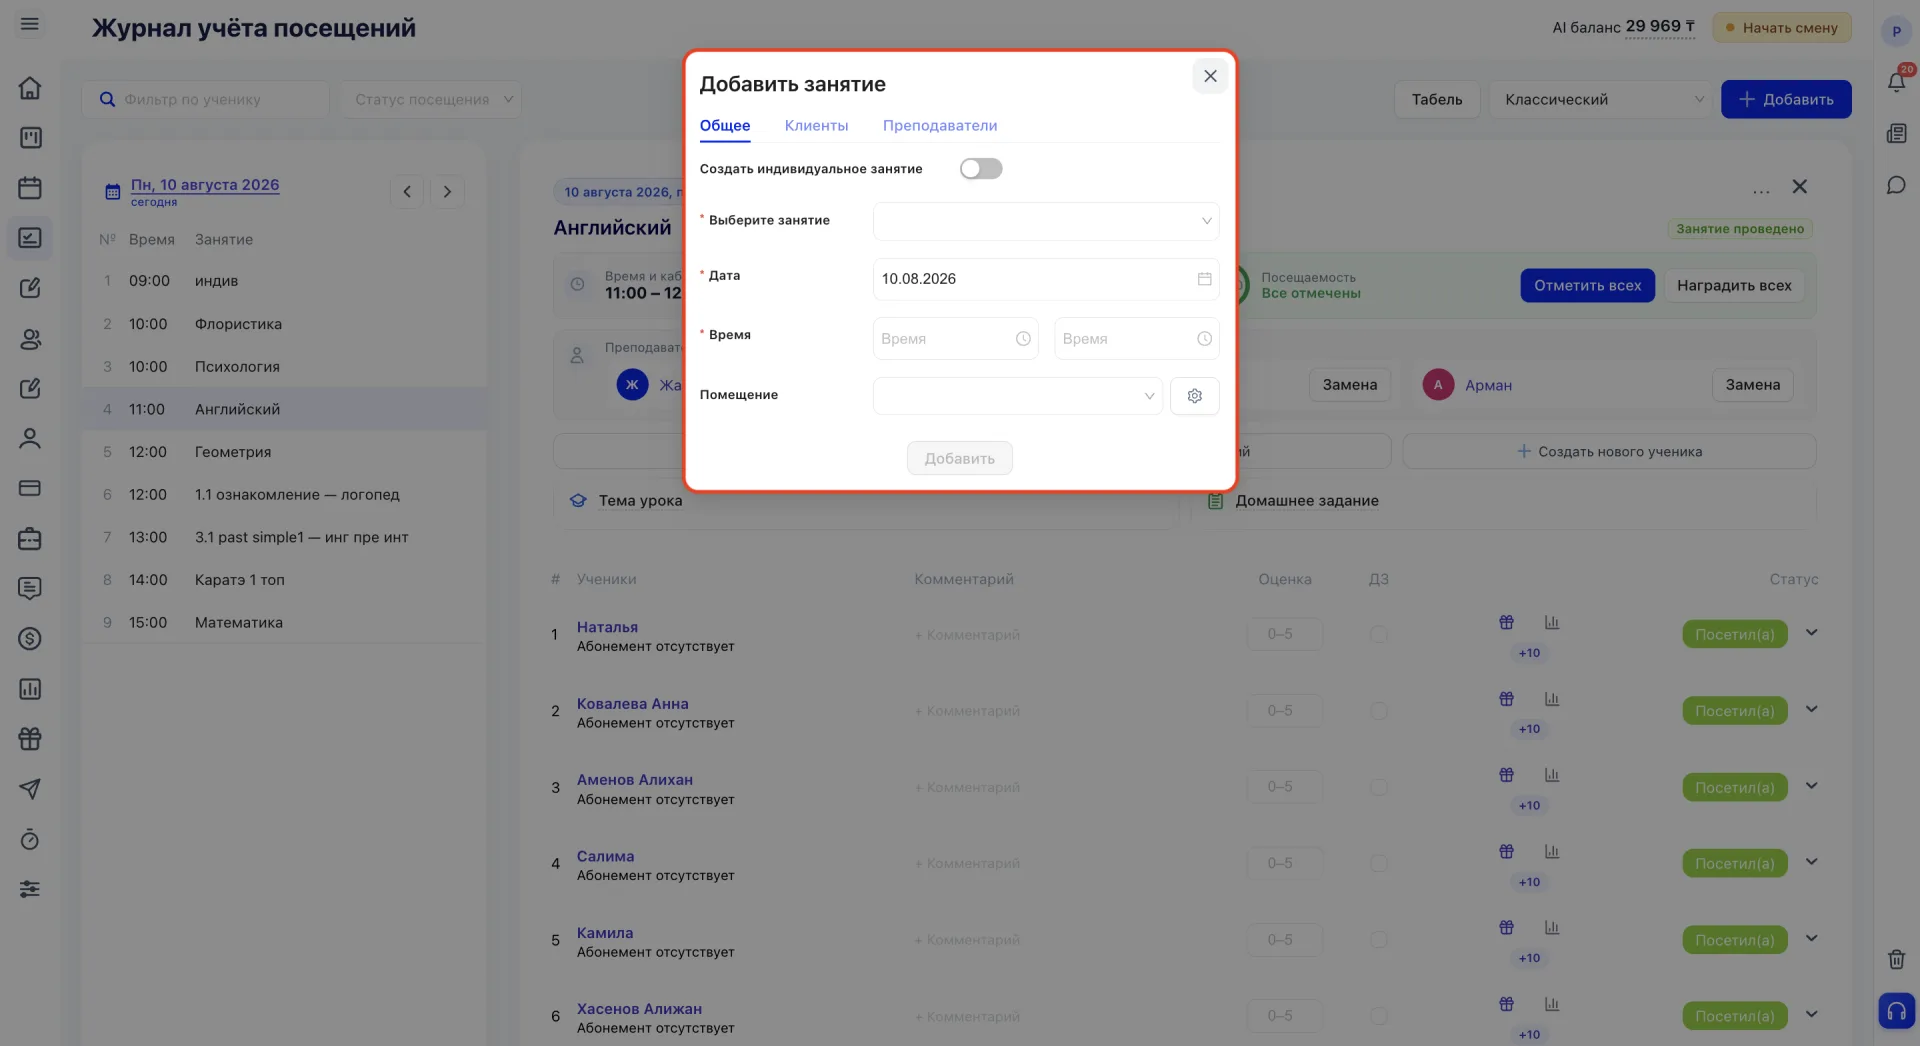
If you select an existing Class in the system, the system will automatically pull the assigned Teacher and Students, and you will not need to fill in the "Clients" and "Teachers" tabs manually.
If necessary, you can enable individual Class mode with the "Create individual Class" toggle.
"Clients" tab
Students who attended the Class are added in the "Clients" tab.
Start typing a name or phone number and the system will suggest suitable options. After selecting, the Student is assigned to this Class.
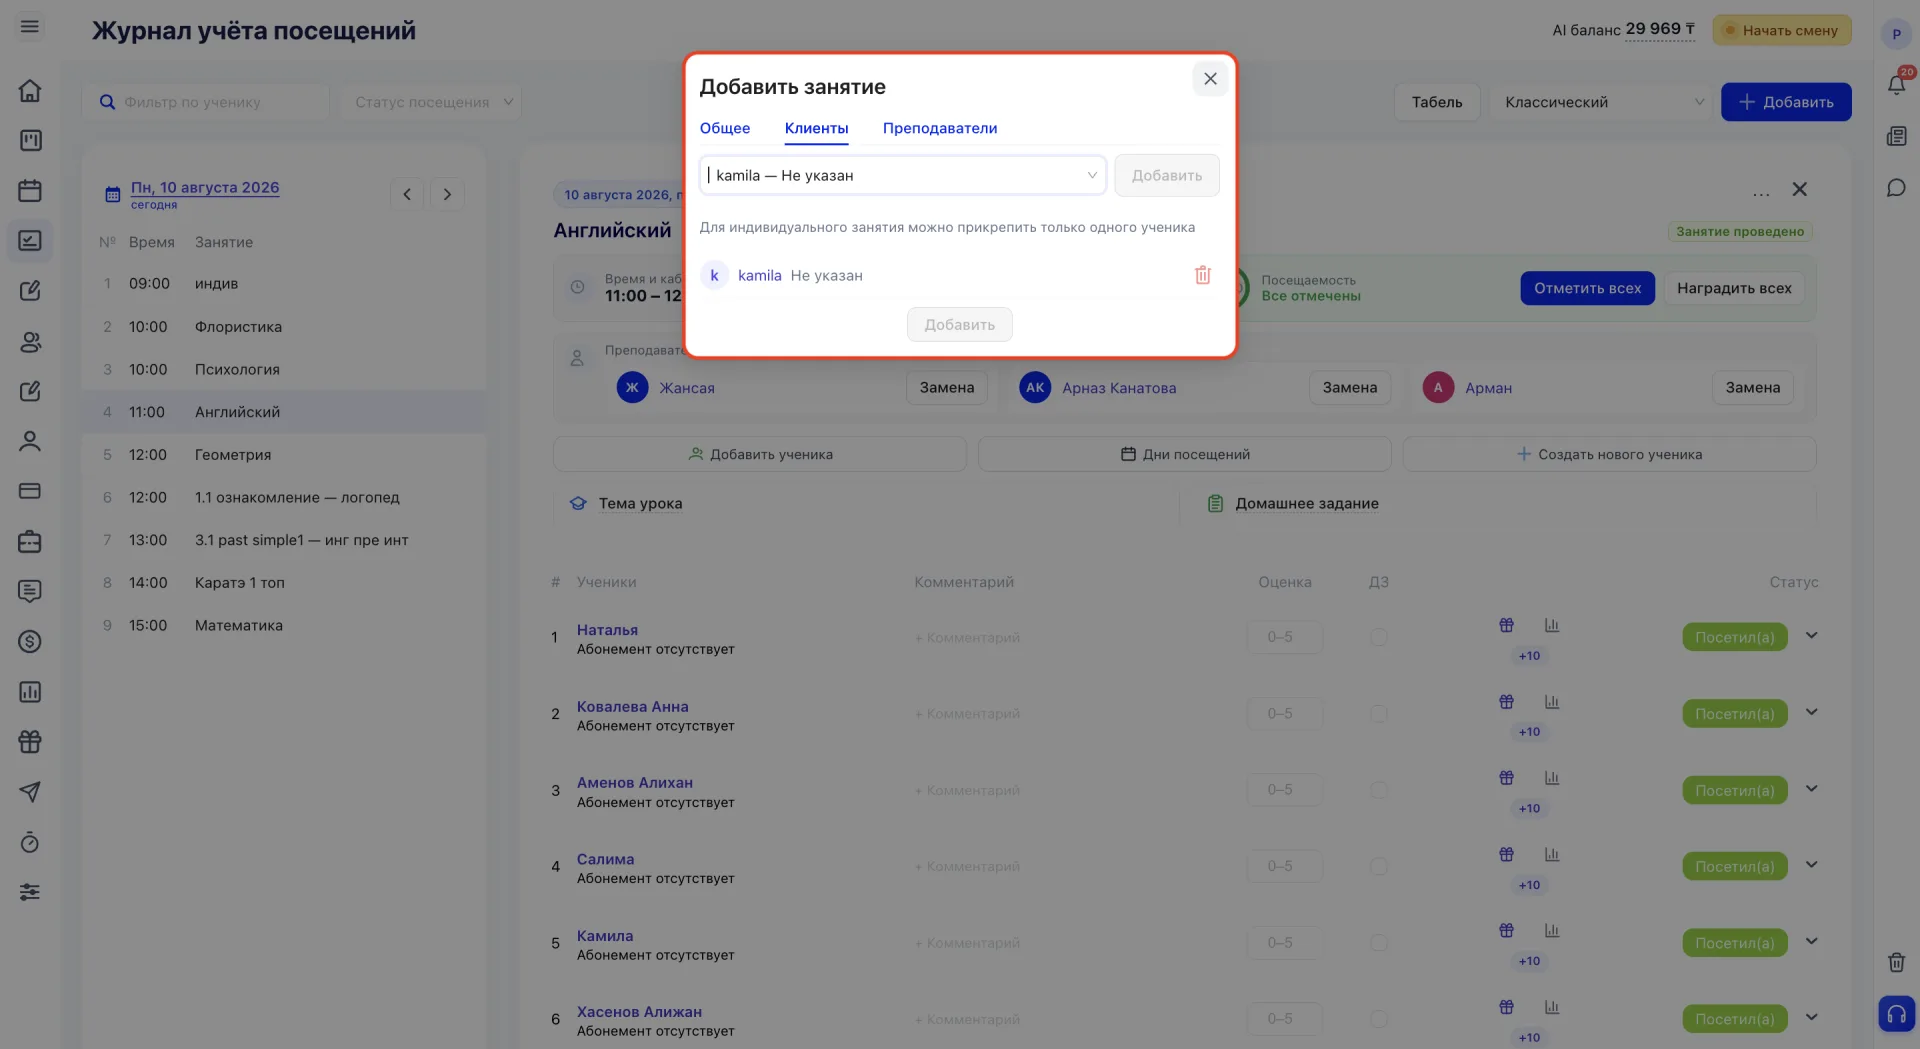
It is important to understand: if a Student is not added, the system will not be able to correctly account for their attendance, deduct a Class from their Membership, or reflect data in analytics.
"Teachers" tab
The Teacher who conducted the Class is assigned here.
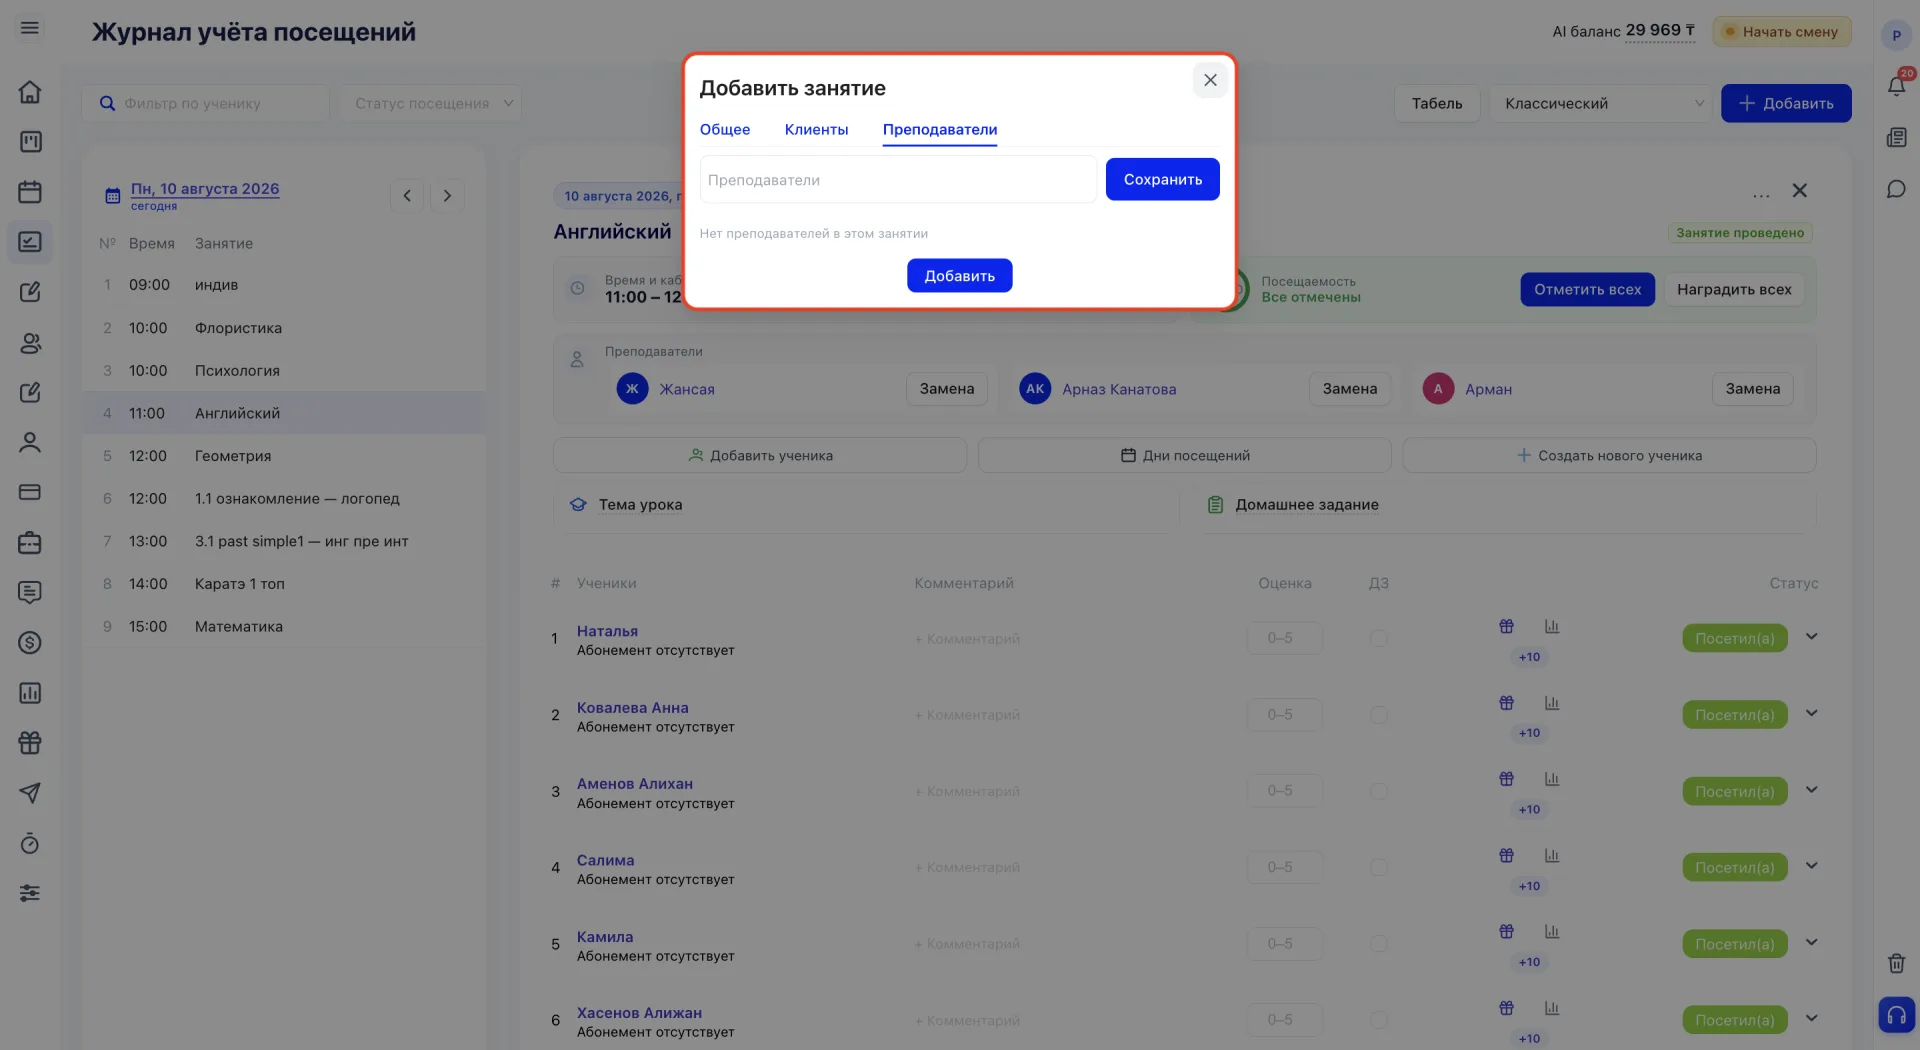
After saving, the Class information is linked to this Employee and is taken into account in their workload and reports. Without specifying a Teacher the Class will not be counted in the system as conducted by them.
Important to consider:
The Visits section affects Membership deduction, reporting and reward awarding, so the marks must be correct.
- The "Attended" status deducts the Class from the Student's Membership.
- An incorrect attendance status distorts not only attendance but also financial data, since the status determines deduction from the Membership.
- Changing statuses retroactively may affect already generated reports.
- If a Student is not added to the Class, their attendance is not counted in statistics or for Membership deduction.
- Deleting or duplicating Classes distorts attendance statistics and reporting.
- If a Student has a Membership freeze active, the attendance status is set automatically and cannot be changed manually.
- Grade and homework marking do not affect Membership deduction and are not related to rewards; this is a separate methodological record.
- The three Zoom functions ("Mark attendees + WA to absentees", "Attendance by Zoom participants", "Send lesson recording") require that the Class has a Zoom conference link specified, added in the Classes section.
Before saving, check the date, the composition of Students and the selected statuses, since all processes related to the Class depend on these data: Membership deductions, reporting, analytics and reward awarding.