
The section defines which parts of the system an employee can see and what actions they can perform in them. A role is assigned to an employee and determines their access level across the system.
1. Access to the section
The "Роли" section is located in Settings, under the "Роли" tab. Roles can be managed by a user with the "Head" role.
2. List of roles
The page displays a table with all roles in the system. For each role, the name and a brief description of the access level are shown.
The system has four default base roles:
- Head — full access without restrictions.
- Manager — limited access to Settings, Analytics and Finance.
- Teacher — access to Classes and Visits. The right to change the Schedule depends on the role settings in a specific center.
- Call center operator — works with Leads in the kanban, without access to the Schedule, Students or Finance.
In addition to the base roles, the list may show custom roles created by center staff based on one of the base roles. A label "Custom" is displayed next to the name of such a role and it indicates which role it was based on, for example "based on: Manager." When created, a custom role inherits the same rights as the template role, and then they can be modified as desired.
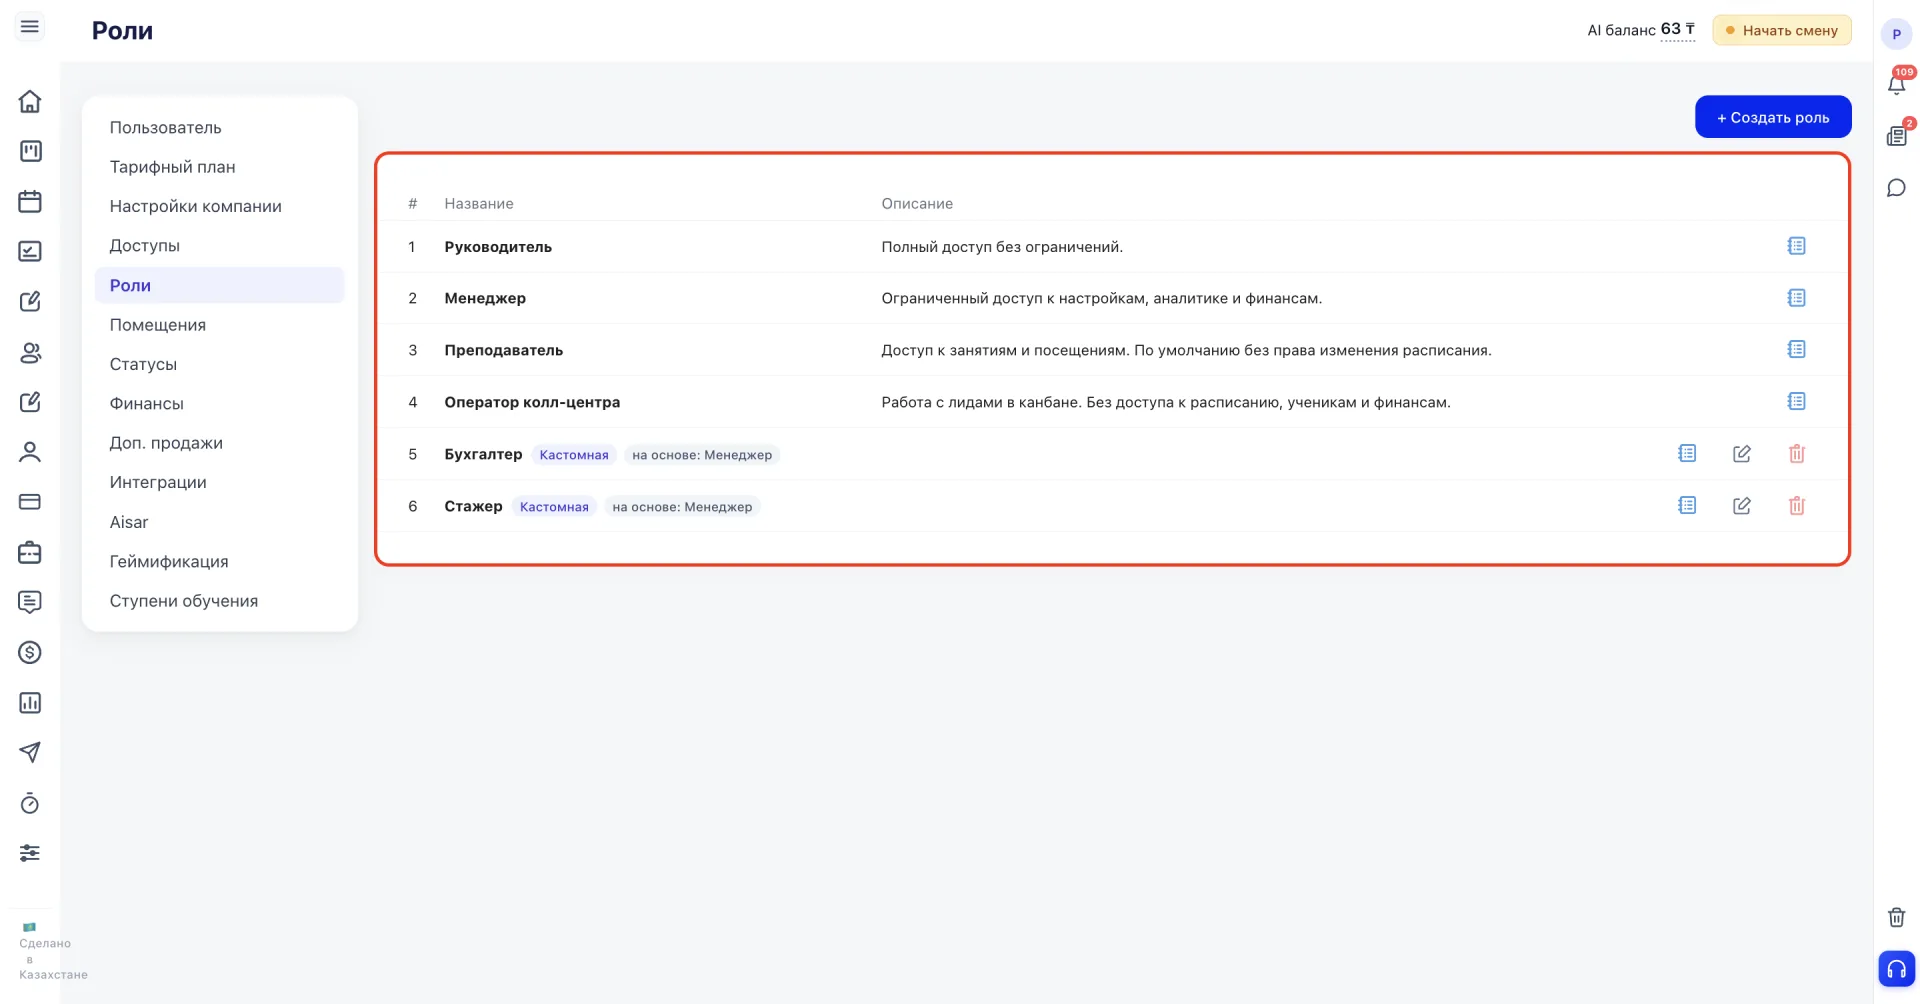
To open the detailed rights card for a role and see exactly what it permits, click the book icon in the role row.
3. Creating a new role
To create a new role, click the "+ Create role" button in the top right corner of the page. The "New role" form will open, where you specify:
- Name — the name of the new role.
- Description — a brief description of the access level.
- Based on role — the template from which the initial set of rights will be copied: Manager, Teacher, Call center operator or Head. After creating the role, rights can be changed independently of the chosen template.
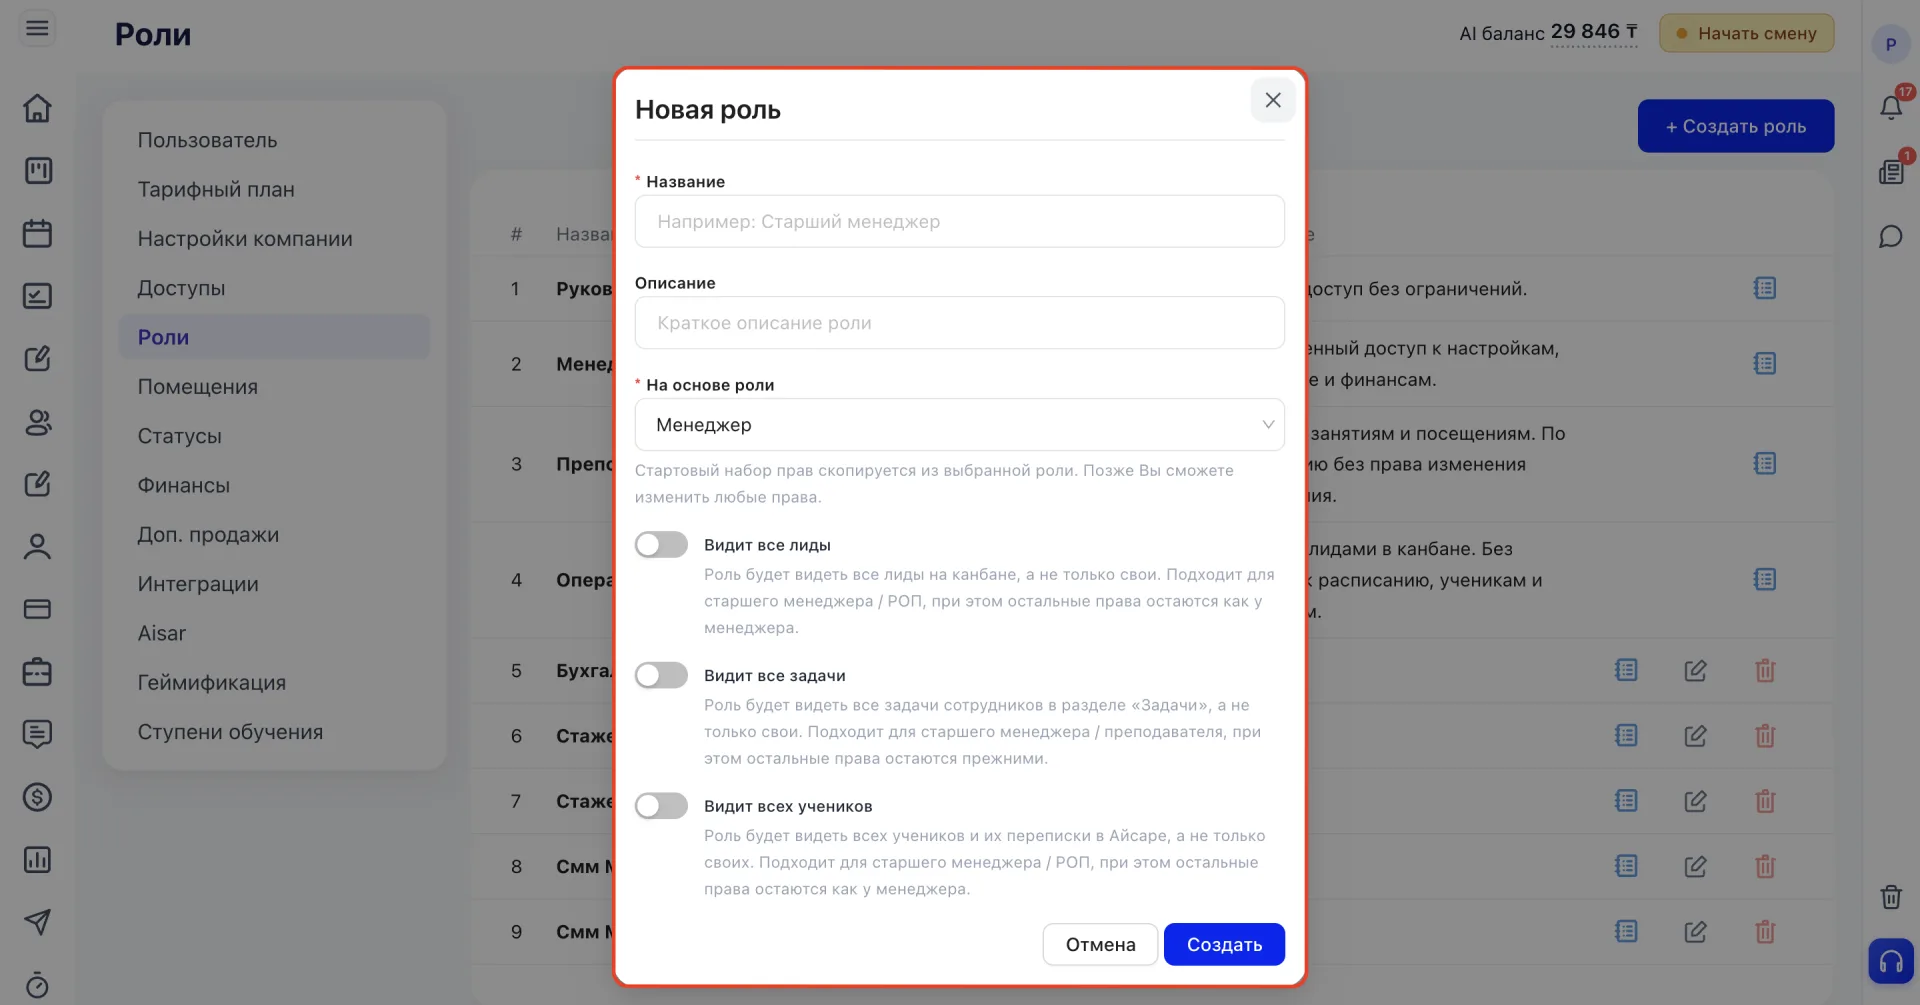
Below are toggles that grant roles extended access on top of the selected template. Available toggles depend on the role selected in the "Based on role" field.
When selecting the "Manager" template, three toggles are displayed:
"Sees all Leads" grants access to all Leads on the kanban, not only their own, and is suitable for a senior manager or sales head.
"Sees all Tasks" grants access to all employees' Tasks in the Tasks section, not only their own, and is suitable for a senior manager or Teacher.
"Sees all Students" grants access to all Students and their conversations in Aisar, not only their own, and is suitable for a senior manager or sales manager.
When selecting the "Teacher" template, the toggles "Sees all Tasks" and "Sees all Students" are available. Their purpose corresponds to the descriptions above.
When selecting the "Call center operator" or "Head" templates, these toggles are not displayed because extended access to Leads, Students and other employees' Tasks is not provided for these roles at the creation stage.
In all other cases, the set of rights corresponds to the chosen template. After filling out the form, click "Create."
4. Editing a role
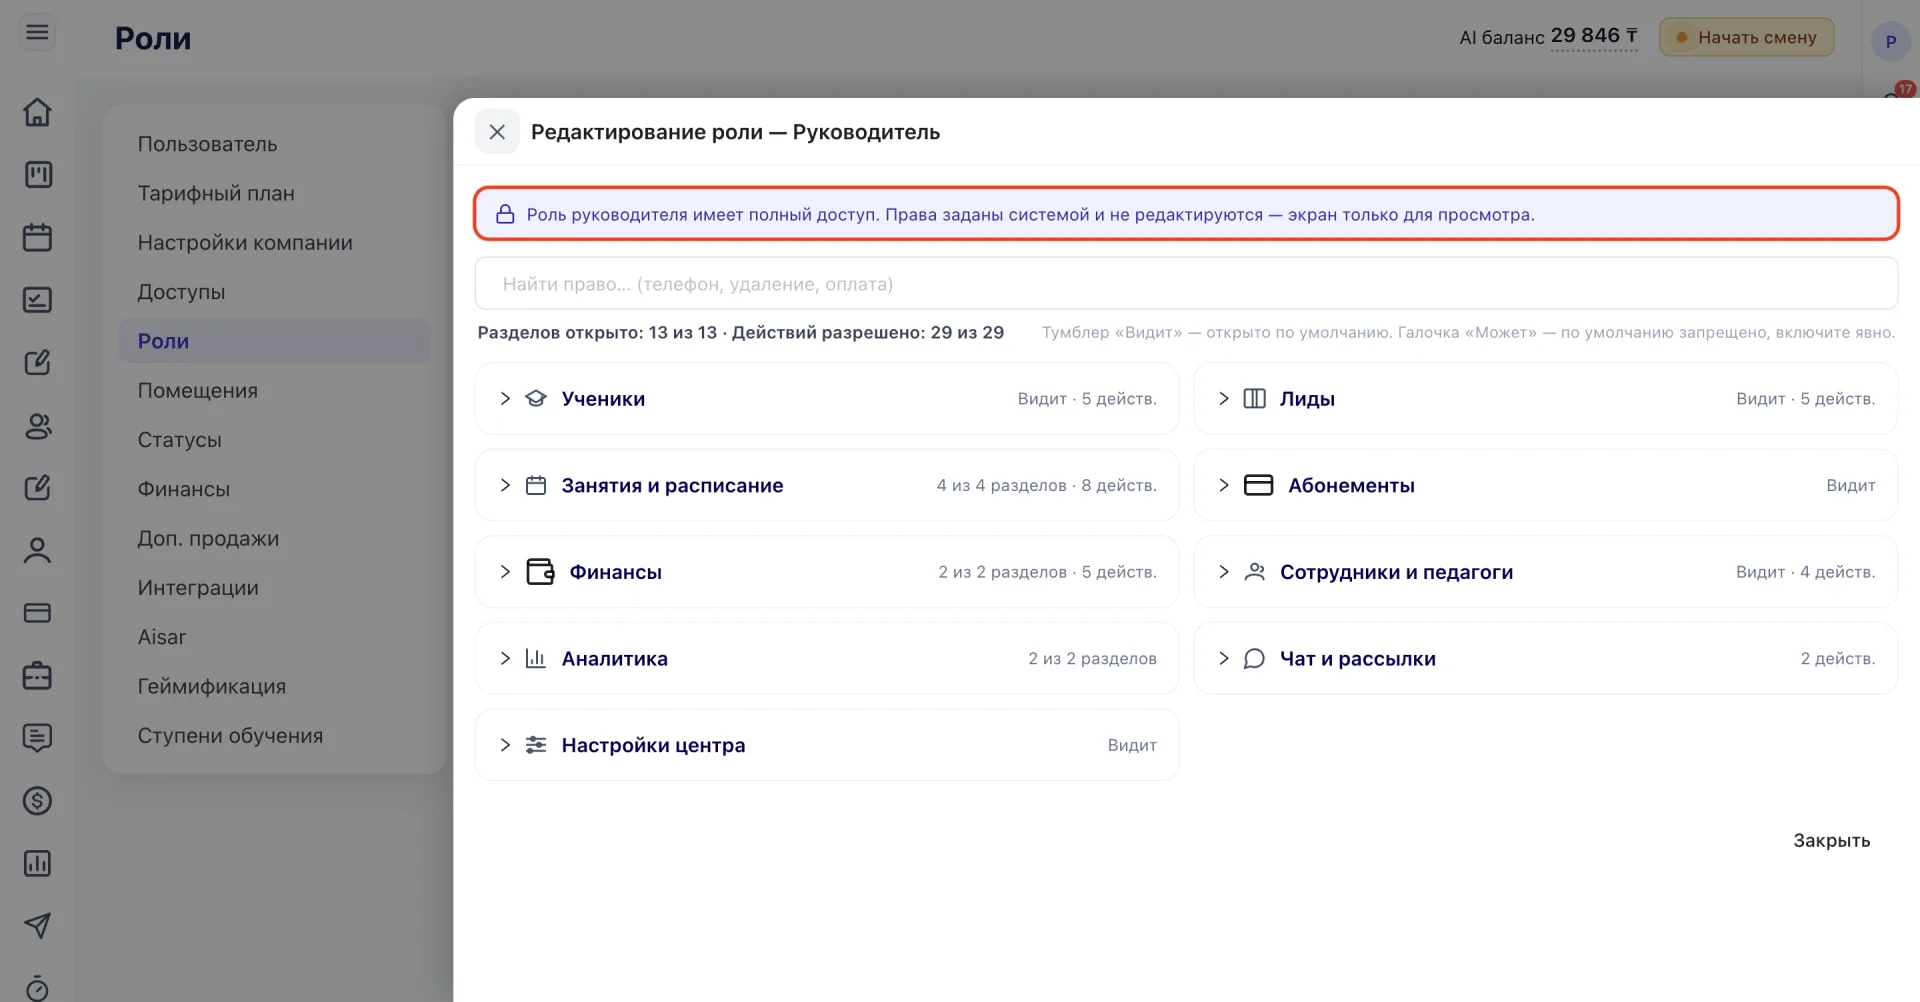
The rights card opens via the book icon next to the role name. For the "Head" role all sliders in the card are locked and viewable only; its rights are defined by the system. For all other roles, including base roles ("Manager", "Teacher", "Call center operator") and custom roles, the sliders are active: rights are changed directly in the card by toggling the required sections and actions.
At the top of the window there is a search field "Find a right... (phone, deletion, payment)", a button "Reset to role template" and a counter of opened sections and allowed actions.
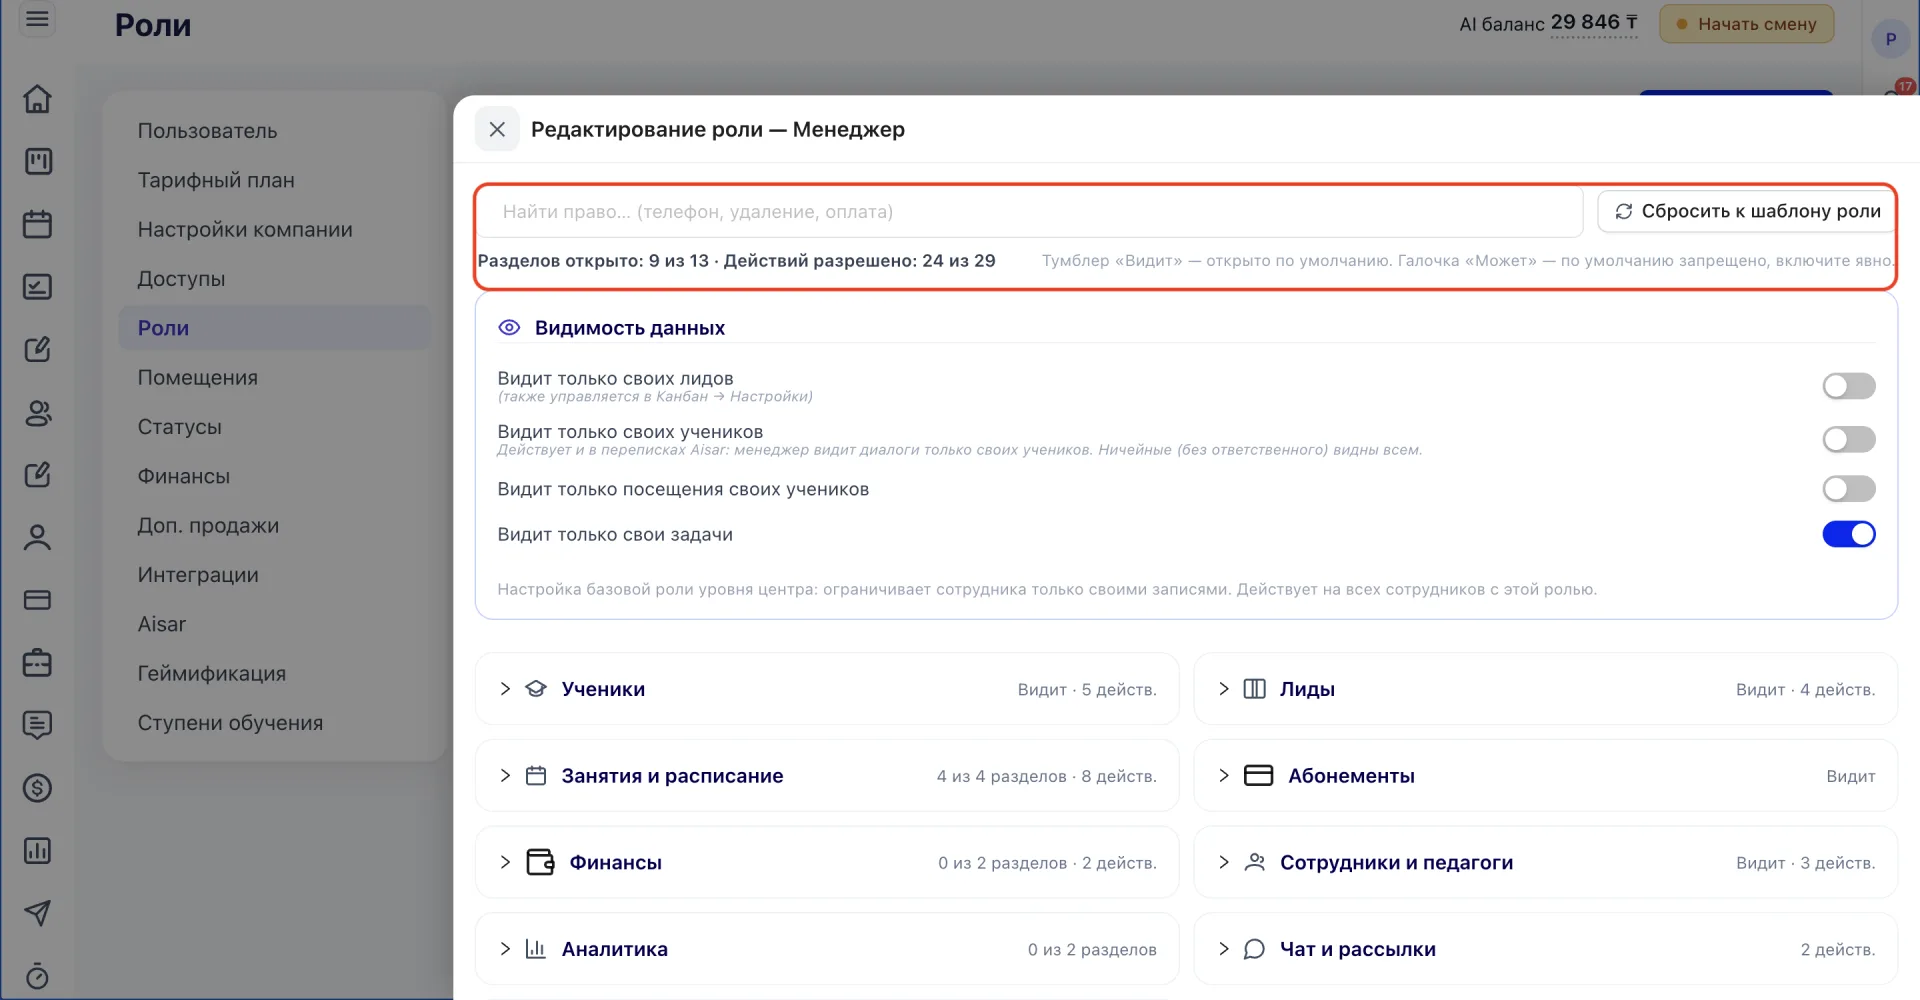
The search field helps quickly find the required right by a keyword, for example "phone", "deletion" or "payment."
The "Reset to role template" button returns the role to the original set of rights corresponding to the base template from which it was created.
The counter shows the number of opened sections and allowed actions, for example "Sections opened: 9 of 13 · Actions allowed: 24 of 29." It allows you to immediately evaluate the scope of rights without expanding each section.
To change the name or description of a role, click the edit icon next to its name in the list. The "Rename role" window will open with the "Name" and "Description" fields. This form changes only the name and description of the role and does not affect its rights.
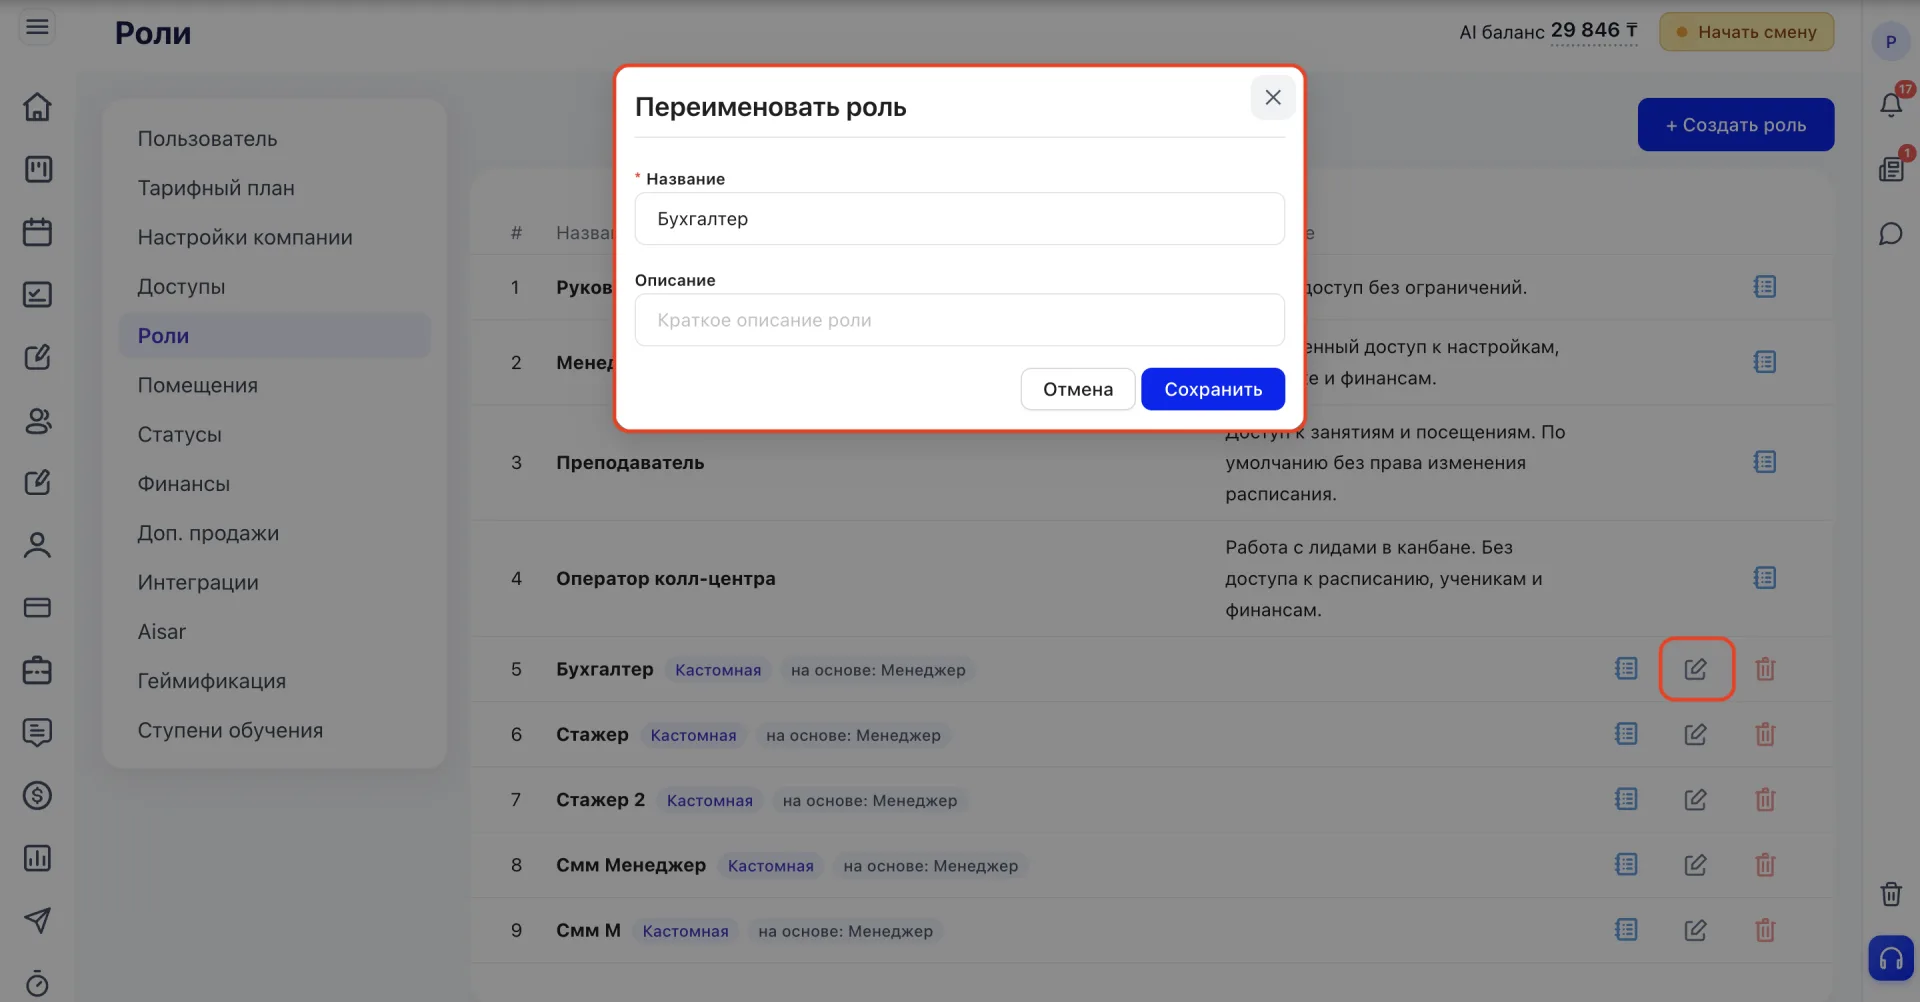
After making changes click "Save."
5. Data visibility
Some roles have a "Data visibility" block at the top of the editing panel, which determines whether an employee with that role sees all records in the system or only their own. This block is not present for all roles: its set of toggles depends on the specific role.
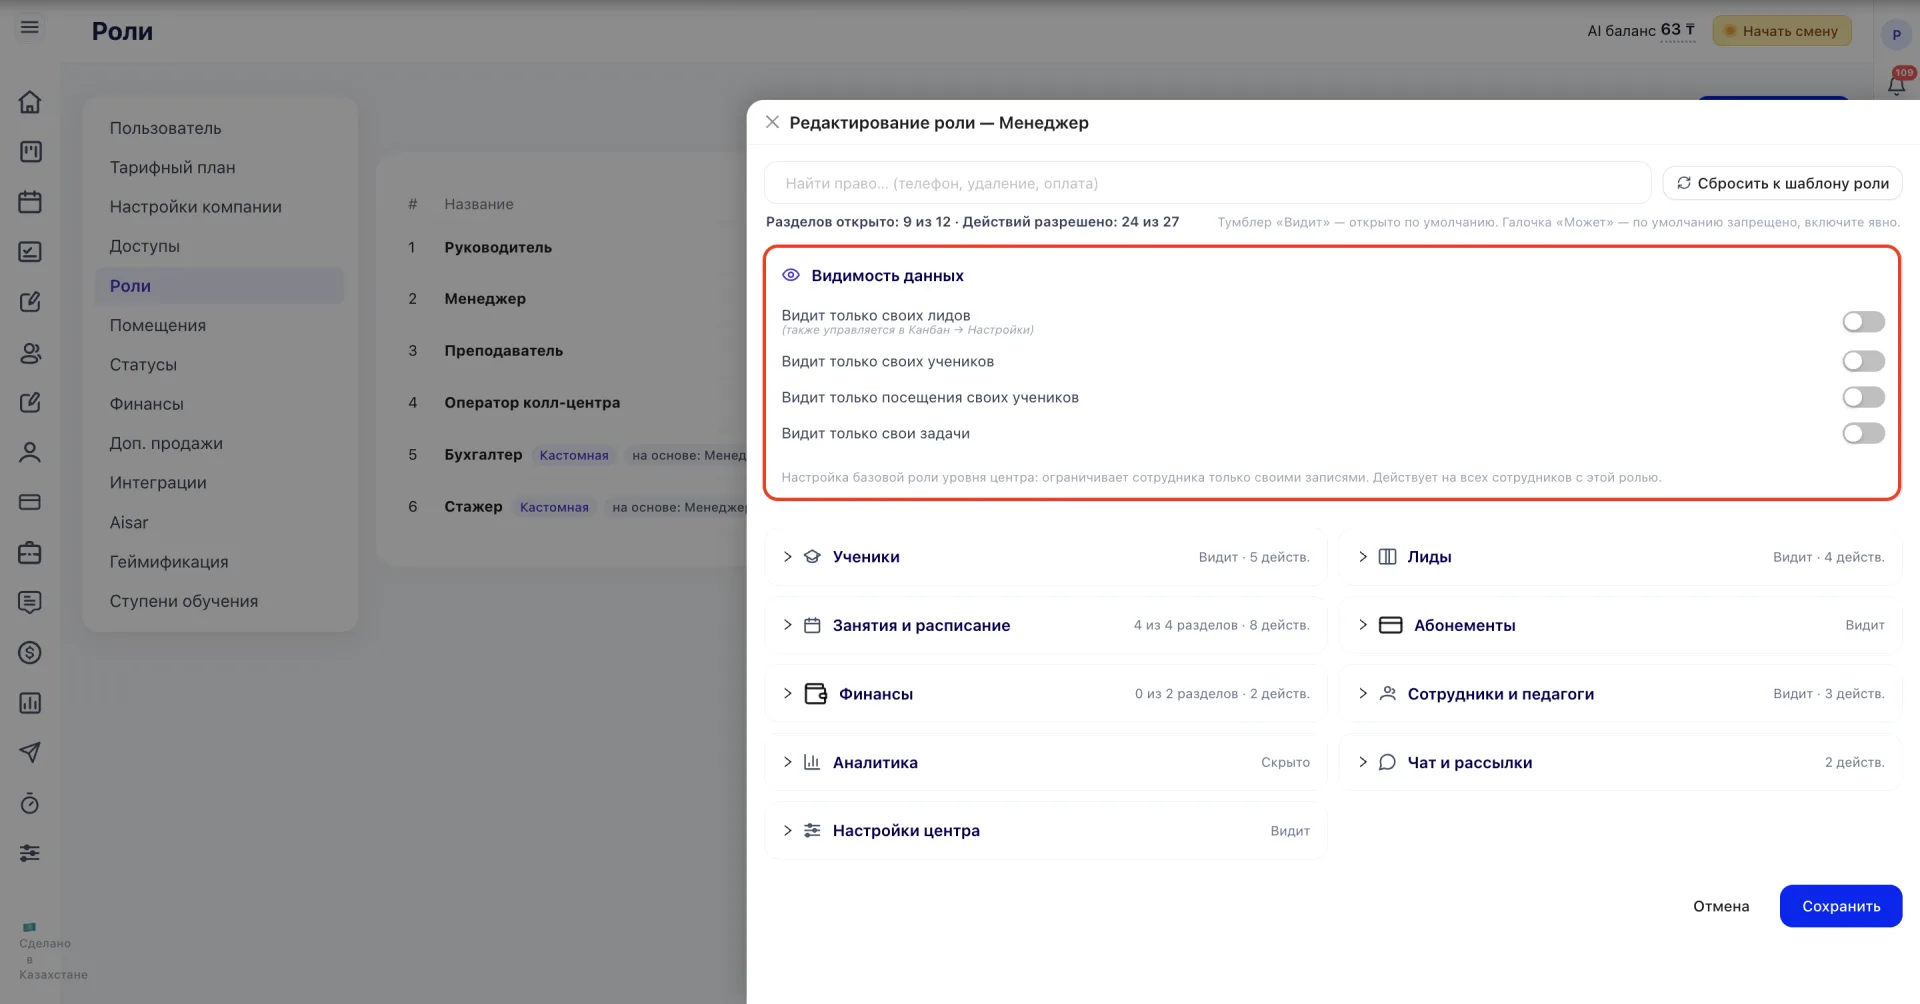
For example, the "Manager" role has four toggles in this block:
- Sees only their Leads — limits the employee to Leads where they are assigned as responsible. This same setting is controlled in the Kanban → Settings, so a change in one place is reflected in the other.
- Sees only their Students — limits access to Students assigned to the employee. The restriction also applies to conversations in Aisar: a manager will see only dialogues of their Students. Unassigned dialogues, i.e., without an assigned responsible, are visible to everyone.
- Sees only Visits of their Students — limits access to Visits to only their assigned Students.
- Sees only their Tasks — limits access to Tasks that are assigned to or created for the employee.
The "Teacher" role block includes a different set of toggles: "Sees only their Students", "Sees only their Tasks" and "Show trial Classes"; the last one determines whether trial Classes are shown in the Teacher's interface.
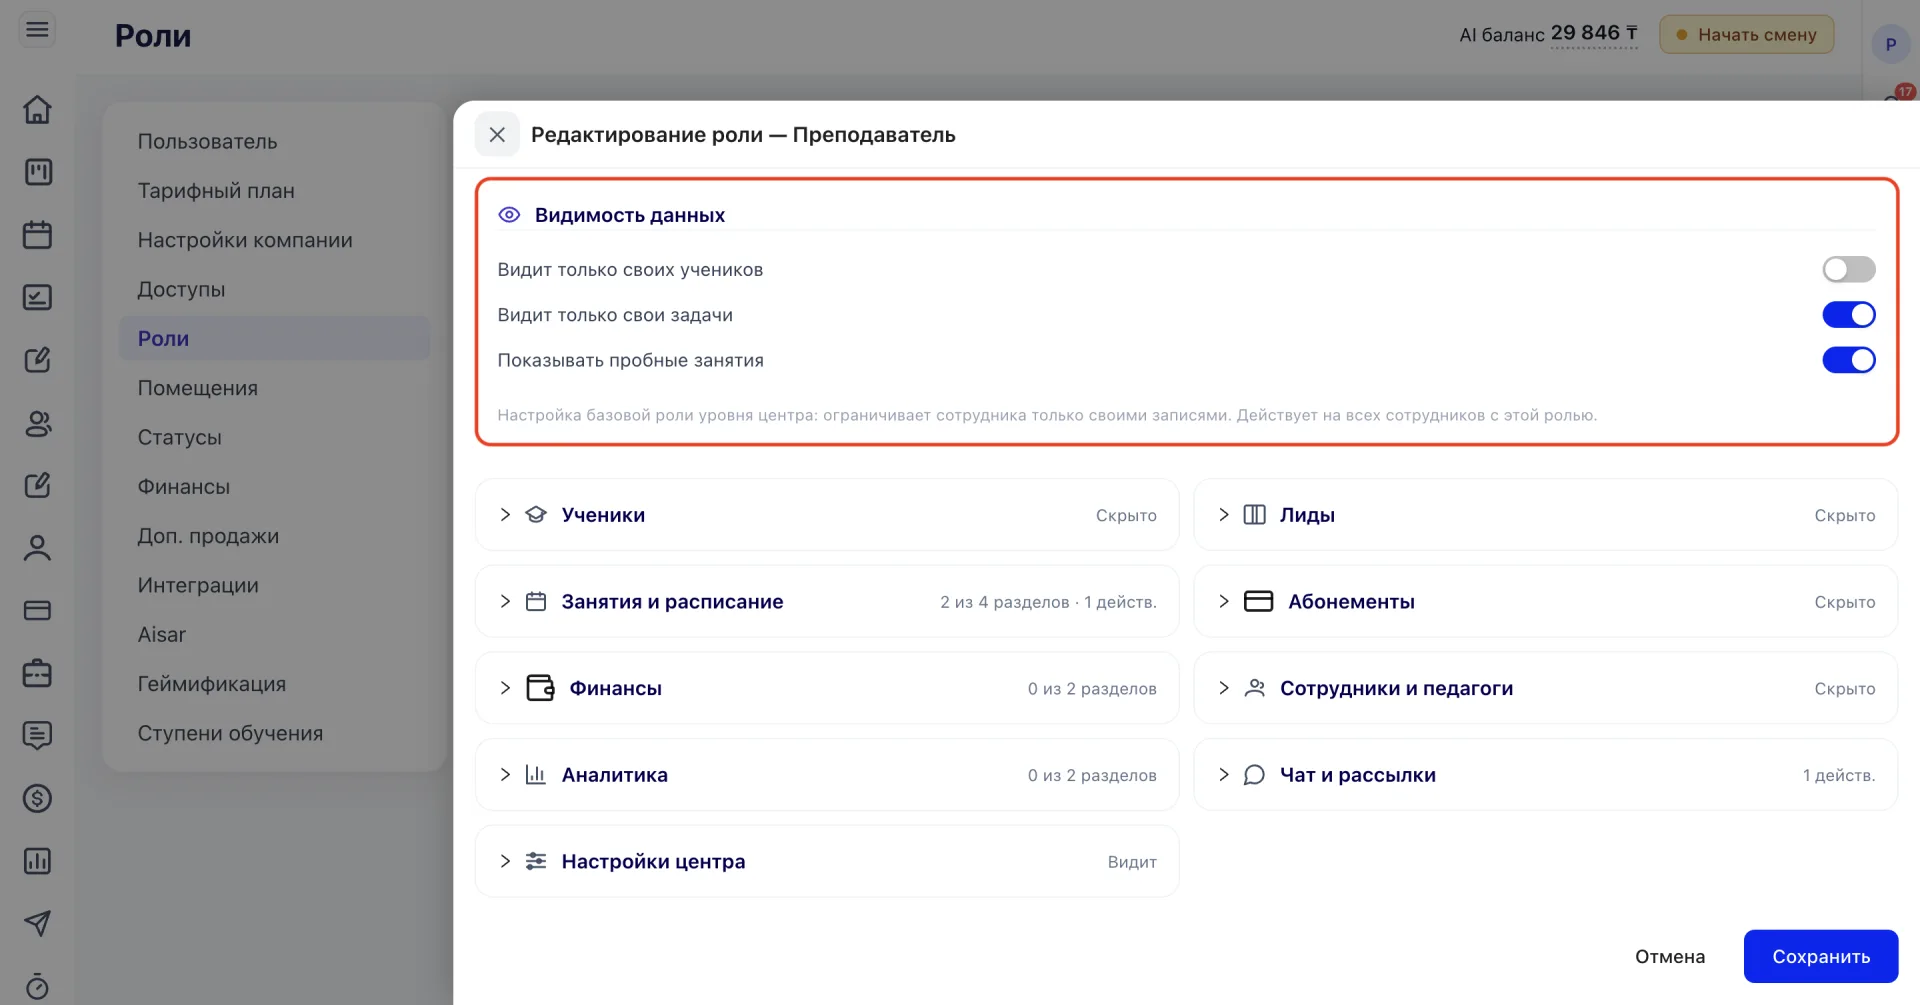
This setting applies to all employees with the corresponding role at once; if someone needs to see colleagues' data, assign them a separate role without this restriction.
6. Rights structure by sections
Role rights are divided into thematic blocks: Students, Leads, Classes and Schedule, Memberships, Finance, Employees and Teachers, Analytics, Chat and mailings, Center Settings.
Within each block, rights may be divided into several categories, but their set depends on the specific section:
- Access to sections — the "Sees" toggle determines whether the section will appear in the employee's menu at all. If the section is hidden, the employee will not see it in navigation.
- What can be done — a list of specific actions within the section, for example adding Students, deleting Leads or editing Classes. Next to the heading there are links "Select all" and "Deselect all" for quickly enabling or disabling all actions at once.
- Card fields — controls the visibility of individual fields in cards, for example the Student's phone or parent data. Not present in all sections: for example, the Leads block does not have this category.
- On the main page — determines which informational blocks the employee will see on the main page, for example students' birthdays, debts or expired Memberships.
- Settings tabs — controls access to individual tabs within sections, for example the "Accesses" and "Roles" tabs in the Employees section.
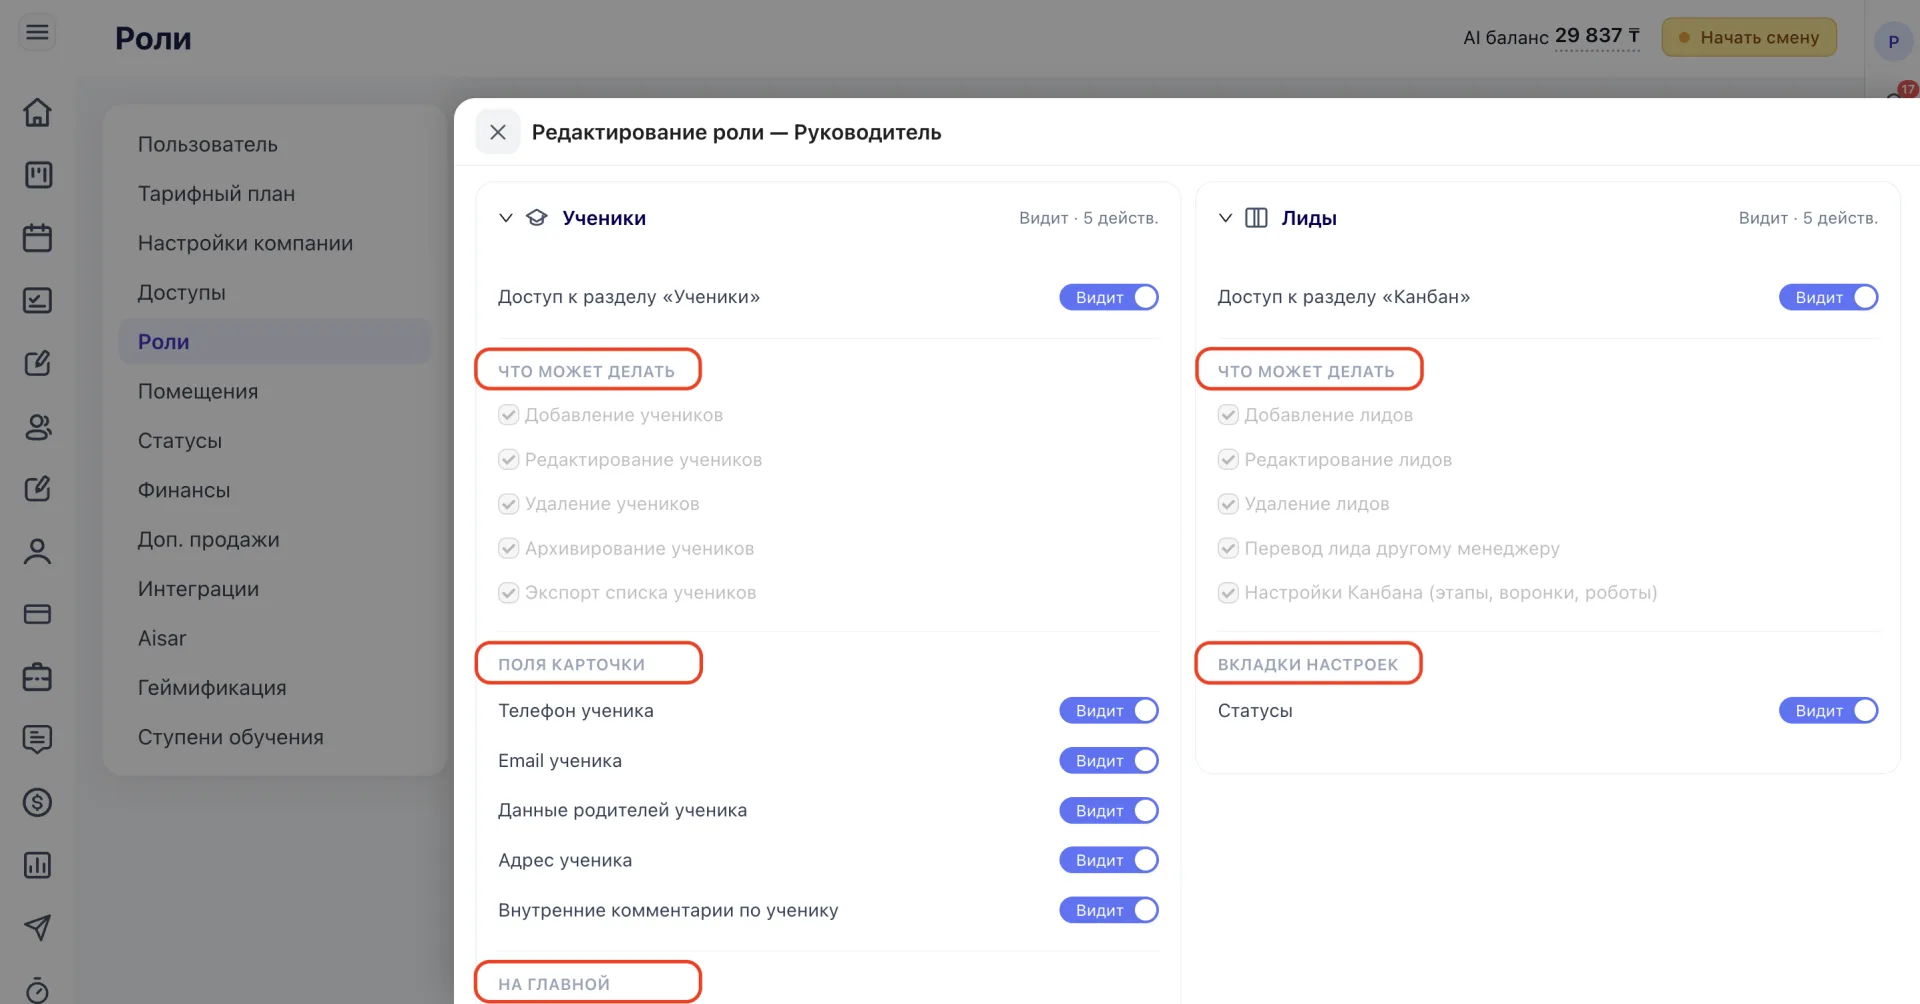
It is worth noting separately the rights that are found in all roles and are directly related to other sections of the system:
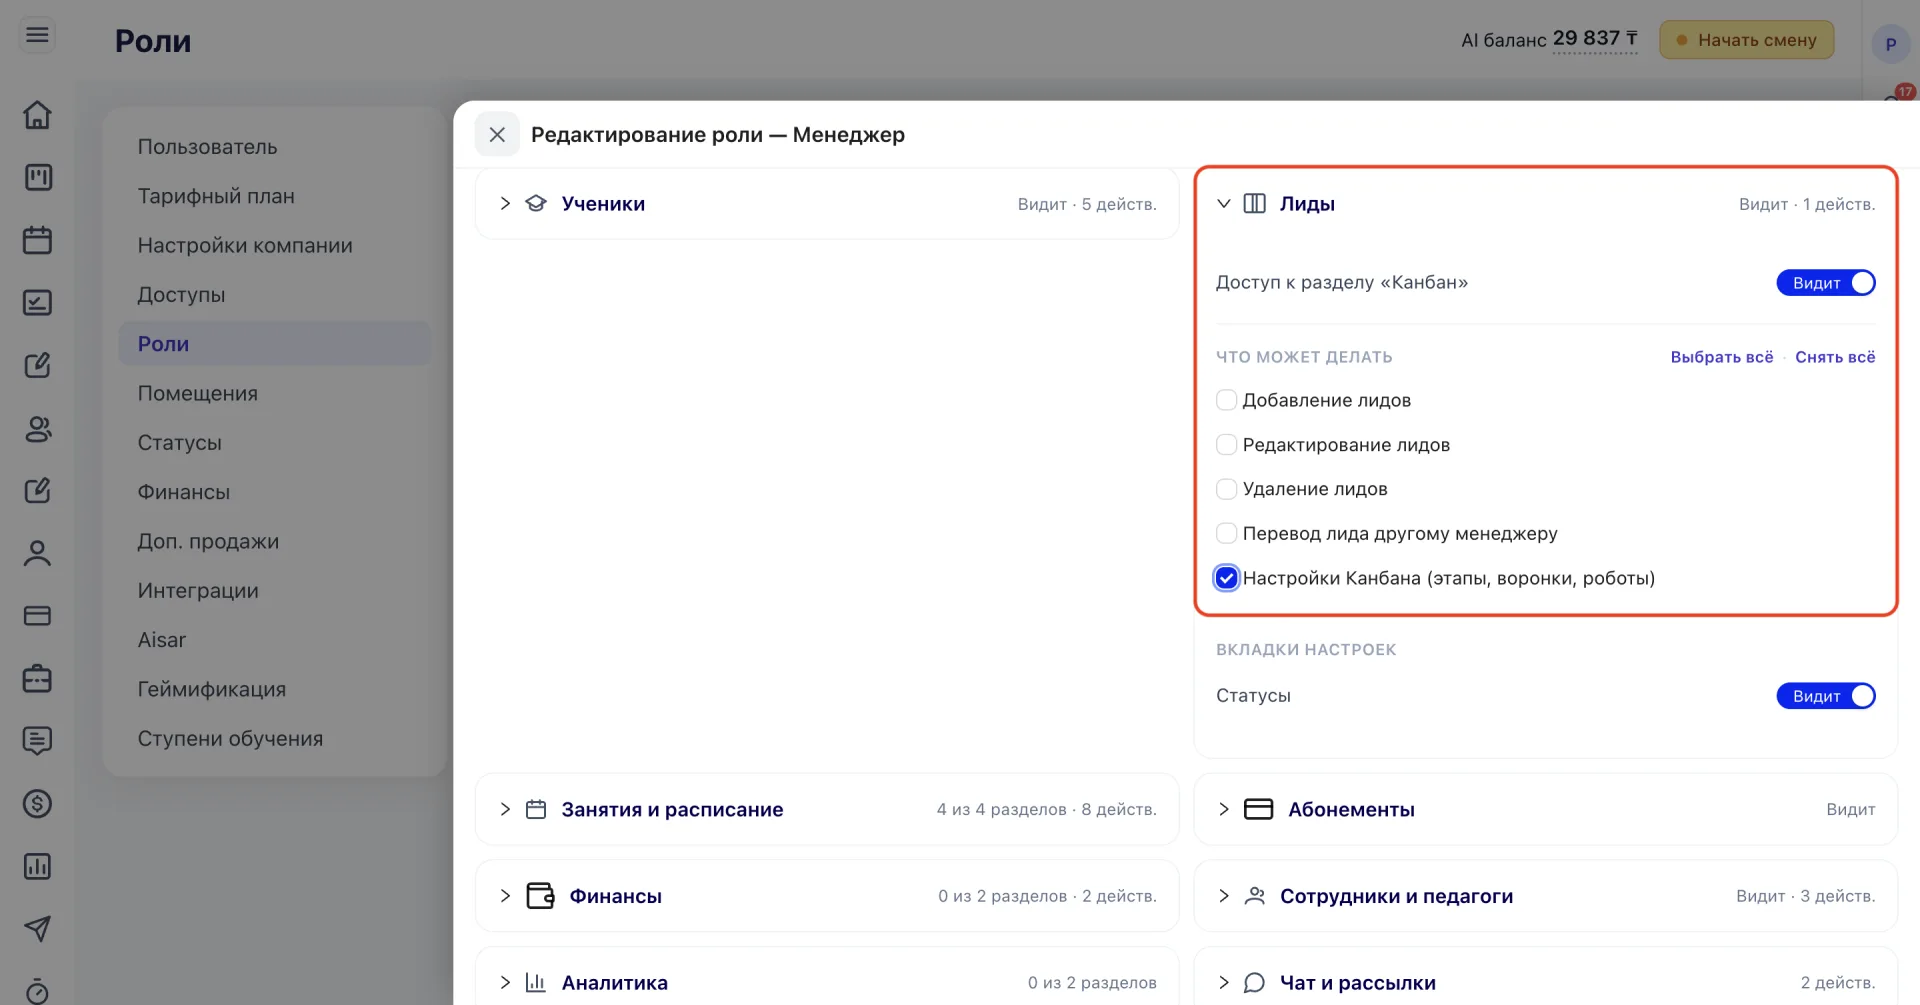
In the "Leads" block under "What can be done" there is a right "Kanban Settings (stages, funnels, robots)" — it is available for all roles with access to the Leads section and determines whether an employee can change kanban settings: funnel stages, the funnel itself and robot settings.
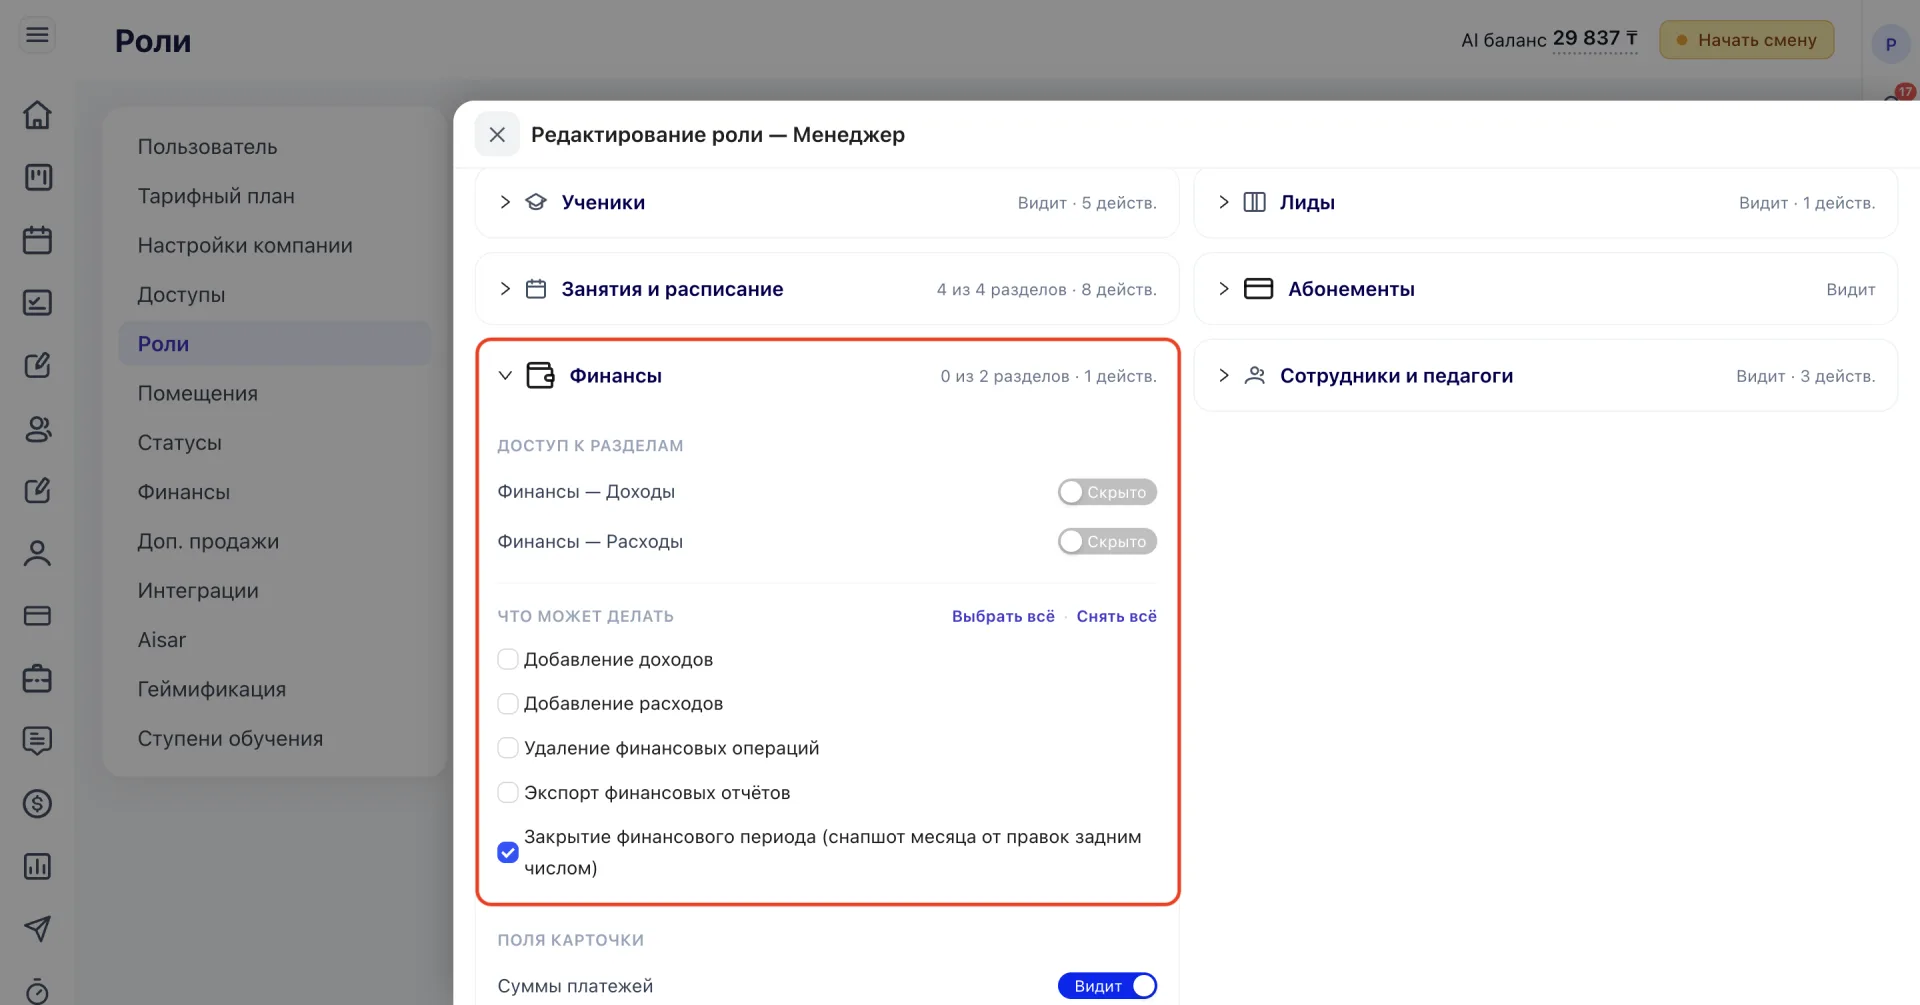
In the "Finance" block under "What can be done" there is a right "Closing the financial period (month snapshot from backdated edits)". It determines whether an employee can close and reopen financial periods in the Finance section. This right is available for all roles and should be enabled for those who need to manage period closing.
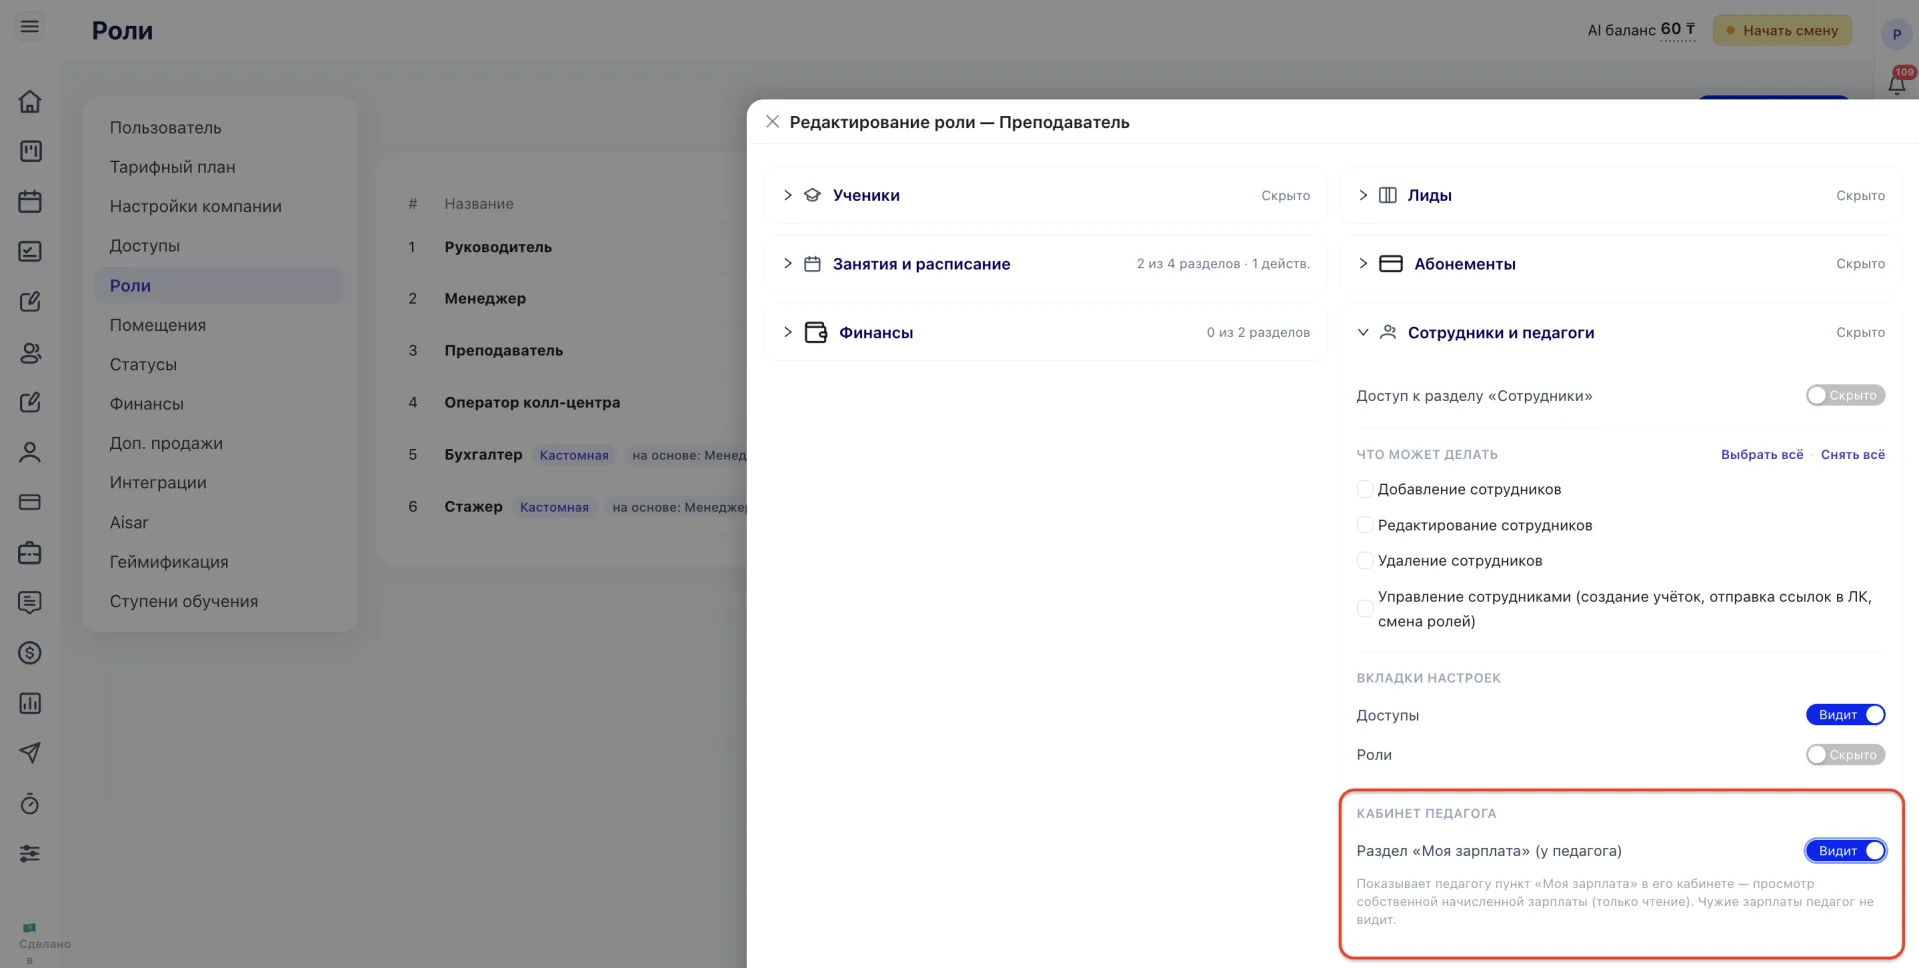
In the "Employees and Teachers" block the "Teacher" role has a separate setting "Section 'My salary'". If enabled, the Teacher will see a section with their own salary in their account (view only), but will not be able to see other employees' salaries.
In all sections the settings work the same. The "Sees" toggle is responsible only for displaying the section in the menu. The checkboxes in the "What can be done" block determine which actions the employee is allowed to perform inside that section.
If only the "Sees" toggle is enabled, the employee will be able to open the section but will not be able to perform actions until they are allowed separately.
Important to note:
- If an employee does not see a required section or a certain action is unavailable, first check the rights of their role. Any changes are applied immediately to all employees assigned to that role.
- The rights of the "Head" role cannot be changed because they are set by the system. If a different set of rights is needed, create a new role based on a suitable template and configure it for your tasks.
- To access specific actions, it is not enough to enable the section. Make sure the necessary permissions are checked in the "What can be done" block.
- If an employee does not see Leads, Students, Tasks or Visits of colleagues, pay attention to the settings in the "Data visibility" block. Most often the reason is the configured restrictions.
- The restriction by Students also applies in Aisar. In this case the employee will have access only to conversations of their Students, while unassigned dialogues remain visible to everyone.
- The number of toggles when creating a role depends on the chosen template. The Manager role has three toggles, the Teacher role has two. For the Call center operator and Head roles they are not displayed.
- The "Closing the financial period" right is disabled by default for all roles. Grant it only to employees who truly need to close financial periods.
- The "Kanban Settings (stages, funnels, robots)" right allows changing stages, funnels and robot settings. It is recommended to grant it only to employees responsible for configuring the kanban.